Revit & BIM Cloud Rendering: 3ds Max + V-Ray Workflow (2026)
Overview
Introduction
If you build in Revit, you already know the gap: the model holds every wall, slab, and curtain panel of the project, but the moment a client asks for a photoreal still or a smooth flythrough, your workstation starts to crawl. A single interior frame with global illumination can tie up a machine for hours, and a 30-second walkthrough at 25 frames per second is 750 frames of that same wait.
Let us be precise about what a render farm can and cannot do here, because it is a common point of confusion. A cloud render farm does not open your .rvt file and render it. What it renders is the 3ds Max scene you export from Revit — geometry brought across, then dressed with materials and lighting in a production render engine like V-Ray, Corona, or Arnold. That distinction matters for every decision in this guide, so we will keep it front and center.
We have run distributed rendering for archviz and BIM teams for years, and the export-then-render pipeline is one of the most reliable workflows we see. This guide covers how the models reach a farm, which engine fits which job, how to prepare a Revit-derived scene so it renders cleanly across many machines, and how to handle the large scenes and flythrough animations BIM projects produce.
How Revit and BIM Models Reach a Render Farm
The render farm renders 3ds Max scenes. So the first job is getting your Revit (or other BIM) model into 3ds Max in a usable state. There are three established routes.

Revit/BIM cloud render pipeline: source model, prepare materials and lighting in 3ds Max, upload to the cloud, render across CPU/GPU nodes, then download
File Link Manager (the primary route). 3ds Max ships with Autodesk's own File Link Manager, which links a live .rvt file into the scene. It is a link rather than a flat import: if the architect updates the Revit model, you can reload and re-sync without rebuilding. Most archviz artists use the link for the geometry stage, then add materials and lighting on top in 3ds Max while keeping the link read-only.
FBX export. When you are handed a file rather than collaborating live, FBX is the common exchange format. It produces a static snapshot of the geometry — no live link back to Revit — and is widely used for one-way delivery.
DWG. Mostly used to bring 2D floor plans and site drawings in as reference, not for transferring the 3D model in a modern archviz pipeline.
Whichever route you take, it is essential to understand what survives the trip and what does not. This is the honest core of the whole workflow:
| What transfers from Revit to 3ds Max | What does NOT transfer (must be rebuilt in 3ds Max) |
|---|---|
| Geometry — walls, slabs, ceilings, glazing, structure (as editable mesh) | BIM intelligence — schedules, parameters, quantities, element data |
| Revit category organization (mapped to 3ds Max layers) | Revit materials (the Autodesk material system does not map to V-Ray/Corona/Arnold) |
| Placeholder material slots named by Revit category ("Walls", "Glass") | Revit lighting — sun/sky and artificial lights are rebuilt natively |
| Basic cameras (usually rebuilt by the artist anyway) | High-quality entourage — trees, people, furniture detail are replaced with archviz assets |
In plain terms: the model arrives as "dumb" geometry. The BIM data is gone, the materials are placeholders, and the lighting is unbuilt. Re-authoring materials and lighting in the render engine is typically the largest part of the setup — and it is real creative work, not a button. The farm enters the picture only after that 3ds Max scene is finished, ready, and exported for rendering.
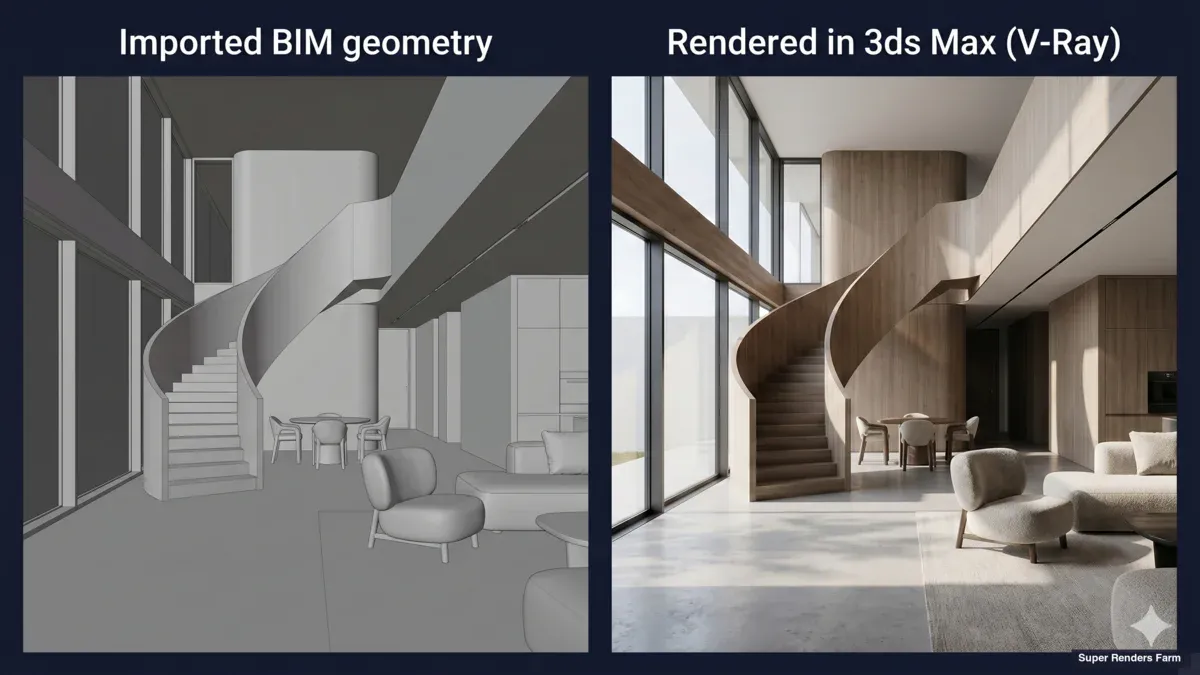
Imported BIM geometry (gray, untextured) next to the same interior after materials and lighting are rebuilt and rendered in 3ds Max with V-Ray
Why Render Revit/BIM Archviz in the Cloud
Architectural rendering is one of the heaviest jobs a 3D workstation can be asked to do. Interior scenes lean hard on global illumination — bounced light through windows, soft shadows, glass and metal reflections — and the realistic result that clients expect comes from a lot of sampling. On a single machine, a high-resolution still can run for hours, and an animation multiplies that by hundreds or thousands of frames.
Distributed rendering changes the arithmetic. Because frames (and even tiles within a frame) are independent, a render farm can split the work across many machines at once. Two hundred frames that would render one-after-another on a workstation can render in parallel, so wall-clock time drops roughly in proportion to the compute you put on the job. For a studio facing a Friday deadline with a Monday-morning client review, that is often the difference between making it and missing it.

One workstation versus a cloud render farm for an animation: a single machine renders frames one after another and stays tied up, while a farm renders many frames in parallel across nodes and leaves your machine free
There is a second reason that matters specifically for architects, who are designers first and render-pipeline engineers second. A fully managed farm means you do not remote-desktop into machines, install software yourself, or juggle render-engine licenses node by node. You prepare and upload the 3ds Max scene; the platform provisions the nodes, applies the render-engine licenses, and runs the job. On our farm, that managed model runs on a CPU fleet of 20,000+ CPU cores plus dedicated GPU machines with NVIDIA RTX 5090 cards (32 GB VRAM each), and the render-engine licenses — V-Ray, Corona, Arnold, Redshift, and Octane — are included in the per-GHz rate rather than billed separately.
This is also where managed rendering differs from infrastructure rental (IaaS): with a raw machine rental you still install the DCC, manage the license, and babysit the node, where the managed model keeps that complexity off the architect's plate. Our guide to fully managed versus DIY render farms covers the comparison.
Choosing a Render Engine: V-Ray, Corona, and Arnold for Architecture
Once the scene lives in 3ds Max, the render engine determines look, setup effort, and how the job behaves on a farm. For architecture, the field is well established and CPU-first — which lines up with how most archviz studios actually work.
| Engine | Hardware | Where it fits in archviz |
|---|---|---|
| V-Ray (CPU) | CPU | The archviz workhorse in 3ds Max — mature, flexible, strong for both stills and animation |
| Corona | CPU | Very popular with studios and freelancers; physically based defaults need little setup |
| Arnold | CPU | Common where a studio also does VFX/film work; robust and predictable |
| V-Ray GPU / Redshift | GPU | Fast iteration and viable for finals, but bounded by VRAM on very heavy scenes |
V-Ray and Corona are the two engines we see most often on architectural jobs, with Arnold close behind in studios that overlap with film and VFX. All three are production-proven for stills and flythroughs, and all three scale cleanly across a farm because CPU bucket rendering subdivides the work naturally. You can read more about V-Ray for 3ds Max in Chaos's own documentation, and our comparison of the top render engines for 3ds Max goes deeper on the trade-offs.
GPU rendering — V-Ray GPU or Redshift — is a real and growing option, and it shines for fast look-development iterations. The honest caveat for architecture is VRAM: a large exterior with 8K–16K textures, displacement, and dense scatter can exceed even a 32 GB card, where a CPU node with 96–256 GB of system RAM keeps going. Many studios iterate on GPU and render heavy finals on CPU. There is no single right answer; pick the engine your team already knows, and let scene weight guide the CPU-versus-GPU call. Our CPU render farm guide explains why CPU still carries the majority of archviz work.
Preparing a Revit-Exported Scene for Distributed Rendering
A scene that renders fine on your workstation can still fail on a farm if it was not prepared for many machines. Most farm "render failures" on Revit-derived scenes trace back to a handful of preparation issues. Here are the ones that genuinely bite, and how to clear them before you submit:
| Issue | Why it happens | Fix before submitting |
|---|---|---|
| Polygon explosion | Revit tessellates aggressively — a railing alone can be millions of faces | Optimize heavy meshes (ProOptimize/Simplygon) or swap Revit-origin detail for purpose-built assets |
| Unconverted materials | Placeholder or default materials render as flat gray or error out | Re-author every surface as native V-Ray/Corona/Arnold material — no leftovers |
| Wrong units/scale | Revit works in mm or feet; 3ds Max may default to inches | Match the 3ds Max system unit to the Revit source before lighting — physical lights are scale-sensitive |
| Broken texture paths | Worker nodes cannot read a local path like C:\Users\you\... | Run Asset Tracking / Resource Collector to pack all maps with the scene |
| Missing plugins | Scatter tools (Forest Pack, RailClone) or proxies must exist on every node | Confirm the farm supports the plugins your scene uses before dispatch |
| Out-of-memory | Heavy scenes with HDRI, displacement, and scatter can exceed 64 GB | Size the job for high-RAM nodes; use proxies for repeated heavy assets |
| Progressive mode | Progressive rendering is single-machine only — it cannot distribute | Switch to bucket rendering so tiles can be split across nodes |
The single most common cause of a "black textures" or "gray render" surprise is the texture-path problem. When a scene references maps on your local drive, the render nodes simply cannot see them, and the failure is silent until you look at the output. Packing assets with the scene — and uploading that complete package — removes the issue entirely. The Forest Pack and RailClone render farm guide covers the scatter-and-proxy side in more depth, which matters a lot for site context and landscaping in exterior archviz.
Rendering BIM Flythrough Animations Without Flicker
Stills are forgiving; animations are not. The classic problem with an architectural flythrough is flickering global illumination — frames that subtly pulse in brightness because the GI solution is recomputed slightly differently on each one. Naive per-frame GI on a farm produces exactly this, and it is the surest way to make an otherwise beautiful walkthrough look amateurish.
The proven approach is to precompute the GI so it stays consistent across the sequence. In V-Ray that means computing a light cache and irradiance map as a first pass, then rendering the beauty frames against that stable solution; Corona has an equivalent workflow. On a distributed farm this becomes a two-stage job: a precompute phase, then the parallel beauty render. Set it up that way and the flicker disappears; skip it and no amount of extra samples will hide it.
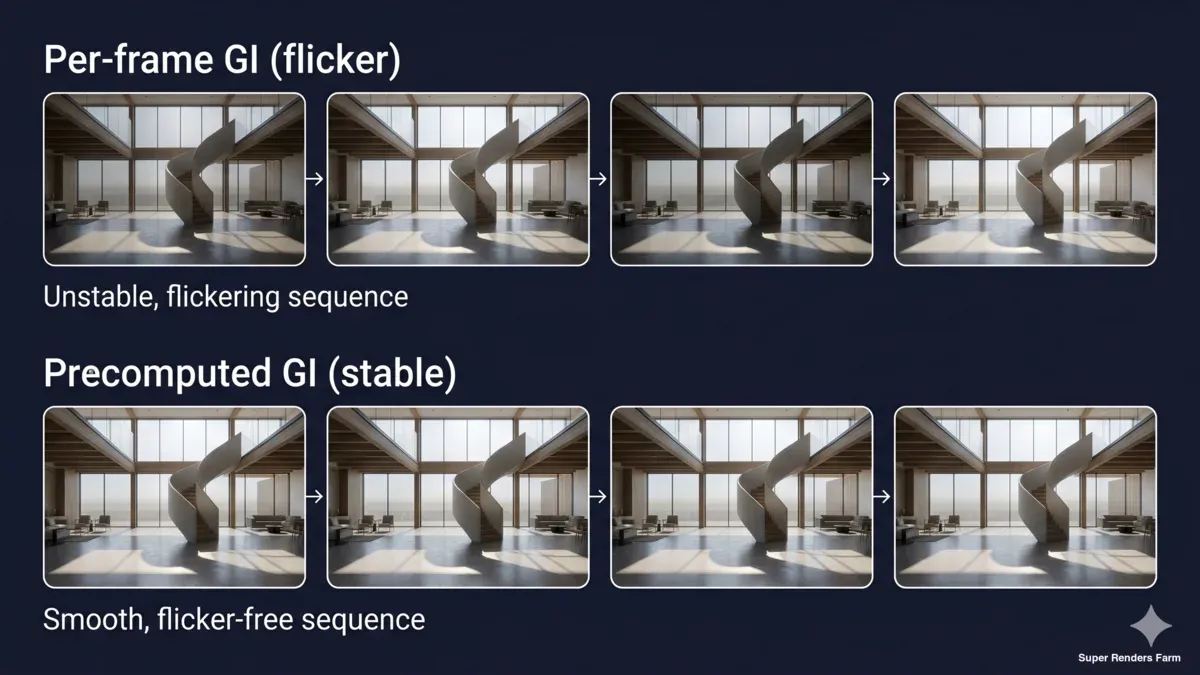
Flythrough global illumination before and after precompute: the top row of frames flickers with uneven brightness, the bottom row is stable after a light cache and irradiance map
Once frames are rendering, the farm's parallelism does the heavy lifting — independent frames spread across machines and complete far faster than they would in sequence. Finished output stays available for download for 45 days after a job completes, so build your download or auto-download step into the schedule rather than leaving frames sitting on the server.
Working With Large BIM Scenes
BIM projects are big by nature: full buildings, detailed interiors, high-resolution textures, and site context all add up. A render-ready 3ds Max scene exported from a substantial Revit model, with HDRI lighting and scatter, can run to tens of gigabytes and demand well over 64 GB of RAM per frame. Two things keep this manageable.
First, transfer. There is no hard cap on upload size, though for very large packages we recommend SFTP or the desktop Client App over the browser above roughly 300 GB, because they are resumable and parallel. Pack your scene and assets into a supported archive — tar, tar.gz, or 7z. Note that .zip is not supported, so repack a zip as .tar.gz first or upload through SFTP. If your assets already live in Google Drive or Dropbox, you can pull them in from there (import only — finished renders come back via download, SFTP, or the Client App, not pushed back to cloud drives).
Second, memory and geometry. The CPU fleet runs 96–256 GB of RAM per machine, which covers the large majority of archviz scenes, but a scene that genuinely needs 128 GB or more should be sized for high-memory nodes so it does not run out of memory mid-render. Proxies are your friend here: convert repeated heavy objects (trees, furniture, vehicles) to V-Ray Proxy or equivalent so the scene references them rather than holding every polygon in memory at once. The same discipline that keeps a scene light on your workstation keeps it stable across a farm.
Real-Time Tools vs Farm Rendering: Different Jobs
It is worth drawing a clear line, because architects often ask why they would export to 3ds Max at all when Enscape or Twinmotion render "instantly" inside Revit. The answer is that those are different tools for a different stage.
Real-time engines — Enscape, Twinmotion, D5, Lumion — run on a local GPU and produce results in seconds to minutes. They are excellent for design-stage communication: live walkthroughs in a client meeting, quick option studies, fast feedback. Revit also has its own built-in renderer (the Autodesk Raytracer), which renders directly from the model without any export. All of these are genuinely useful, and none of them involve a render farm.
What they trade away is the top end of quality and control. Real-time tools cap the number of light bounces, simplify global illumination, and do not give you the unbiased convergence, render-pass separation (for compositing), and animation-grade stability that a production engine delivers. The Revit → 3ds Max → V-Ray/Corona/Arnold → farm path takes longer to set up and to render, but it is what you reach for when the deliverable is a final, high-resolution, photoreal image or a polished flythrough. The two approaches are complementary: real-time for the conversation, farm rendering for the final frame. Our architectural visualization and AI workflow guide maps out where each fits across a project.
The model is always yours; a cloud farm simply supplies the machines to finish it at production quality. Our 3ds Max cloud rendering and V-Ray cloud render farm pages cover the render side of this pipeline.
FAQ
Q: Can a cloud render farm render a Revit (.rvt) file directly? A: No. A render farm renders the 3ds Max scene you export from your Revit model, not the .rvt file itself. You bring the Revit geometry into 3ds Max (via the File Link Manager or FBX), author materials and lighting there, then submit that 3ds Max scene to render with V-Ray, Corona, or Arnold.
Q: How do I get my Revit model into 3ds Max for rendering? A: The most common route is 3ds Max's File Link Manager, which links the live .rvt file so geometry updates can be re-synced. FBX export is the alternative for one-way delivery. Geometry and basic layer organization transfer; materials and lighting are rebuilt in 3ds Max.
Q: Which render engine should I use for architectural visualization? A: V-Ray and Corona are the most widely used CPU engines for archviz in 3ds Max, with Arnold common in studios that also do VFX. GPU options like V-Ray GPU and Redshift are good for fast iteration but are limited by VRAM on very heavy scenes, so many teams render heavy finals on CPU.
Q: Will my Revit materials and lighting transfer to the final render? A: No. Revit's material and lighting systems do not map to V-Ray, Corona, or Arnold. You will get placeholder material slots named by Revit category, and you rebuild the materials and lighting natively in 3ds Max. This re-authoring is usually the largest part of scene setup.
Q: Do I need to install or own a V-Ray or Corona license to render on the farm? A: On a fully managed farm you do not install software or manage licenses yourself. On our farm, render-engine licenses for V-Ray, Corona, Arnold, Redshift, and Octane are included in the per-GHz render rate, so you prepare the 3ds Max scene and submit it.
Q: How do I render a BIM flythrough animation without flickering? A: Precompute the global illumination so it stays consistent across frames — in V-Ray, compute a light cache and irradiance map first, then render the beauty frames against that stable solution. On a farm this becomes a two-stage job: a precompute pass, then the parallel beauty render. Skipping the precompute is the usual cause of flickering GI.
Q: How large a BIM scene can I upload and render? A: There is no hard upload cap. For packages above roughly 300 GB, SFTP or the desktop Client App is more reliable than the browser because they resume and run in parallel. Pack scenes as tar, tar.gz, or 7z (zip is not supported), and size very heavy scenes for high-memory nodes — the CPU fleet runs 96–256 GB of RAM per machine.
Q: Why export to 3ds Max instead of just using Enscape or Twinmotion? A: Real-time tools like Enscape, Twinmotion, and D5 are great for design-stage walkthroughs and fast client feedback on a local GPU. They cap light bounces and simplify GI, so for final photoreal stills, compositing passes, or animation-grade quality you move to a production engine — V-Ray, Corona, or Arnold in 3ds Max — and render that on the farm.
About Alice Harper
Blender and V-Ray specialist. Passionate about optimizing render workflows, sharing tips, and educating the 3D community to achieve photorealistic results faster.