Render Blender trên Cloud: Cách Render Dự Án Trên Render Farm
Tổng quan
Giới thiệu
Cloud rendering cho Blender nghĩa là gửi scene .blend của bạn tới một mạng lưới máy tính từ xa — một render farm (hệ thống máy tính kết xuất) — render các frame song song và trả về kết quả hoàn chỉnh, thay vì để workstation của bạn xử lý từng frame một. Render một scene Blender phức tạp trên máy local nghĩa là workstation của bạn bị khóa trong nhiều giờ — đôi khi nhiều ngày nếu bạn đang làm animation hoặc still ảnh độ phân giải cao với volumetrics nặng. Cloud rendering giải quyết vấn đề này bằng cách phân tán render của bạn qua hàng chục hoặc hàng trăm máy, trả về các frame hoàn chỉnh trong khi bạn tiếp tục làm shot tiếp theo.
Chúng tôi render dự án Blender hàng ngày trên farm của mình. Các dự án trải dài từ still kiến trúc đơn lẻ tới animation nhân vật 10,000 frame, và các câu hỏi mà artist thường hỏi có xu hướng lặp lại: chuẩn bị scene như thế nào, engine nào chạy được trên farm, texture và add-on của tôi sẽ ra sao, và chi phí thực tế là bao nhiêu? Bài viết này trả lời tất cả những câu hỏi đó.
Dù bạn đã từng render trên farm hay đây là lần đầu chuyển khỏi máy local, quy trình vẫn giống nhau: chuẩn bị scene, upload lên, cấu hình render settings từ xa, và tải kết quả về.
Khi đã quen với quy trình thủ công này, bạn có thể script hóa nó; hướng dẫn tự động hóa upload render farm bằng Python của chúng tôi chỉ cách tự động hóa các bước upload và tải về. Chi tiết từng bước mới là điều quan trọng, và đó là những gì chúng tôi trình bày ở đây.
Vì Sao Cloud Rendering Hợp Lý Với Blender
Blender miễn phí, nhưng render thì không — nó tốn thời gian. Một frame Cycles trên GPU desktop hiện đại có thể mất 5 đến 15 phút cho một scene nội thất. Nhân với 300 frame, bạn sẽ mất 25 đến 75 giờ render liên tục trên một máy. Đó là ba đến chín ngày workstation của bạn không thể dùng để modeling, texturing, hay lighting.
Một render farm cloud thay đổi phương trình này:
| Yếu tố | Render local | Cloud rendering |
|---|---|---|
| Chi phí phần cứng | $2,000-$5,000 trả trước (GPU workstation) | Trả theo frame hoặc theo giờ |
| Thời gian render (300 frame) | 25-75 giờ | 1-4 giờ (phân tán) |
| Tình trạng workstation | Bị khóa khi render | Rảnh để tiếp tục làm việc |
| Khả năng mở rộng | Giới hạn ở phần cứng của bạn | Mở rộng tới hàng trăm node |
| Điện năng và làm mát | Tiền điện của bạn | Đã bao gồm trong chi phí render |
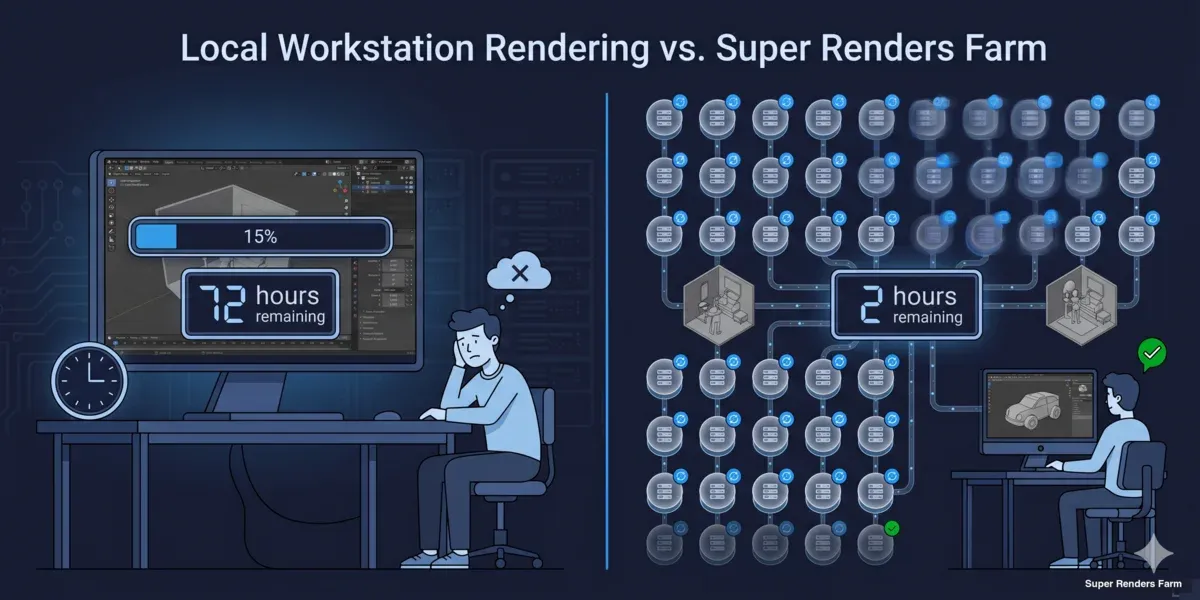
Cloud rendering vs local rendering comparison for Blender — time, cost, and scalability
Cloud rendering đặc biệt có giá trị cho người dùng Blender vì bản thân phần mềm miễn phí — chi phí sản xuất chính của bạn hoặc là phần cứng, hoặc là thời gian render. Chuyển bước render sang cloud giúp giữ ngân sách phần cứng thấp trong khi loại bỏ nút thắt về thời gian.
Điều này áp dụng cho freelancer chạy deadline khách hàng, studio chạy nhiều dự án cùng lúc, và sinh viên có kỹ năng nhưng không có phần cứng. Để so sánh rộng hơn về đánh đổi giữa render cloud và local, phân tích tổng chi phí xây dựng vs cloud của chúng tôi phân tích chi tiết các con số.
Chuẩn Bị Scene Blender Cho Cloud Rendering
Chuẩn bị scene là bước quan trọng nhất. Một scene render hoàn hảo trên máy của bạn có thể lỗi trên farm nếu asset bên ngoài bị thiếu, path sai, hoặc dependency chưa được pack.
Pack tất cả dữ liệu bên ngoài. Vào File > External Data > Automatically Pack Resources. Thao tác này nhúng texture, HDRI, font, và các file bên ngoài khác trực tiếp vào file .blend của bạn. Nếu không làm điều này, các máy trên farm sẽ không tìm thấy texture của bạn và render sẽ trả về sai — bề mặt xám, môi trường bị thiếu, hoặc lỗi hoàn toàn.
Dùng relative path. Trong Edit > Preferences > File Paths, xác nhận path mặc định của bạn là relative (//textures/ thay vì C:\Users\YourName\textures\). Absolute path trỏ tới ổ đĩa local của bạn sẽ bị lỗi trên bất kỳ máy nào không phải máy của bạn.
Bake simulation và cache. Physics simulation (cloth, fluid, rigid body, smoke), particle system, và Geometry Nodes phụ thuộc vào dữ liệu simulation phải được bake trước khi submit. Farm render các frame độc lập — nó không chạy simulation của bạn từ frame 1 để tạo ra frame 200. Nếu cache chưa được bake, frame sẽ lỗi hoặc render trạng thái nghỉ của physics object.
Đơn giản hóa hoặc xóa các phần tử chỉ hiển thị trong viewport. Viewport overlay, grease pencil annotation (trừ khi chúng là một phần của render), và object trên render layer đã disable nên được dọn dẹp. Chúng không gây lỗi, nhưng có thể làm tăng dung lượng file và gây nhầm lẫn khi debug.
Kiểm tra output settings. Trong panel Output Properties:
- Đặt resolution (khớp với spec giao hàng — đừng để mặc định 1920x1080 nếu dự án của bạn cần 4K)
- Đặt frame range (frame bắt đầu và kết thúc)
- Đặt output format: PNG cho still, OpenEXR cho quy trình compositing, PNG sequence cho animation
- Đặt output path (farm thường sẽ ghi đè cái này, nhưng vẫn đặt đúng như một biện pháp an toàn)
Checklist nhanh trước khi upload:
- Tất cả texture đã pack (File > External Data > Automatically Pack Resources)
- Relative path đã bật
- Simulation và cache đã bake
- Render engine đặt đúng (Cycles hoặc Eevee)
- Output format và resolution đã cấu hình
- Camera đã chọn (camera đúng được đặt làm active)
- Frame range đã xác định
- Không thiếu linked library nào (File > External Data > Report Missing Files)

Blender scene preparation steps for cloud rendering — pack textures, bake simulations, verify settings
Cycles Trên Render Farm Cloud
Cycles là engine chính được dùng cho cloud rendering trên Blender, đặc biệt cho các job animation phân tán lớn. Đây là path tracer dựa trên vật lý (physically-based), và output của nó mang tính deterministic — cùng scene và settings, bất kỳ máy nào cũng sẽ cho ra kết quả giống nhau. Điều này khiến nó lý tưởng cho render phân tán.
Render CPU vs. GPU trên farm. Cycles hỗ trợ cả render CPU và GPU. Trên farm, lựa chọn phụ thuộc vào scene của bạn:
| Loại scene | Khuyến nghị | Lý do |
|---|---|---|
| Geometry nặng (hàng triệu polygon) | CPU | Nhiều RAM hệ thống hơn (96-256 GB so với giới hạn VRAM của GPU) |
| Volumetrics và subsurface scattering | CPU | CPU xử lý tốt các trường hợp này; tăng tốc GPU thì khác nhau |
| Material tiêu chuẩn, geometry vừa phải | GPU | Thời gian render mỗi frame nhanh hơn đáng kể |
| Scene dưới 20-24 GB bộ nhớ sử dụng | GPU | Vừa vặn thoải mái trong VRAM của GPU (RTX 5090: 32 GB) |
| Kết hợp (geometry nặng + material GPU) | CPU kèm denoising GPU | Kết hợp dư địa bộ nhớ với denoising nhanh |
Trên farm của chúng tôi, khoảng 70% job Blender chạy trên CPU (Dual Intel Xeon E5-2699 V4, 96-256 GB RAM) và 30% trên GPU (NVIDIA RTX 5090, 32 GB VRAM). Render CPU đáng tin cậy cho bất kỳ scene nào bất kể bộ nhớ — bạn sẽ không bao giờ chạm trần VRAM. Render GPU nhanh hơn mỗi frame nhưng đòi hỏi scene của bạn phải vừa với bộ nhớ GPU.
Các cài đặt Cycles quan trọng cho cloud rendering:
- Samples: Đặt số sample mục tiêu. Khi bật adaptive sampling (Render Properties > Sampling > Noise Threshold đặt 0.01), Cycles sẽ ngừng sample từng pixel khi chúng đạt chất lượng chấp nhận được. Điều này tiết kiệm thời gian ở các vùng đơn giản của frame mà không giảm chất lượng ở các vùng phức tạp.
- Denoising: Bật OpenImageDenoise (OIDN) làm denoiser. Nó chạy như một post-process và xử lý noise tốt ở sample count thấp hơn. Trên farm, điều này nghĩa là bạn có thể giảm sample count (ví dụ, từ 4096 xuống 1024-2048) và để denoiser dọn sạch noise còn lại — cắt giảm đáng kể thời gian render.
- Light paths: Với hầu hết scene sản xuất, cài đặt light path mặc định hoạt động tốt. Nếu scene của bạn có caustic phức tạp hoặc glass recursion sâu, bạn có thể cần tăng bounce Transmission và Glossy. Với nội thất kiến trúc, 8-12 bounce tổng là điểm khởi đầu phổ biến.
- Tile size: Trong Blender 3.0 trở lên, tile size được quản lý tự động. Bạn không còn cần đặt tile lớn thủ công cho GPU hay tile nhỏ cho CPU — engine tự xử lý việc này.
Để tìm hiểu sâu về mọi panel render Cycles, xem hướng dẫn tối ưu cài đặt render Blender của chúng tôi. Nếu bạn đang render các chuỗi animation cụ thể, hướng dẫn render animation Blender của chúng tôi trình bày chi tiết hơn về frame range, output format, và temporal denoising. Với các scene cần bao quát từ nhiều góc trong một lần submit, hướng dẫn render nhiều camera trong Blender của chúng tôi hướng dẫn cách cài đặt.
Eevee và Cloud Rendering
Eevee (Eevee Next trong Blender 4.x) hoạt động khác với Cycles. Đây là engine rasterization — nó render bằng kỹ thuật screen-space, shadow map, và light probe thay vì ray tracing, điều mà trước đây khiến việc hỗ trợ render phân tán khó khăn hơn.
Eevee được hỗ trợ trên farm của chúng tôi (GPU). Chúng tôi render job Eevee trên node GPU của mình (NVIDIA RTX 5090, 32 GB VRAM) cùng với Cycles — Eevee Next trong Blender 4.2+ render headless trên GPU mà không cần active display context, đây chính là điều khiến việc phân tán trên farm khả thi. Trong thực tế sử dụng trên farm của chúng tôi, đại đa số job Eevee GPU được submit hoàn thành thành công.
Khi nào chọn Eevee thay vì Cycles trên farm. Eevee đủ nhanh trên máy local đến mức với các job ngắn, render trên máy của bạn có thể vẫn nhanh hơn upload lên farm. Cloud rendering phát huy giá trị cho Eevee ở các animation dài hơn hoặc batch độ phân giải cao, nơi thời gian render local vẫn cộng dồn thành nhiều giờ. Cycles vẫn là khuyến nghị mặc định của chúng tôi cho các job animation phân tán rất lớn, vì output path-tracing deterministic của nó nhất quán nhất qua nhiều node — nhưng nếu dự án của bạn được xây dựng quanh look của Eevee, bạn không cần đổi engine chỉ để dùng cloud rendering.
Một pattern sản xuất phổ biến: iterate trong Eevee trong quá trình sáng tạo để có feedback nhanh, sau đó quyết định theo từng dự án xem output cuối cùng render trong Eevee (giờ đã được hỗ trợ trên farm của chúng tôi) hay Cycles, tùy thuộc vào cái nào phù hợp hơn với look-development và kích thước job của bạn. Để so sánh sâu hơn xem engine nào thắng cho cloud rendering cụ thể, xem so sánh Eevee vs Cycles trên render farm cloud của chúng tôi.
Quy Trình Submit
Các bước chính xác khác nhau tùy render farm, nhưng quy trình cốt lõi thì nhất quán trên tất cả. Đây là quy trình trên một farm được quản lý toàn diện (fully managed) như Super Renders Farm:
Bước 1: Cài plugin. Hầu hết render farm cung cấp một add-on Blender tích hợp trực tiếp vào giao diện của bạn. Trên farm của chúng tôi, plugin Super Renders Farm cho Blender thêm một panel trong render properties nơi bạn cấu hình và submit job mà không cần rời khỏi Blender.
Bước 2: Upload scene của bạn. Plugin đóng gói file .blend của bạn (kèm mọi asset đã pack) và upload lên farm. Nếu scene của bạn dùng asset bên ngoài không thể pack (ví dụ, thư viện texture rất lớn, cache simulation lưu riêng), bạn có thể upload chúng dưới dạng archive riêng.
Bước 3: Cấu hình cài đặt farm. Chọn render engine của bạn (Cycles CPU, Cycles GPU, hoặc Eevee GPU), frame range, output format, và mức độ ưu tiên. Giao diện của farm cũng có thể cho phép bạn đặt giới hạn chi phí hoặc tùy chọn thông báo.
Bước 4: Submit và theo dõi. Sau khi submit, farm phân tán các frame của bạn qua các máy khả dụng. Bạn có thể theo dõi tiến độ trong panel plugin hoặc trên dashboard web của farm — theo dõi frame hoàn thành, thời gian render mỗi frame, và bất kỳ log lỗi nào.
Bước 5: Tải kết quả về. Các frame hoàn thành có sẵn để tải về ngay khi xong. Hầu hết farm hỗ trợ tự động tải về qua plugin, vì vậy các frame xuất hiện trong thư mục output của bạn mà không cần can thiệp thủ công.
Toàn bộ quy trình — từ khi nhấn "Submit" đến khi nhận được frame đầu tiên — thường mất 5 đến 15 phút tùy tốc độ upload và hàng đợi của farm.

Render farm submission workflow for Blender — install plugin, upload, configure, render, download
License và Khả Năng Tương Thích Add-on
Một trong những mối lo phổ biến nhất chúng tôi nghe được từ artist Blender khi chuyển sang cloud rendering: còn add-on và asset thương mại của tôi thì sao?
Bản thân Blender: Blender là open source (GPL). Không có ràng buộc license nào — farm có thể chạy Blender tự do trên mọi máy.
Render engine: Cycles và Eevee đều đi kèm Blender và không tốn thêm chi phí license. Nếu bạn dùng engine bên thứ ba như V-Ray for Blender hoặc Redshift for Blender, render farm cần có sẵn các license đó. Trên farm của chúng tôi, chúng tôi bao gồm license V-Ray, Corona, Arnold, và Redshift như một phần của chi phí render — bạn không cần cung cấp license riêng của mình.
Add-on chỉnh sửa geometry: Các add-on như Scatter, BagaPie, hoặc thiết lập Geometry Nodes tạo geometry tại thời điểm render cần có sẵn trên farm. Cách an toàn nhất là apply modifier và chuyển geometry procedural thành mesh trước khi submit. Nếu add-on là thương mại, hãy kiểm tra với farm của bạn — một số farm cài sẵn các add-on phổ biến, một số thì không.
Thư viện texture và asset: Asset từ các thư viện như Poliigon, Quixel Megascans, hoặc Poly Haven đều ổn miễn là chúng được pack vào file .blend. Farm không cần truy cập riêng vào các thư viện này — nó chỉ cần texture đã nhúng trong file scene của bạn.
Tối Ưu Chi Phí
Chi phí cloud rendering phụ thuộc vào ba biến số: thời gian render mỗi frame, số lượng frame, và loại phần cứng bạn dùng (CPU vs. GPU). Đây là những cách thực tế để giảm chi phí:
1. Tối ưu scene của bạn trước khi upload. Mỗi phút tiết kiệm được mỗi frame sẽ nhân lên trên toàn bộ job của bạn. Những điểm cải thiện lớn nhất:
- Bật adaptive sampling (Noise Threshold: 0.01) — có thể giảm thời gian render 20-40%
- Dùng OpenImageDenoise và giảm sample count (2048 → 1024)
- Giới hạn light bounce ở mức scene của bạn thực sự cần (nội thất: 8-12, ngoại thất: 4-6)
- Tắt các render layer bạn không cần cho output cuối cùng
2. Test với một batch nhỏ trước. Render 5 đến 10 frame trước khi submit toàn bộ job. Điều này bắt lỗi sớm (texture thiếu, cài đặt sai, vấn đề bộ nhớ) và cho bạn ước tính chi phí mỗi frame chính xác. Nhân con số đó với tổng số frame và bạn có ngân sách của mình trước khi cam kết.
3. Chọn đúng cấp phần cứng. Render GPU nhanh hơn mỗi frame nhưng tốn nhiều hơn mỗi giờ. Render CPU chậm hơn mỗi frame nhưng rẻ hơn mỗi giờ. Với nhiều scene, tổng chi phí ra kết quả tương đương — nhưng nếu scene của bạn vừa với bộ nhớ GPU (dưới 20-24 GB), GPU thường tiết kiệm chi phí hơn vì thời gian render nhanh hơn bù lại mức giá theo giờ cao hơn.
4. Dùng frame range một cách chiến lược. Nếu bạn đang render một animation, hãy submit theo range (frame 1-100, 101-200) thay vì một job khổng lồ duy nhất. Điều này giúp bạn bắt vấn đề sau batch đầu tiên và điều chỉnh cài đặt trước khi tiêu hết toàn bộ ngân sách.
Để biết mô hình giá chi tiết và cách tính chi phí, xem hướng dẫn chi phí render farm theo frame và trang giá của chúng tôi.
Các Vấn Đề Thường Gặp và Khắc Phục Sự Cố
Đây là những vấn đề chúng tôi thấy thường xuyên nhất với các job cloud rendering Blender, dựa trên các support ticket thực tế:
| Vấn đề | Nguyên nhân | Cách khắc phục |
|---|---|---|
| Thiếu texture (bề mặt xám hoặc hồng) | Asset chưa được pack | File > External Data > Pack All Into .blend |
| Render trông khác so với local | Phiên bản Cycles khác nhau | Khớp phiên bản Blender trên farm với phiên bản local của bạn |
| Hết bộ nhớ (GPU) | Scene vượt quá VRAM của GPU | Chuyển sang render CPU hoặc đơn giản hóa geometry |
| Simulation không render đúng | Cache chưa bake | Bake tất cả simulation trước khi submit |
| Frame ngẫu nhiên bị lỗi | Scene không ổn định (geometry lỗi hoặc driver expression) | Test local với đúng frame bị lỗi |
| Frame đen | Camera chưa đặt, hoặc render region đang bật | Kiểm tra camera active và tắt render region (Ctrl+Alt+B) |
| Render mất nhiều thời gian hơn dự kiến | Sample count cao mà không có adaptive sampling | Bật adaptive sampling với noise threshold 0.01 |
| Màu sắc trông sai | Không khớp color management | Đặt View Transform thành AgX hoặc Filmic (khớp cài đặt local) |
Nếu bạn gặp vấn đề không có trong danh sách này, bước đầu tiên tốt là render đúng frame bị lỗi trên máy local với cùng cài đặt. Nếu nó hoạt động ở local, vấn đề có khả năng liên quan đến việc đóng gói file (asset hoặc path bị thiếu). Nếu nó cũng lỗi ở local, vấn đề nằm ở cài đặt scene của bạn.
Geometry Nodes và Quy Trình Procedural
Hệ thống Geometry Nodes của Blender đáng được chú ý đặc biệt cho cloud rendering. Geometry procedural được tạo tại thời điểm render hoạt động đúng trên farm — farm đánh giá node tree của bạn giống hệt máy local của bạn sẽ làm. Tuy nhiên, có một số trường hợp đặc biệt:
Simulation zone (mới trong Blender 4.x): Những cái này phải được bake trước khi submit, giống như physics simulation truyền thống. Farm render các frame độc lập và không thể simulate tiến từ frame 1.
Biến thể random seed: Nếu thiết lập Geometry Nodes của bạn dùng phân phối random, output sẽ giống hệt trên farm miễn là giá trị seed giống nhau. Điều này được xử lý tự động — Cycles mang tính deterministic.
Node tree tốn hiệu năng: Các thiết lập procedural phức tạp có thể tốn nhiều bộ nhớ. Nếu Geometry Nodes của bạn tạo ra hàng triệu instance tại thời điểm render, hãy theo dõi mức sử dụng bộ nhớ local của bạn trước. Các scene dùng 60+ GB RAM ở local sẽ cần render CPU trên farm (có sẵn 96-256 GB). Render GPU sẽ lỗi nếu geometry được tạo ra vượt quá VRAM.
Bắt Đầu
Chuyển từ render local sang cloud rendering rất đơn giản khi scene của bạn đã được chuẩn bị đúng cách. Quy trình cho hầu hết artist Blender:
- Chuẩn bị scene của bạn — pack asset, bake simulation, kiểm tra cài đặt
- Cài plugin của farm — tải về từ tài liệu của farm bạn
- Submit một batch test — 5-10 frame để xác minh mọi thứ render đúng
- Xem xét và điều chỉnh — kiểm tra chất lượng output, chi phí mỗi frame, thời gian render
- Submit toàn bộ job — và tiếp tục làm việc trong khi farm xử lý render
Để có hướng dẫn cài đặt render cụ thể cho Blender, hướng dẫn tối ưu cài đặt render của chúng tôi bao quát mọi panel. Với quy trình cụ thể cho animation, hướng dẫn render animation trình bày chi tiết chuỗi frame, output format, và temporal denoising.
Nếu bạn đang đánh giá các render farm cho Blender, so sánh render farm Blender cho 2026 của chúng tôi bao quát những gì cần xem xét — mô hình giá, hỗ trợ engine, và chất lượng plugin.
Chọn Render Farm 3D Cho Blender: Những Gì Cần Kiểm Tra
Không phải render farm 3D nào cho Blender cũng hỗ trợ cùng engine, add-on, hoặc kích thước scene, vì vậy đáng để xác minh vài điểm cụ thể trước khi giao một job thực tế. Khi đánh giá render farm cho Blender, hãy kiểm tra:
- Độ bao phủ engine. Xác nhận farm hỗ trợ cả Cycles (CPU và GPU) và, nếu dự án của bạn cần, render Eevee GPU — không phải farm nào cũng hỗ trợ Eevee, và chất lượng hỗ trợ khác nhau ở nơi có.
- VRAM mỗi node GPU. Nếu scene của bạn nặng về GPU, trần VRAM của GPU (không chỉ tốc độ của nó) quyết định scene của bạn có render được hay không. Hỏi rõ loại card cụ thể và VRAM, không chỉ "có GPU".
- Độ mới của phiên bản Blender. Một farm chậm vài phiên bản point release có thể tạo ra khác biệt render tinh tế, đặc biệt với Geometry Nodes và shader node mới hơn. Hỏi farm cập nhật phiên bản stable mới nhanh thế nào.
- Xử lý add-on và plugin. Xác nhận liệu các add-on thương mại tạo geometry tại thời điểm render có được hỗ trợ không, hoặc liệu bạn có cần apply modifier trước khi submit không (xem License và Khả Năng Tương Thích Add-on ở trên).
- Được quản lý toàn diện vs. tự phục vụ. Một render farm 3D cho Blender được quản lý toàn diện (fully managed) xử lý việc cài đặt engine, license, và khắc phục sự cố cho bạn; một farm tự phục vụ (IaaS) cung cấp cho bạn một máy từ xa và yêu cầu bạn tự cấu hình nó.
Chạy một batch test nhỏ (5-10 frame) trên bất kỳ farm ứng viên nào, dùng scene sản xuất thực tế của bạn thay vì file demo, là cách nhanh nhất để xác nhận tất cả những điều trên trước khi giao một job đầy đủ.
FAQ
Q: Cloud rendering trên Blender có hỗ trợ cả Cycles và Eevee không? A: Có. Cycles được hỗ trợ đầy đủ trên hầu hết các render farm lớn vì nó tạo ra kết quả deterministic trên các phần cứng khác nhau, và nó vẫn là khuyến nghị mặc định cho các job animation phân tán lớn. Eevee (Eevee Next trong Blender 4.2+) cũng được hỗ trợ trên farm của chúng tôi trên node GPU, vì giờ đây nó có thể render headless mà không cần active display context — hãy kiểm tra với bất kỳ farm cụ thể nào bạn đang đánh giá, vì mức độ hỗ trợ Eevee khác nhau giữa các nhà cung cấp.
Q: Tôi có cần cung cấp license Blender riêng cho cloud rendering không? A: Không. Blender là phần mềm open-source phát hành theo license GPL, vì vậy render farm có thể chạy nó trên mọi máy mà không tốn phí license. Đây là một trong những lợi thế của Blender cho cloud rendering — không có chi phí license theo từng node như với một số ứng dụng DCC thương mại.
Q: Tôi chuẩn bị file Blender như thế nào cho một render farm? A: Pack tất cả tài nguyên bên ngoài vào file .blend (File > External Data > Automatically Pack Resources), dùng relative path, bake tất cả simulation và physics cache, và đặt render engine, resolution, frame range, và output format trước khi upload. Chạy File > External Data > Report Missing Files để bắt bất kỳ reference chưa được resolve nào.
Q: Chuyện gì xảy ra với texture và add-on của tôi khi render trên cloud? A: Texture đã được pack vào file .blend của bạn sẽ render đúng trên bất kỳ máy nào của farm. Với các add-on thương mại tạo geometry tại thời điểm render, cách an toàn nhất là apply modifier hoặc chuyển thành mesh trước khi submit. Render engine bên thứ ba (V-Ray, Redshift) cần license trên farm — các farm được quản lý toàn diện thường bao gồm những cái này trong chi phí render.
Q: Render GPU hay CPU tốt hơn cho Blender trên farm? A: Tùy thuộc vào scene của bạn. Render GPU (ví dụ, NVIDIA RTX 5090) nhanh hơn mỗi frame và tiết kiệm chi phí cho các scene vừa với VRAM (dưới 20-24 GB). Render CPU (Dual Xeon, 96-256 GB RAM) xử lý bất kỳ scene nào bất kể bộ nhớ và đáng tin cậy hơn cho geometry nặng, volumetrics, và subsurface scattering. Nhiều farm cung cấp cả hai — hãy test vài frame trên mỗi loại để so sánh.
Q: Render một dự án Blender trên farm cloud tốn bao nhiêu? A: Chi phí phụ thuộc vào thời gian render mỗi frame, số lượng frame, và loại phần cứng. Một ví dụ ước tính: một scene nội thất Cycles ở 2048 sample render trong 8 phút mỗi frame trên GPU tốn khoảng $0,30-0,80 mỗi frame. Một animation 300 frame sẽ tốn $90-240. Bật adaptive sampling và denoising có thể giảm con số này 30-50%. Hầu hết farm cho phép bạn chạy một batch test nhỏ để ước tính tổng chi phí trước khi cam kết.
Q: Tôi có thể render Geometry Nodes và các thiết lập procedural trên một farm cloud không? A: Có. Geometry Nodes đánh giá giống hệt trên các máy của farm như ở local — output mang tính deterministic. Điều cần cân nhắc chính là bộ nhớ: nếu thiết lập procedural của bạn tạo ra hàng triệu instance, hãy đảm bảo scene của bạn vừa với giới hạn phần cứng của farm. Simulation zone (Blender 4.x) phải được bake trước khi submit, giống như physics simulation truyền thống.
Q: Render farm hỗ trợ những phiên bản Blender nào? A: Hầu hết farm hỗ trợ tất cả bản phát hành stable chính thức và phiên bản LTS. Trên farm của chúng tôi, chúng tôi duy trì phiên bản Blender hiện tại và LTS, và cập nhật trong vòng vài ngày sau khi có bản phát hành mới. Luôn khớp phiên bản Blender trên farm với phiên bản bạn dùng để tạo scene — sự không khớp phiên bản có thể gây ra khác biệt tinh tế trong output render, đặc biệt với shader và Geometry Nodes.
Q: Tôi nên tìm gì ở một render farm 3D cho Blender? A: Kiểm tra độ bao phủ engine (Cycles CPU/GPU, và Eevee GPU nếu bạn cần), VRAM mỗi node GPU, độ mới của phiên bản Blender của farm, add-on và plugin của bạn có được hỗ trợ không, và farm được quản lý toàn diện hay tự phục vụ. Chạy một batch test nhỏ trên scene sản xuất thực tế của bạn là cách nhanh nhất để xác nhận khả năng tương thích trước khi giao một job đầy đủ.
Q: "Render farm cho Blender" và "Blender render farm" có phải cùng một thứ không? A: Có. "Render farm cho Blender," "Blender render farm," và "render farm blender" đều mô tả cùng một hạng mục: render farm trên cloud hoặc on-premises được cấu hình để chạy job Blender (Cycles và, trên các farm hỗ trợ, Eevee). Không có sự khác biệt kỹ thuật nào — cách diễn đạt khác nhau tùy theo cách người dùng tìm kiếm, không phải theo dịch vụ thực hiện.
About Alice Harper
Blender and V-Ray specialist. Passionate about optimizing render workflows, sharing tips, and educating the 3D community to achieve photorealistic results faster.