How to Render Animation in Blender: A Complete Guide for 3D Artists
Overview
Introduction
Rendering a single frame in Blender is straightforward. Rendering an animation — hundreds or thousands of frames with consistent quality, no flickering, and manageable render times — is a different challenge entirely. Every inefficiency in your render settings gets multiplied by your frame count, and problems that are invisible in a still image (temporal noise, light flickering, memory leaks) become obvious in motion.
We render Blender animations daily on our farm, and the issues we see most often come down to the same handful of mistakes: wrong output format, unoptimized sample counts, denoising that introduces temporal artifacts, and memory that climbs frame over frame until the job crashes. This guide walks through the full process of setting up and rendering an animation in Blender 4.x, from initial render settings to final output — whether you are rendering locally or sending frames to a cloud render farm.
The examples here use Blender 4.2 LTS with Cycles, though we cover Eevee workflows where relevant. If you need a deeper reference on individual render settings, our Blender render settings optimization guide covers every panel in detail.
Choosing Your Render Engine for Animation
Blender ships with two production engines: Cycles (path tracing) and Eevee (rasterization). Both can render animations, but they have different strengths for motion work.
Cycles is the go-to for photorealistic animation. It handles complex lighting, reflections, volumetrics, and motion blur physically — meaning you get correct results without faking anything. The trade-off is render time. A single Cycles frame might take 2 to 30 minutes depending on complexity, so a 300-frame animation can take anywhere from 10 hours to several days on a single machine.
Eevee (Eevee Next in Blender 4.x) renders at near-real-time speeds using rasterization. It is excellent for motion graphics, stylized animation, and previz. Eevee handles animations where absolute photorealism is not required — title sequences, abstract loops, architectural fly-throughs where speed matters more than ray-traced accuracy. The Blender manual covers both engines in detail.
When to use which:
| Scenario | Recommended Engine |
|---|---|
| Architectural walkthrough (photorealistic) | Cycles |
| Product turntable with reflections/caustics | Cycles |
| Motion graphics / title sequence | Eevee |
| Character animation (stylized look) | Eevee |
| VFX compositing plates | Cycles |
| Quick previz before final render | Eevee, then Cycles for finals |
| Long-form animation (1,000+ frames, tight deadline) | Cycles on a render farm |
One common workflow we see: artists iterate on timing and camera movement using Eevee (seconds per frame), then switch to Cycles for the final render. This saves hours of waiting during the creative phase.
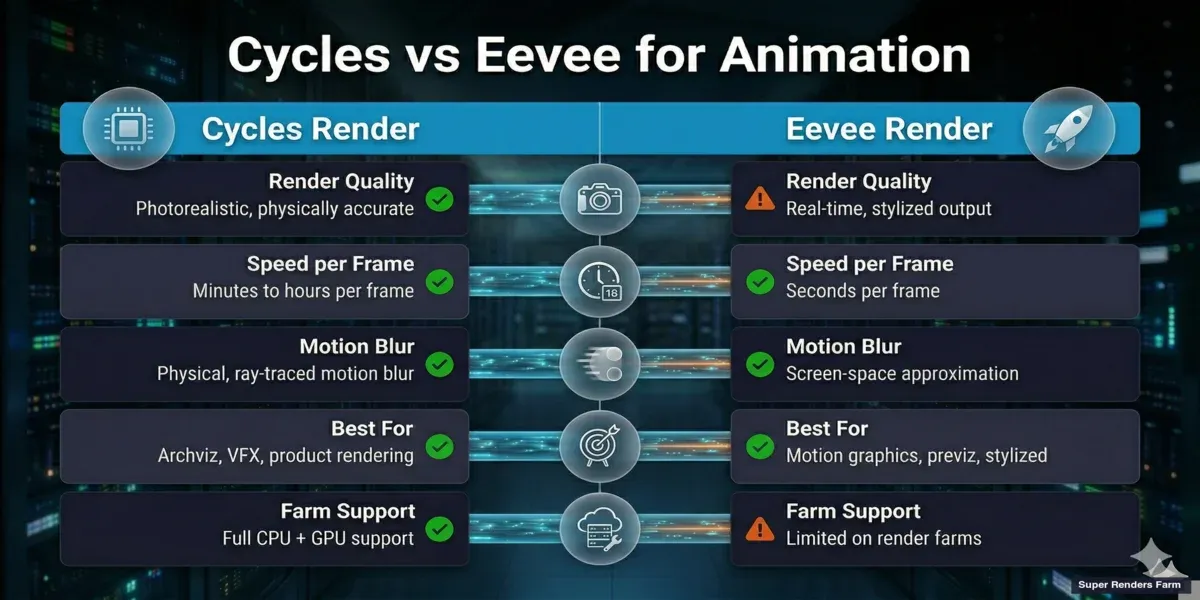
Comparison infographic — Cycles vs Eevee for animation rendering in Blender
Setting Up Your Animation Render
Before hitting Render Animation, configure these core settings in the Output Properties panel.
Frame Range
Set your Start Frame and End Frame in Output Properties > Format. Blender defaults to frames 1-250. For production work, set these to match your timeline exactly — rendering extra frames wastes time, and missing frames means re-rendering.
The Frame Step setting renders every Nth frame. Setting it to 2 renders frames 1, 3, 5, 7... which is useful for test renders to check timing at half the cost. Always reset to 1 for finals.
Frame Rate
Match your project's target delivery format:
| Use Case | Frame Rate |
|---|---|
| Film / cinematic | 24 fps |
| European broadcast (PAL) | 25 fps |
| North American broadcast (NTSC) | 30 fps |
| Web video / YouTube | 24 or 30 fps |
| Slow motion (rendered at normal speed) | 60 fps |
| Game cinematics | 30 or 60 fps |
Set this in Output Properties > Format > Frame Rate. Changing frame rate after animation is keyframed requires retiming — set it before you start animating.
Resolution
Set your final output resolution in Output Properties > Format. Common production resolutions:
- 1920 x 1080 (Full HD) — standard for most delivery
- 2560 x 1440 (2K) — increasingly common for web
- 3840 x 2160 (4K UHD) — high-end delivery, 4x the pixels of HD
Use the Resolution Percentage slider (default 100%) to do test renders at reduced resolution. Rendering at 50% gives you a quarter of the pixels — much faster for checking composition and timing.
Output Format: PNG Sequence vs Video File
This is one of the most important decisions for animation rendering, and the answer is almost always: render to a PNG image sequence, not a video file.
Why PNG sequences are preferred for production:
-
Crash recovery. If Blender crashes on frame 847 of a 1,200-frame animation, you have 846 finished frames. Change your Start Frame to 847 and resume. With a video file, a crash means starting over — the entire file may be corrupted.
-
Distributed rendering. Render farms split your animation across many machines. Machine A renders frames 1-100, machine B renders 101-200, and so on. Each machine writes individual image files. This is impossible with a single video container.
-
Post-production flexibility. Image sequences import into compositing software (After Effects, Nuke, DaVinci Resolve) frame-by-frame, allowing non-destructive color grading, re-timing, and effects. You can also replace individual bad frames without re-rendering the entire sequence.
-
No quality loss. PNG is lossless. Video codecs like H.264 are lossy — they compress frames and introduce artifacts, especially in areas with fine detail or subtle gradients.
When video output is acceptable: Quick previews, test renders, social media drafts where convenience outweighs quality. Use FFmpeg (video container) with a fast codec for these.
Recommended output settings:
| Setting | Value | Why |
|---|---|---|
| File Format | PNG | Lossless, universal, crash-safe |
| Color Mode | RGBA | Preserves transparency for compositing |
| Color Depth | 16-bit | More latitude for color grading |
| Compression | 15% | Good balance of file size and write speed |
| Output Path | //render/project-name/frame_#### | Relative to .blend file, organized |
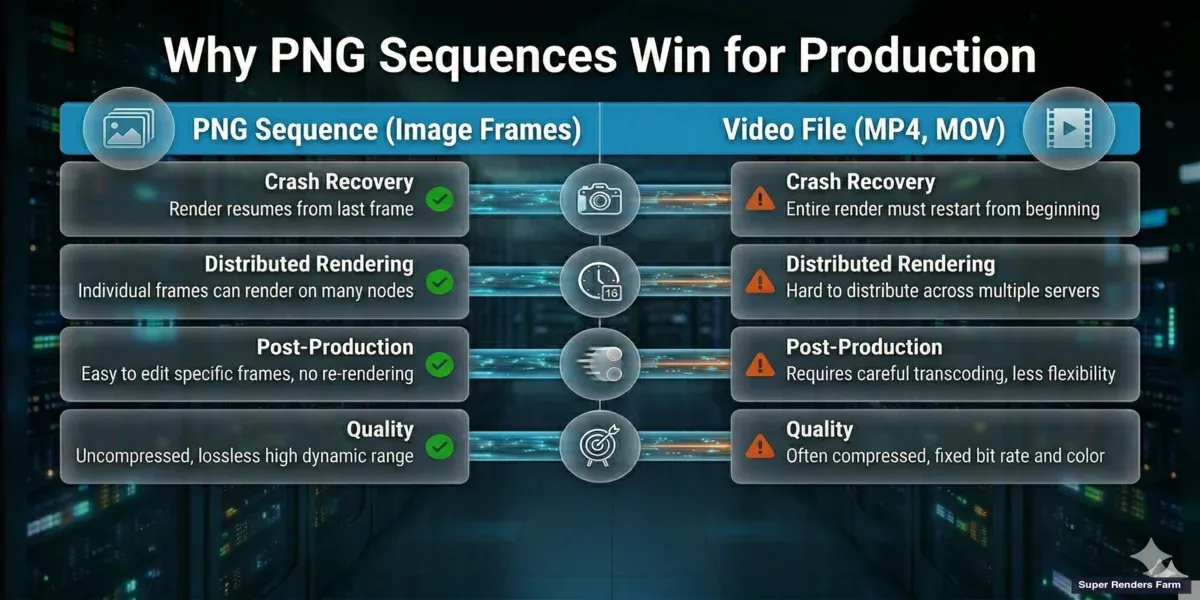
Infographic comparing PNG image sequence vs video file output for Blender animation rendering
For OpenEXR workflows (VFX compositing with render passes), set File Format to OpenEXR Multilayer. This embeds all render passes (diffuse, glossy, shadow, mist, cryptomatte) in a single file per frame — essential for professional compositing pipelines. See our guide to EXR and Cryptomatte workflows for details.
Optimizing Cycles Render Settings for Animation
Animation rendering multiplies every inefficiency. A setting that adds 30 seconds per frame adds 2.5 hours to a 300-frame animation. Here is how to optimize Cycles specifically for animation work.
Sampling and Adaptive Sampling
Cycles in Blender 4.x uses adaptive sampling by default. Instead of rendering a fixed number of samples per pixel, it stops sampling pixels that have already converged — bright, well-lit areas converge fast while dark corners and caustics need more samples.
For animation, configure:
- Render Samples: Set this as your upper limit. 256 to 512 is a good range for most scenes with denoising enabled. Complex interiors may need 1024.
- Noise Threshold: 0.01 is a solid default. Lower values (0.005) produce cleaner frames but increase render time. For animation, consistency between frames matters more than absolute cleanliness — a consistent noise level gets cleaned by denoising, while varying noise levels cause visible "swimming" in the final video.
- Min Samples: Keep at 32 or higher to prevent adaptive sampling from cutting corners on early pixels. Values below 16 can cause artifacts in gradient areas.
Denoising for Animation
Denoising is critical for animation — it lets you render at lower sample counts while maintaining visual quality. But not all denoisers handle animation equally.
- OpenImageDenoise (OIDN): CPU-based, included with Blender. Produces excellent results and is the most stable option for animation. Consistent frame-to-frame behavior minimizes temporal flickering. Use this as your default.
- OptiX Denoiser: GPU-based (NVIDIA only). Faster than OIDN but can produce slightly different results frame to frame, which may cause subtle flickering in animations. More suited to preview renders where speed matters.
For production animation, we recommend: OIDN with "Accurate" quality setting, applied as a render pass (not viewport). Enable it in Render Properties > Sampling > Denoise. Ensure the Denoising Data pass is enabled under View Layer Properties > Passes > Data — this gives the denoiser additional information (normal and albedo passes) for better results.
Light Paths
Light path settings control how many times rays bounce in your scene. For animation:
- Total bounces: 8-12 for most scenes. Architectural interiors with many reflective surfaces may need 12-16.
- Transparency bounces: Increase to 16-32 if your scene has stacked glass, curtains, or layered translucent materials. Insufficient transparency bounces cause black artifacts that flicker in animation.
- Volume bounces: Only increase above 0 if you have volumetric fog, smoke, or fire. Each volume bounce adds significant render time.
Motion Blur
Cycles handles motion blur physically — it samples the scene at multiple time points within each frame's shutter interval. This is accurate but expensive.
- Shutter: 0.5 is standard (180-degree shutter). Values above 1.0 create exaggerated blur. Values below 0.25 may not produce visible blur at 24fps.
- Steps: Controls motion blur quality. Default (1) works for simple motion. Increase to 3-5 for fast-moving objects or objects with complex deformation.
- Position: "Center on Frame" is the standard. "Start on Frame" shifts the blur direction.
If motion blur is adding more than 30% to your render time, consider rendering without it and adding it in post using a vector pass — export the Vector render pass and apply directional blur in your compositor.
Memory Management for Long Animations
Memory issues are the most common cause of failed animation renders. A scene that renders frame 1 fine can crash on frame 400 because memory usage climbs over time.
Why memory grows during animation rendering:
- Texture caching: Blender caches textures in memory. Animated textures or procedural textures that change per frame accumulate cached data.
- Particle systems: Hair, cloth, and fluid simulations store per-frame state. Long simulations can consume gigabytes.
- Undo history: Blender keeps undo steps in memory by default. For rendering, this serves no purpose.
How to prevent memory crashes:
- Bake simulations before rendering. Bake particle systems, cloth, fluid, and rigid body simulations to disk. This prevents Blender from recalculating physics each frame and keeps memory predictable.
- Reduce undo steps. In Preferences > System, reduce Undo Steps to 0 during rendering. This frees memory that would otherwise accumulate.
- Use Persistent Images (Render Properties > Performance). This keeps texture data in memory between frames instead of reloading it — sounds counterintuitive, but it prevents the memory fragmentation that causes gradual leaks.
- Enable CPU + GPU rendering (Cycles). In Preferences > System > Cycles Render Devices, enable both CPU and GPU. This distributes the workload and can prevent GPU memory overflow on complex scenes. Check our GPU vs CPU rendering guide for when this makes sense.
- Render in chunks. If rendering locally on a machine with limited RAM, split your animation into chunks (frames 1-100, 101-200, etc.) and restart Blender between chunks. This clears accumulated memory.
Rendering Blender Animations on a Render Farm
For animations longer than a few hundred frames, local rendering is often impractical. A 500-frame Cycles animation at 5 minutes per frame takes 42 hours on a single machine. On a render farm, those same 500 frames distribute across dozens of machines and finish in hours instead of days.
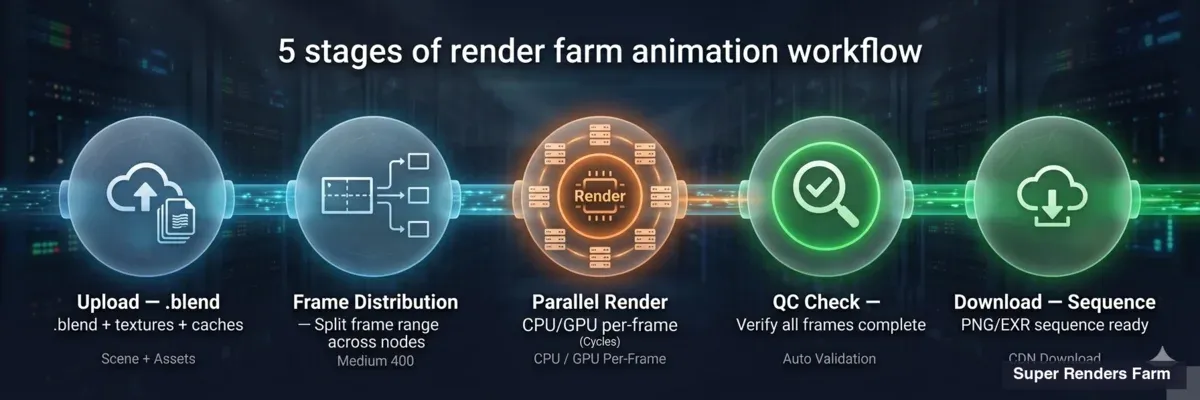
Pipeline diagram showing render farm workflow for Blender animations — upload, distribute, render, download
How farm rendering works for animations:
- You upload your .blend file and all linked assets (textures, caches, HDRIs) through the farm's submission tool.
- The farm splits your frame range across available machines. Each machine renders its assigned frames independently.
- Finished frames upload to your download folder as PNG or EXR files — one file per frame.
- You download the complete sequence and assemble it locally.
This is exactly why PNG sequences matter. Each machine writes individual frame files. There is no single video container to corrupt.
What we support for Blender on our farm:
- Cycles (CPU and GPU): Full support. CPU rendering uses our fleet of 20,000+ cores. GPU rendering uses NVIDIA RTX 5090 cards with 32 GB VRAM — enough for most production scenes. We include Blender licensing automatically (Blender is open source, so there is no licensing cost).
- Eevee: Limited support on render farms. Eevee relies heavily on GPU context and viewport state in ways that make distributed rendering unreliable. It works for some scenes, but we recommend Cycles for farm submissions. If your project requires Eevee, test a small frame range first.
Preparing your .blend file for farm submission:
- Pack external files. Go to File > External Data > Pack Resources. This embeds textures and HDRIs into the .blend file so they transfer to the farm correctly.
- Bake all simulations. Particle, cloth, and fluid caches must be baked and saved — farm machines cannot run your simulation from scratch.
- Set output to PNG or EXR. Never set output to a video format when submitting to a farm — each machine would try to write to the same video file.
- Remove viewport-only objects. Disable or delete objects used only for viewport reference (empties with background images, guide meshes). They waste memory on farm machines.
- Test render 3 frames. Render frames from the beginning, middle, and end of your timeline locally to verify settings before uploading. This catches problems that would waste farm credits.
For a detailed walkthrough of farm pricing and submission, see our pricing page and Blender render farm guide. For the full cloud rendering workflow — scene preparation, plugin setup, and cost optimization — see our Blender cloud rendering guide.
Rendering Multiple Camera Angles
Many animation projects require renders from multiple camera angles — architectural walkthroughs with different viewpoints, product turntables with close-up and wide shots, or VFX plates from multiple virtual cameras.
For a closer look at one of those categories, our render farm guide for real estate animation and 3D walkthroughs covers frame counts and render costs for typical residential and commercial walkthrough animations.
Blender supports this through scene-based multi-camera setups and Python batch rendering. Rather than duplicating the entire scene, you create linked scene copies that share geometry but reference different active cameras. A Python script then iterates through scenes and renders each one in sequence.
This approach works well on both local machines and render farms. On a farm, each camera angle can be submitted as a separate job, rendering all angles in parallel. We cover the full setup in our guide to rendering multiple cameras in Blender.
Common Animation Rendering Problems
Flickering between frames
Flickering is usually caused by insufficient samples in areas with complex lighting. Adaptive sampling may converge differently frame to frame, creating visible brightness variation. Fix: increase Min Samples to 64, tighten Noise Threshold to 0.005, and ensure denoising is enabled. For firefly-heavy scenes (bright pixel spikes from caustics), enable the Clamp Indirect value at 10 — this caps the brightness of indirect light paths.
Denoising artifacts in motion
AI denoisers can produce slightly different results per frame, causing a "boiling" or "swimming" texture effect in areas that should be static. Fix: use OpenImageDenoise (OIDN) instead of OptiX for final renders. OIDN is more temporally consistent. Also ensure you are rendering the Denoising Data passes (albedo + normal) — without these, the denoiser has less information and produces less stable results.
Memory crashes on later frames
If rendering fails on frame N but frame 1 renders fine, memory is likely accumulating. See the Memory Management section above. The most common culprit is unbaked simulations — bake everything to disk before rendering.
Animation renders differently than viewport preview
This usually happens because viewport and render settings diverge. Check: render resolution vs viewport resolution, render samples vs viewport samples, and render camera vs viewport camera. The render always uses the active camera set in Scene Properties > Camera — not whatever camera you are looking through in the viewport.
Render output overwrites previous frames
If your output path does not include a frame number placeholder (####), Blender overwrites the same file every frame. Ensure your output path ends with something like frame_#### — the #### is replaced by the frame number (padded to 4 digits).
Assembling Your Final Video
After rendering your PNG or EXR sequence, you need to encode it into a video file for delivery.
Using Blender's Video Sequence Editor (VSE):
- Open a new Blender file (or switch to the Video Editing workspace).
- In the Sequencer, go to Add > Image/Sequence. Navigate to your render folder and select all frames.
- Set the output resolution and frame rate to match your render settings.
- Set Output to FFmpeg Video, container MP4, codec H.264, encoding quality High or Lossless.
- Render Animation (Ctrl+F12) — this encodes the sequence into a video.
Using FFmpeg directly (faster, no GUI):
ffmpeg -framerate 24 -i frame_%04d.png -c:v libx264 -crf 18 -pix_fmt yuv420p output.mp4
-framerate 24: Match your project frame rate-crf 18: Quality (lower = better, 18 is visually lossless)-pix_fmt yuv420p: Ensures compatibility with most players
For professional delivery, render to ProRes (for editing handoff) or DNxHR (for broadcast) rather than H.264.
FAQ
Q: What output format should I use for rendering animation in Blender? A: PNG image sequence is the recommended format for production animation rendering. PNG is lossless, crash-recoverable (you keep all frames rendered before a crash), and compatible with render farm workflows where multiple machines render frames simultaneously. Encode to H.264 or ProRes only as a final delivery step.
Q: How do I reduce render time for Blender animations? A: Enable adaptive sampling with a noise threshold of 0.01, use OpenImageDenoise to allow lower sample counts (256-512 instead of 2048+), reduce light path bounces to match your scene complexity, and render at the minimum resolution needed. For large projects, using a render farm with thousands of CPU cores can reduce days of rendering to hours.
Q: Can I render Eevee animations on a render farm? A: Eevee has limited support on render farms because it depends on GPU context and viewport state that does not always transfer cleanly between machines. Cycles is the recommended engine for farm rendering. If your project requires Eevee, test a small frame range on the farm first to verify compatibility before committing to a full render.
Q: Why do my Blender animation frames flicker? A: Flickering is typically caused by adaptive sampling converging differently per frame, producing varying noise patterns that the denoiser handles inconsistently. Fix this by increasing Min Samples to 64, tightening Noise Threshold to 0.005, using OpenImageDenoise (which is more temporally stable than OptiX), and enabling Denoising Data passes for better denoiser input.
Q: Should I use GPU or CPU rendering for Blender animations? A: Both work well for Cycles animations. GPU rendering (CUDA, OptiX, HIP) is faster per frame but limited by VRAM — complex scenes with many textures may exceed GPU memory. CPU rendering handles any scene size but is slower per frame. For render farms, CPU fleets offer more total compute cores, while GPU machines offer faster individual frame times. Many artists use GPU rendering for simple scenes and CPU for complex ones.
Q: How do I resume a failed animation render in Blender? A: If you rendered to a PNG or EXR image sequence, check your output folder to find the last successfully rendered frame. Set the Start Frame to the next frame number and render again — Blender will continue from where it stopped. If you enable "Overwrite" in Output Properties, existing frames are re-rendered; disable it to skip frames that already exist on disk.
Q: What causes memory crashes during long animation renders? A: Memory typically accumulates from unbaked simulations (particles, cloth, fluid), texture caching, and undo history. Bake all simulations to disk before rendering, reduce Undo Steps to 0 in Preferences, and enable Persistent Images in render performance settings. For extremely long animations, consider rendering in chunks and restarting Blender between them to clear accumulated memory.
Q: How many samples do I need for animation rendering in Cycles? A: With denoising enabled, 256 to 512 samples and a noise threshold of 0.01 produce clean results for most scenes. Architectural interiors with complex caustics may need 1024 samples. The key for animation is consistency — a uniform noise level across frames denoise more predictably than varying noise levels. Use adaptive sampling to let Blender allocate extra samples only where needed.
About Alice Harper
Blender and V-Ray specialist. Passionate about optimizing render workflows, sharing tips, and educating the 3D community to achieve photorealistic results faster.