Cloud Rendering for Interior Designers Using 3ds Max
Overview
Introduction
It's 11pm, the client walkthrough is at 9am, and the living room render still hasn't cleared the noise floor. The scene is a single interior: a kitchen and living space with layered material libraries, three area lights, a window doing most of the lighting work through sheer curtains, and a workstation fan that's been running for two hours without the image looking meaningfully cleaner than it did forty minutes ago. This is a recognizable moment for interior designers working alone or in a two- or three-person studio, and it's different from the render problem most cloud-rendering content is written for.
Most "cloud rendering for archviz" guides are written for an architecture firm producing exterior hero shots or full site renders. Interior work has a different shape: fewer polygons overall, but far more time per frame, because light has to bounce around inside a closed box instead of escaping into open sky. A living room, bedroom, or retail interior with global illumination on is one of the slower categories of scene to render cleanly, regardless of how modest the geometry looks in the viewport. This guide is written for that workload: a solo interior designer or a small interior studio in 3ds Max, producing still renders for client presentations, working through several rounds of revisions per project, on a machine sized for daily design work rather than dedicated rendering.
We run render jobs across our farm daily at Super Renders Farm, and this guide covers when sending an interior scene off-machine is worth it, when it isn't, how to prepare a 3ds Max interior file so it doesn't fail on first submission, and what it costs for occasional, revision-heavy use.
Why Interior Stills Render Differently Than Exterior Archviz
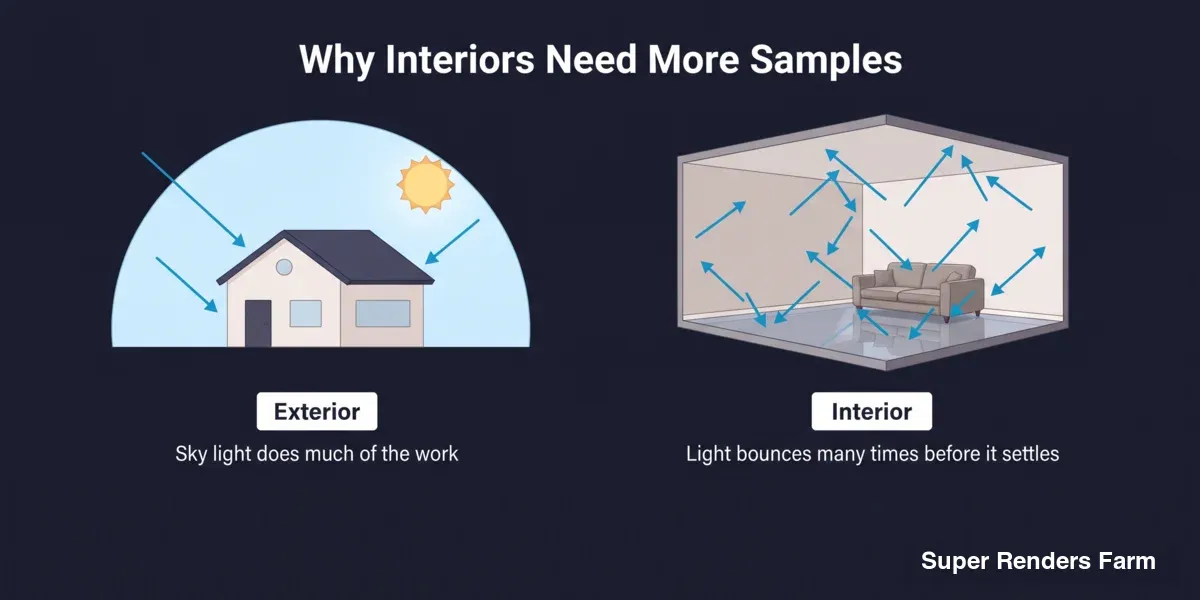 Concept illustration: an exterior lit mostly by the sky with light arriving directly, versus an enclosed interior where light bounces many times between walls, floor, ceiling and furniture before it settles.
If you've read general archviz cloud-rendering guides before, the advice usually centers on exterior scenes, walkthrough animations, or full-building visualizations — our own architectural visualization guide and archviz render farm comparison cover exterior and whole-building work, and this article doesn't repeat it. Interior work has its own render-time drivers worth naming directly.
An enclosed room traps light. Every bounce off a wall, a fabric surface, or a glossy floor finish has to be resolved before the image converges, and a room mixing a matte wall paint, a glossy countertop, and a fabric sofa forces the renderer to resolve very different light behavior in the same frame. Exterior scenes get to "cheat" with a sky dome doing a lot of the lighting work in one bounce; interiors rarely get that shortcut. A well-lit exterior hero shot and a well-lit interior still can take very different render times per frame even with fewer total polygons on the interior, because it needs far more samples to clear its noise floor.
Interior design work also tends to carry a heavier furnishing and material load than a comparable exterior shot. A single room might reference dozens of furniture, textile, and decor assets from vendor libraries, each with its own texture set and sometimes displacement. That adds up in file size and in the asset-path complexity of the scene, which matters once the file has to leave your machine (more on that below).
When Your Own Machine Is Still the Right Call
The honest answer for a lot of interior design work is that a farm doesn't help, and it's worth being direct about that before getting into when it does.
- Look-dev and material iteration. Testing how a fabric, a stone finish, or a paint sheen reads under your lighting is a fast local loop. Sending each iteration to a farm adds packaging and upload time that swamps the render-time saving, and breaks the tight feedback loop this work depends on.
- A single still that already renders in a few minutes locally. If your workstation clears an interior at presentation quality quickly, the overhead of preparing and uploading a scene usually costs more real time than it saves.
- Camera-angle exploration. Early in a project, deciding which angles sell the room is iterative work best done at low sample counts locally, not high-sample farm submissions.
- A revision so small it doesn't need a full re-render. Swapping a throw pillow color is sometimes faster to patch in post than to re-render from scratch.
If none of the "genuinely helps" situations below apply to what you're working on, your own workstation is still the right tool.
When Cloud Rendering Genuinely Helps an Interior Project
The situations where a farm earns its cost for interior work cluster around scenes that have outgrown what one machine can clear before a deadline.
- A final presentation render at full resolution and full sample count. The quick preview you've been test-rendering all week isn't the frame that goes in front of the client. Fully converged interior stills — especially multiple rooms or angles for one presentation — are where a single workstation's render time turns into a real deadline risk.
- Several angles or a full presentation set due at once. One interior render is manageable locally; five or six angles needed by the same morning is a parallelization problem a farm solves by running them at once instead of one after another.
- A round of client revisions landing the day before a deadline. A farm exists precisely to absorb the render-time cost of "the client wants three material variations of the same room by tomorrow" without working through the night.
- A scene that's grown heavier than expected. A living space assembled from several vendor asset libraries, with high-resolution textures and instanced furniture across multiple rooms, can end up render-time-heavy in ways not obvious at the modeling stage.
For the general question of what separates a design that benefits from a farm from one that doesn't, our small-studio render farm guide covers the studio-scale version of this decision — most of the same reasoning applies at the scale of one designer or a two-person studio.
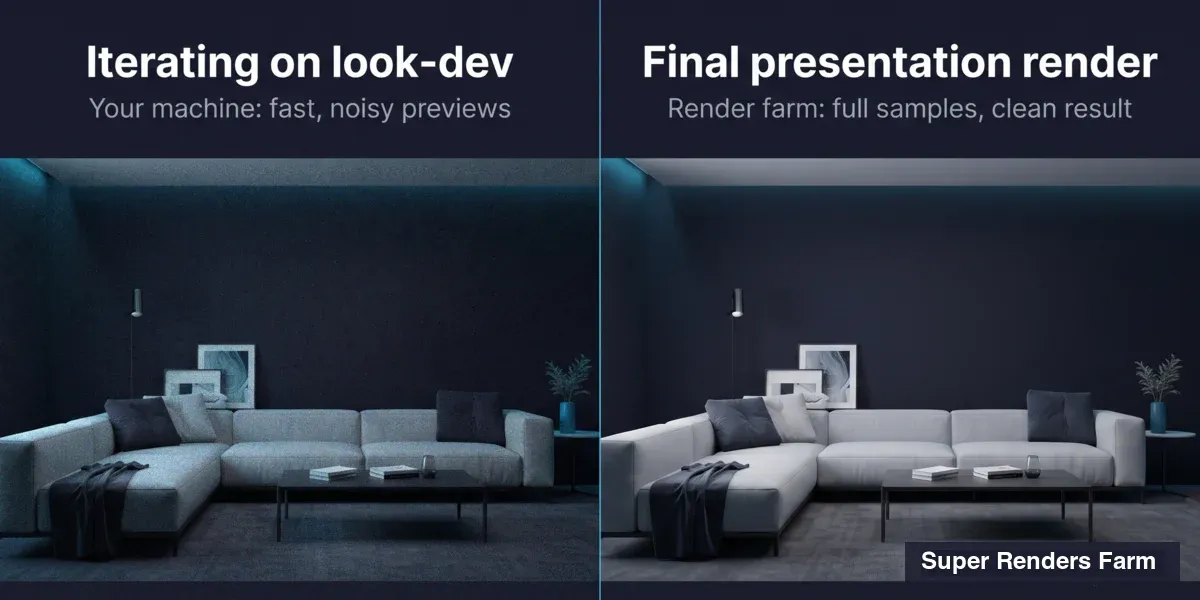 Split comparison of the same living room interior: a noisy look-dev preview on your own machine versus a clean, fully converged final render on a render farm.
The Software You're Already Using
3ds Max is the tool most interior designers doing 3D presentation work are already in, often alongside a rendering plugin rather than the built-in Arnold renderer. On our farm, 3ds Max is supported across versions 2013 through 2027, so an older-release scene usually doesn't need to be re-saved into a newer format first. For an older release, check with support which Corona or V-Ray version matches the scene before you submit.
The two render engines interior designers on 3ds Max reach for most, Corona and V-Ray, are both ready on every 3ds Max node without a separate installation step or a request in advance — the render-engine license is included in the per-compute rate. Corona is currently supported at versions 15 and 14; V-Ray at versions 7 and 6. Whichever your studio has settled on, neither requires anything extra to confirm before you submit a job.
If Corona is your renderer of choice, our dedicated Corona render farm guide goes deeper into engine-specific settings and troubleshooting than this article does.
One practical note for interior work: many designers use scatter or instancing plugins (for rugs, plants, books, or other repeated library objects) or third-party asset libraries for furniture and materials. Those tools generate or reference geometry that has to be resolvable at render time on whatever machine runs the job, not just visible in your local viewport. Before submitting a scene built around one, confirm with support that the plugin is available, or convert its output to standard geometry/proxies before packaging — in our experience, it's one of the checks that saves the most wasted render time.
Preparing a 3ds Max Interior Scene for the Farm
Interior scenes fail on first submission for a short, predictable list of reasons, almost all of them file-prep rather than the render itself.
- Absolute file paths. If your textures, HDRI, or referenced assets are saved with an absolute local path (
C:\Users\...), they won't resolve on a remote machine. Use 3ds Max's Asset Tracking / Resource Collector to gather all referenced files and convert paths to relative before packaging. Two caveats from Autodesk's own documentation: Resource Collector does not collect maps used for displacement, which interior scenes use often, so check those by hand; and its built-in option to compress into a ZIP produces a.zip, which the farm does not extract, so leave that option off and upload the collected folder unpacked. On our farm, broken asset paths are one of the most common first-submission failures, and interior scenes with dozens of texture-heavy assets are more exposed to it than a simpler exterior shot. - Missing proxies or unresolved instances. If your furniture and decor come from proxy objects (V-Ray or Corona proxies referencing external mesh files), make sure those referenced files travel with the scene, not just the proxy pointer inside the .max file. A proxy pointing at a file that only exists on your local drive will render as an empty box, or fail outright, elsewhere.
- Corona and V-Ray settings worth checking before you submit. Denoising settings and GI settings should match what you intend for the final frame: for Corona, whether the UHD Cache is used as the secondary GI solver (Chaos recommends it for GI-dominant scenes such as interiors) and which precomputation preset it uses; for V-Ray, the GI engine combination (for example Brute Force with Light Cache) and the image sampler type (Bucket or Progressive). All of it should match the final frame, not whatever was left over from a fast preview pass. A preview-quality denoiser setting submitted as "final" wastes farm time on a frame you'll still want to re-render.
- No archives. The farm does not extract archives (.zip, .rar, .7z, .tar, .tar.gz), so nothing inside an archive gets rendered. Upload the collected folder unpacked; zipping out of habit is what catches people out.
- Texture and file size. Interior scenes with several vendor asset libraries can accumulate a large texture footprint quickly. That's not a blocker on its own, since there's no hard limit on web uploads, but a single browser upload gets slow above roughly 2 GB and unreliable above about 5 GB, so above 2 GB the Client App (resumable) or S3 access (Cloud Direct Connect) is the steadier path.
For a broader walkthrough of getting a 3ds Max project ready for farm submission, our 3ds Max render farm setup guide covers the general workflow; the notes above are specifically about what tends to go wrong on an interior-heavy scene.
 Diagram of packaging a 3ds Max interior scene: scene file, proxies and assets, relative texture paths, then the project folder uploaded unpacked (no .zip, .7z or .tar.gz), with a missing file flagged as the cause of a failed frame.
Where This Trips Up First-Time Submissions
| Issue | Cause | Fix |
|---|---|---|
| Textures or materials missing on the render | Absolute local file paths, or proxy-referenced assets not packed with the scene | Run Asset Tracking / Resource Collector, convert to relative paths, confirm proxy source files are included |
| Plugin-generated content missing or geometry empty | A scatter/instancing plugin or asset-library tool not available on the render machine | Confirm plugin availability with support before uploading, or convert scattered/instanced content to standard geometry first |
| Job can't find the scene | Project uploaded as an archive (.zip, .7z, .tar.gz) | Extract locally and upload the folder unpacked |
| Render looks noisier or softer than expected | Preview-quality denoiser or GI settings carried over into the "final" submission | Reset denoising and GI engine settings to your actual final-quality values before submitting |
| Job took longer or cost more than expected | Priority tier set above the standard floor rate without realizing it | Check the priority setting against the standard-to-priority rate range before submitting a large batch of angles |
| Submitted the night before a client review, no buffer for a failed first attempt | No time built in to catch a file-prep issue on the first try | Submit a small test render (one frame at low resolution) a day ahead of the real deadline, not the morning of |
How Billing Works for Occasional, Revision-Heavy Work
The billing model matters more for this kind of work than the raw hardware specs do, because a subscription built for continuous studio throughput is the wrong shape for a workflow that's quiet most of the month and then spikes hard around a client deadline.
Rendering here runs on a top-up credit model rather than a plan tier: you buy render credits and jobs draw down that balance. There's no monthly commitment, and render credits never expire, so a balance bought for one project is still good months later. New accounts get $25 in free render credits on signup, often enough to test a real interior scene before deciding whether to put more money in.
CPU rendering (where V-Ray and Corona CPU workflows run) is billed per GHz-hour, and the rate depends on priority: the standard-priority floor is $0.004 per GHz-hour, running up to $0.016 per GHz-hour at the highest priority, which matters if a deadline means you need your job to jump the queue. GPU rendering starts at $0.003 per OctaneBench-hour (OBh). Topping up a larger credit balance at once brings automatic volume discounts, up to 30% at higher amounts, on top of the signup credit.
The practical read here: because credits don't expire and there's no subscription, buying a modest balance once and drawing it down only for the presentation renders and revision rounds that need a farm — not for every angle you test locally — fits a workload that's genuinely intermittent rather than continuous.
A Practical Workflow for a Client Presentation Deadline
- Lock the angle and settings before you submit. Interior work often runs through several look-dev passes locally first; only send the scene to the farm once you've settled on the camera angle, lighting, and render settings you intend to present.
- Pack the scene. Use Asset Tracking / Resource Collector (or your renderer's equivalent) to gather every referenced texture, proxy, and material file, and convert paths to relative.
- Keep it as a folder. Upload the collected folder unpacked; the farm does not extract archives.
- Upload and submit. Below roughly 2 GB, a browser upload is fine; above that, the Client App or S3 access is steadier, because a browser upload does not resume if the tab closes. Beyond your render settings and priority tier, the only other thing to confirm is scatter or asset-library plugin availability, if your scene uses one (see above).
- Download your output. Files stay available for as long as you need them — no fixed automatic deletion period, deletion on request. Download promptly regardless, especially close to a deadline.
If client feedback comes back after the presentation ("can we see the sofa in a different fabric," "can the afternoon light be warmer"), the same workflow applies: lock the new settings locally, pack, submit, and treat each revision round as its own small job rather than batching unrelated changes into one submission.
Deciding Between Your Own Machine and a Farm
| Your situation | Best fit |
|---|---|
| Testing material or lighting look-dev, still deciding on the look | Your own machine |
| Exploring camera angles before committing to a presentation set | Your own machine |
| A single interior still that already renders in a few minutes locally | Your own machine |
| Full-resolution, fully converged final render for a client deadline | A farm |
| Several presentation angles or rooms due at the same time | A farm — parallel nodes collapse the total wait the most here |
| A client revision round landing the day before a deadline | A farm |
| A scene that's grown heavier than expected from stacked vendor asset libraries | A farm |
For a wider comparison of cloud render farm options for archviz-adjacent work, the archviz comparison linked near the top of this article covers that broader evaluation. Current per-compute rates and the full priority-tier breakdown are on our 3ds Max render farm page and pricing page.
FAQ
Q: Is cloud rendering worth it for a single interior room, or only for a full project with multiple spaces? A: It depends on the render itself, not the project size. A single full-resolution final render at deadline, or several angles due at once, can justify it on their own. Iterative look-dev and quick local previews almost never do, regardless of how many rooms a project eventually covers.
Q: Do I need to be part of a studio to use a render farm as a solo interior designer? A: No. Signup is per individual account, and the same billing model — top-up credits, $25 in free render credits on signup — applies whether you're a solo designer or part of a larger team.
Q: My scene uses a scatter or instancing plugin for furniture and decor. Will that work on a farm? A: Confirm plugin availability with support before you upload. Plugin-generated content has to be resolvable on whatever machine actually renders the job, not just visible in your local viewport, so it's worth checking ahead of time or converting scattered content to standard geometry as a safer default.
Q: Which renderer should I use for interior work on 3ds Max, Corona or V-Ray? A: Both are ready on every 3ds Max node with the license included in the per-compute rate, so the choice comes down to your own workflow and the look you're going for rather than farm availability. Corona is currently supported at versions 15 and 14; V-Ray at versions 7 and 6.
Q: Why does an interior room take longer to render than an exterior shot with more geometry? A: Enclosed spaces trap light, so global illumination has to resolve many more bounces off walls, fabrics, and glossy surfaces before the image converges, compared with an exterior scene where a sky dome does more of the lighting work in fewer bounces. Render time tracks light complexity more than raw polygon count.
Q: How long do my render outputs stay available after a job finishes? A: Your files stay available for download for as long as you need them. There's no fixed automatic deletion period, and deletion happens on request rather than on an automatic countdown, though it's still good practice to download promptly, especially close to a client deadline.
Q: What file format issue most often causes a failed first job on our farm? A: Uploading the project as an archive. Zipping is the usual habit for sending files, but the farm does not extract archives (.zip, .rar, .7z, .tar, .tar.gz), so the job can't find the scene. Upload the collected folder unpacked.
Q: Is there a discount for topping up a larger credit balance? A: Yes. Automatic volume discounts apply to larger top-ups, up to 30% at the higher amounts, on top of the $25 signup credit that applies to any new account.
About Thierry Marc
3D Rendering Expert with over 10 years of experience in the industry. Specialized in Maya, Arnold, and high-end technical workflows for film and advertising.