Iniziare con un render farm per 3ds Max: guida per principianti passo dopo passo
Panoramica
Introduzione
Hai passato ore a costruire una scena in 3ds Max — l'illuminazione è impostata, i materiali sembrano giusti, e sei pronto a renderizzare. Poi la realtà ti colpisce: un singolo frame richiede 20 minuti, hai 300 frame nella tua animazione e la scadenza è domani. Questo è il momento esatto in cui la maggior parte degli artisti 3D inizia a cercare render farm.
Un render farm è una rete di computer ad alte prestazioni che renderizza i tuoi frame in parallelo. Invece di elaborare il frame 1, poi il 2, poi il 3 sulla tua singola workstation, un render farm elabora decine di frame contemporaneamente su macchine separate. Ciò che richiederebbe quattro giorni al tuo computer da scrivania si completa in poche ore.
In Super Renders Farm, aiutiamo gli artisti di 3ds Max a consegnare i progetti nei tempi previsti dal 2010. Siamo un servizio completamente gestito, il che significa che non devi installare software sulle macchine di render, configurare desktop remoti o risolvere problemi di licenza. Carichi il tuo file di scena e noi ci occupiamo del resto. Questa guida ti accompagna in ogni fase — dalla preparazione della scena al download dei render finali.
Se vuoi capire come funzionano i render farm a livello tecnico, la nostra guida completa su come funzionano i render farm copre in dettaglio il lato infrastrutturale.
Cosa ti serve prima di iniziare
Prima di caricare qualsiasi cosa, prenditi cinque minuti per verificare questi elementi. Preparare correttamente la scena è il fattore più importante per determinare se il tuo render avrà successo al primo tentativo. La maggior parte dei fallimenti di render che vediamo non sono problemi hardware o software — sono file mancanti.
Checklist del file di scena:
| Elemento | Perché è importante |
|---|---|
| File di scena 3ds Max (.max) | Il tuo file di progetto — salvato in una versione compatibile di 3ds Max |
| Tutte le texture e le map | Le texture mancanti vengono renderizzate in nero o magenta. Usa File > Archive per raccoglierle |
| Riferimenti esterni (XRefs) | Qualsiasi scena o oggetto XRef deve essere incluso nel caricamento |
| File proxy | Se usi Forest Pack, RailClone o oggetti VRayProxy, includi i file di geometria proxy |
| Impostazioni di render configurate | Imposta la risoluzione target, l'intervallo di frame e il motore di render prima di caricare |
| Lista plugin | Annota quali plugin usa la tua scena — Super Renders Farm li supporta, ma conoscere le dipendenze aiuta nella risoluzione dei problemi |
Un consiglio rapido che condividiamo con ogni nuovo utente: esegui File > Archive in 3ds Max prima di caricare. Questo raggruppa il tuo file di scena con tutte le texture e gli asset referenziati in un unico ZIP. È il modo più affidabile per garantire che nulla venga lasciato indietro.
Passo 1: Crea il tuo account Super Renders Farm
Vai su superrendersfarm.com e registrati. Il processo richiede circa due minuti — nome, email, password. Una volta registrato, arrivi nel pannello di controllo dove gestisci tutti i tuoi lavori di render.
I nuovi account ricevono crediti di prova gratuiti per testare il servizio con una scena reale prima di impegnare qualsiasi budget. Ti consigliamo di utilizzare la prova su una scena rappresentativa — qualcosa con lo stesso motore di render, gli stessi plugin e la stessa complessità del tuo lavoro di produzione reale. In questo modo saprai esattamente cosa aspettarti quando conta.
Per i dettagli sui prezzi, consulta la nostra pagina prezzi — i costi sono calcolati per GHz-ora per il rendering CPU e per OBh per il rendering GPU.
Passo 2: Preparare la tua scena 3ds Max
La preparazione della scena è il passaggio in cui risparmi tempo ed eviti render falliti. Ecco cosa fare in 3ds Max prima di caricare:
Controlla i percorsi dei file. Apri la finestra di dialogo Asset Tracking (Shift+T) e cerca percorsi contrassegnati come "Missing" o "Found (not in project folder)". Ogni asset deve essere localizzabile. Se vedi percorsi interrotti, ricollegali ora.
Raccogli i tuoi asset. Usa File > Archive per creare uno ZIP che raggruppa il tuo file .max con tutte le texture dipendenti, luci IES, mappe HDRI e file proxy. In alternativa, usa File > Save As > Archive per comprimere tutto in un unico pacchetto.
Imposta l'output di render. Vai in Render Setup > Common tab e conferma:
- Output size — imposta la risoluzione finale (es.: 1920x1080, 3840x2160)
- Frame range — frame singolo, segmento di tempo attivo, o intervallo personalizzato
- Motore di render — assicurati che sia selezionato il motore corretto (V-Ray, Corona, Arnold o ART)
- Output path — imposta un nome file e un formato per i frame renderizzati (EXR, PNG o TIFF sono scelte comuni)
Salva il tuo file di scena. Salva come file .max standard. Se la tua versione di 3ds Max è molto recente, considera il salvataggio in un formato compatibile con versioni precedenti se richiesto.
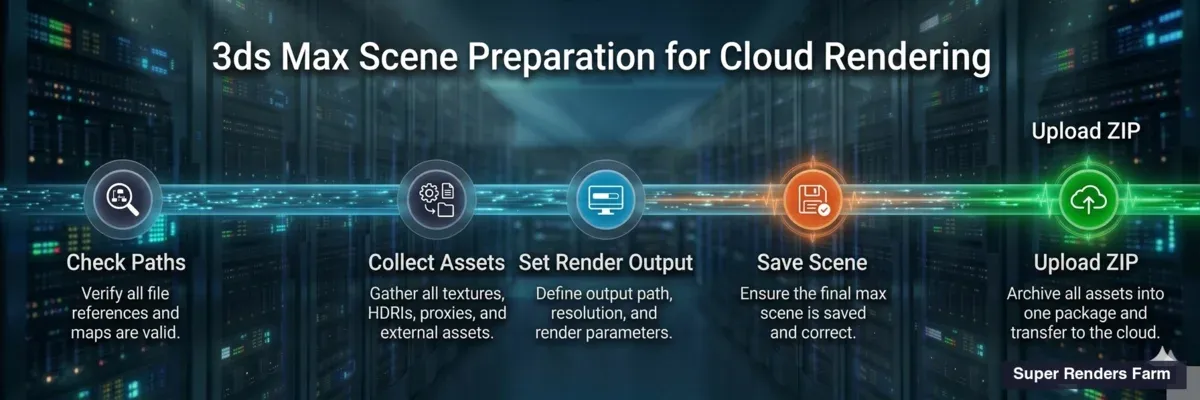
Pipeline di preparazione della scena 3ds Max — cinque passaggi dal tracciamento degli asset al caricamento
Passo 3: Carica la tua scena
Qui è dove Super Renders Farm si distingue dalla maggior parte dei servizi. Non devi installare nessun plugin dentro 3ds Max. Non c'è nessuna applicazione desktop da configurare né connessione al desktop remoto da gestire. Carichi direttamente tramite il pannello di controllo web.
Come funziona:
- Accedi al pannello di controllo SuperRenders
- Fai clic sul pulsante di caricamento
- Trascina e rilascia il tuo file ZIP archiviato (o sfoglia per selezionarlo)
- Il caricamento inizia — i file grandi vengono gestiti con upload riprendibili, quindi una breve interruzione della connessione internet non ti obbligherà a ricominciare da capo
Il nostro sistema rileva automaticamente la versione di 3ds Max, identifica quale motore di render utilizza la scena e installa tutti i plugin necessari sui nodi di render. Forest Pack, RailClone, Tyflow, Phoenix FD — vengono tutti installati automaticamente dalla nostra parte. Non devi preoccuparti della compatibilità dei plugin o della corrispondenza delle versioni.
Questo approccio completamente gestito significa che l'intero flusso di lavoro è: carica, renderizza, scarica. Nessuna configurazione del server, nessuna gestione delle licenze, nessuna sessione RDP.
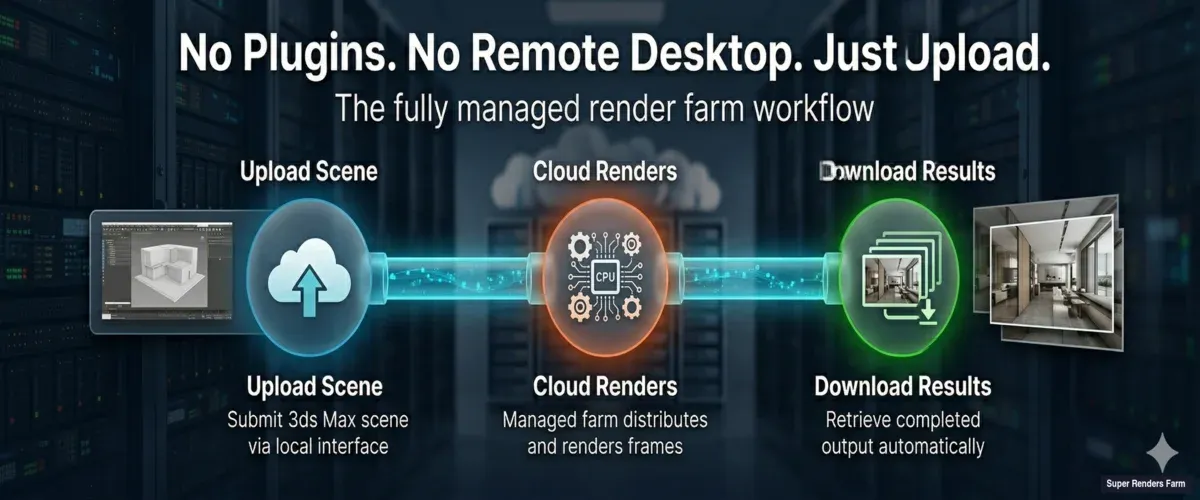
Flusso di lavoro del render farm completamente gestito — carica la scena, renderizza nel cloud, scarica i risultati
Passo 4: Configurare le impostazioni di render
Dopo che la scena è stata caricata, il pannello di controllo presenta le opzioni di configurazione del render. La maggior parte delle impostazioni viene rilevata automaticamente dal tuo file di scena, ma puoi regolarle qui:
Selezione del motore di render. SuperRenders conferma quale motore utilizza la tua scena. Per 3ds Max, supportiamo:
- V-Ray — la scelta più popolare tra i nostri utenti di 3ds Max, che copre sia il rendering CPU che GPU. Se stai usando V-Ray 7, consulta la nostra guida alle funzionalità di V-Ray 7 per le novità
- Corona Renderer — ampiamente utilizzato nella visualizzazione architettonica per la facilità di configurazione e l'output realistico
- Arnold (MAXtoA) — il renderer nativo di Autodesk, incluso nelle sottoscrizioni di 3ds Max
- ART (Autodesk Ray Tracer) — un'opzione leggera integrata in 3ds Max
Come partner ufficiale Chaos, il licenziamento di V-Ray e Corona è incluso nel costo di rendering — non paghi extra per le licenze del motore di render.
Intervallo di frame. Conferma quali frame renderizzare. Per le animazioni, imposta i frame di inizio e fine. Per le immagini statiche, un singolo frame è sufficiente — ma considera il rendering a risoluzione più alta o con più passate per la qualità di produzione.
Priorità e allocazione delle macchine. Scegli quante macchine allocare al tuo lavoro. Più macchine significa completamento più veloce ma costo proporzionalmente più elevato. Per un primo test, inizia con un'allocazione moderata per vedere come si comporta la tua scena.
Passo 5: Invia e monitora il tuo render
Una volta confermate le impostazioni, premi invia. Il tuo file di scena viene distribuito sui nodi di render, vengono installati i plugin e i frame iniziano a essere elaborati.
Monitoraggio in tempo reale. Il pannello di controllo mostra il progresso in diretta:
- Quali frame sono attualmente in fase di rendering
- Tempo stimato rimanente per frame
- Eventuali errori o avvertimenti (come una texture mancante non rilevata nella preparazione)
- Tempo totale trascorso e costo in corso
Notifiche. Ricevi notifiche via email quando il tuo lavoro è completato (o se incontra un errore che richiede attenzione). Non devi stare a guardare la barra di avanzamento — avvia il render, chiudi il laptop e torna a trovare i frame completati.
Se un frame fallisce, il nostro sistema segnala l'errore specifico. Le cause comuni includono la mancanza di memoria su scene complesse o un asset mancante. Il registro degli errori ti dice esattamente cosa è successo così puoi correggere la scena e inviare nuovamente solo i frame falliti, non l'intero lavoro.
Passo 6: Scarica i tuoi risultati
Quando il rendering è completato, i tuoi frame di output sono disponibili per il download direttamente dal pannello di controllo. Puoi:
- Scaricare tutti i frame come archivio ZIP
- Scaricare frame singoli per verificare la qualità prima di scaricare l'intero set
- Visualizzare anteprime miniature nel pannello di controllo per verificare visivamente l'output prima di scaricare
I file renderizzati vengono memorizzati sui nostri server per un periodo di conservazione, quindi non devi scaricare tutto immediatamente. Ma ti consigliamo di scaricare prontamente e tenere i tuoi backup personali — i dati di render completati sono il tuo materiale da consegnare.
Motori di render supportati per 3ds Max
Ecco uno sguardo dettagliato a ciò che supportiamo per 3ds Max. Come nota generale, il rendering CPU rappresenta la maggior parte dei lavori di render che elaboriamo — se stai usando V-Ray (modalità CPU), Corona o Arnold, stai lavorando con la nostra infrastruttura centrale di oltre 20.000 core CPU.
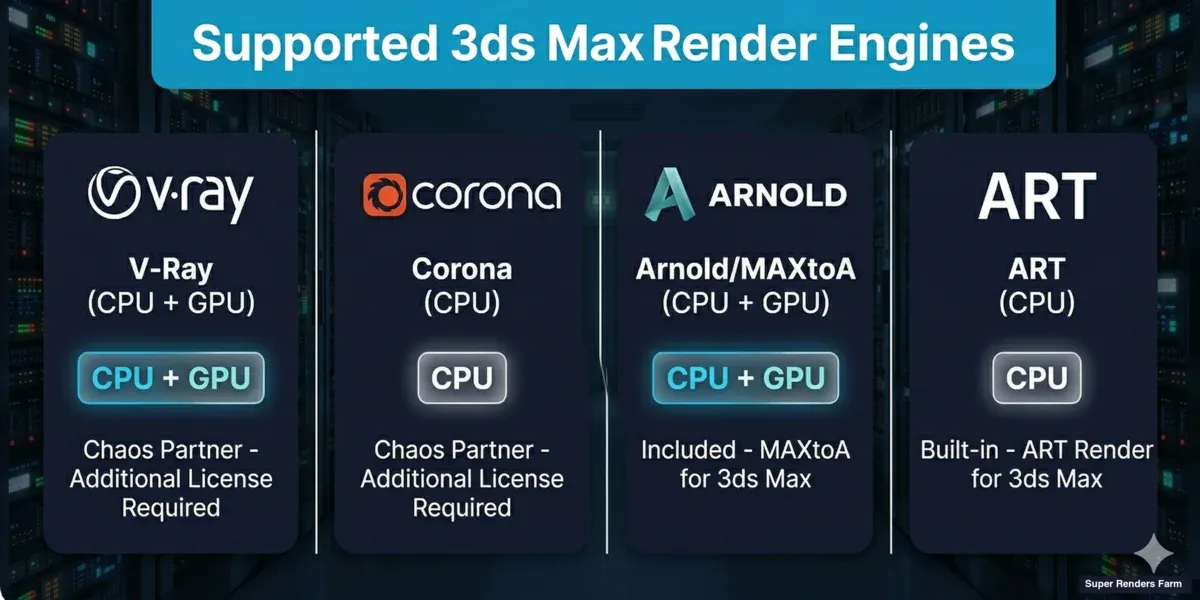
Motori di render supportati per 3ds Max — V-Ray, Corona, Arnold e ART con opzioni di rendering CPU e GPU
| Motore | Tipo | Licenza | Note |
|---|---|---|---|
| V-Ray | CPU & GPU | Inclusa (partner ufficiale Chaos) | Il più popolare tra i nostri utenti di 3ds Max. Supporta V-Ray 5, 6 e 7 |
| Corona Renderer | CPU | Inclusa (partner ufficiale Chaos) | Eccellente per l'archviz. Corona 10, 11, 12 supportato |
| Arnold (MAXtoA) | CPU & GPU | Incluso con la sottoscrizione 3ds Max | Il renderer di Autodesk. Buono per VFX e lavoro sui personaggi |
| ART | CPU | Integrato in 3ds Max | Leggero, nessun licenziamento aggiuntivo |
Per il rendering GPU, la nostra flotta utilizza NVIDIA RTX 5090 con 32 GB di VRAM ciascuna — spazio sufficiente per scene complesse con geometria pesante e texture ad alta risoluzione.
Plugin supportati — installati automaticamente per te
Una delle preoccupazioni più comuni che sentiamo dai nuovi utenti: «I miei plugin funzioneranno sul vostro farm?» La risposta è sì — e non devi fare nulla per farli funzionare. Installiamo e configuriamo i plugin sui nodi di render automaticamente.
| Plugin | Cosa fa | Note |
|---|---|---|
| Forest Pack | Distribuzione di vegetazione, oggetti e array parametrici | Includi i file proxy nel caricamento. Vedi la nostra guida Forest Pack e RailClone |
| RailClone | Modellazione parametrica per l'architettura (recinzioni, ringhiere, muri) | Come Forest Pack — includi la geometria proxy |
| Tyflow | Simulazione di particelle e dinamica | Pre-memorizza nella cache le simulazioni prima di caricare |
| Phoenix FD | Simulazione di fluidi (fuoco, fumo, acqua) | I file di cache devono essere inclusi nel pacchetto di caricamento |
Se la tua scena usa un plugin non elencato qui, contatta il nostro team di supporto prima di caricare. Aggiungiamo regolarmente nuovi plugin in base alla domanda degli utenti.
Per un'analisi più approfondita di come Forest Pack e RailClone interagiscono con l'infrastruttura del render farm, leggi la nostra guida completa al render farm per Forest Pack e RailClone.
Problemi comuni al primo render e soluzioni rapide
Dopo anni di esperienza con artisti di 3ds Max, abbiamo compilato i problemi che si verificano più spesso ai primi render. Nessuno di questi è difficile da risolvere — basta sapere cosa controllare.
| Problema | Causa | Soluzione |
|---|---|---|
| Le texture vengono renderizzate in nero o magenta | File di texture mancanti — i percorsi puntano alla tua unità locale | Usa File > Archive per raccogliere tutti gli asset, o ricollega i percorsi in Asset Tracking (Shift+T) |
| L'output di render è vuoto (tutto nero) | Camera non impostata, o luci mancanti/disabilitate | Verifica la camera attiva e controlla che le luci non siano nascoste o disabilitate |
| I frame falliscono con "out of memory" | La scena supera la RAM disponibile sui nodi di render | Riduci il conteggio dei poligoni, ottimizza le impostazioni proxy o abbassa la risoluzione delle texture. Contatta il supporto per l'allocazione di nodi con più RAM |
| Sfarfallio GI nell'animazione | Irradiance Map calcolata per frame invece di usare il preset animazione | Passa a Brute Force GI, o usa la Irradiance Map in modalità animazione (salva su file, poi renderizza da file) |
| Il render sembra diverso da quello locale | Incompatibilità gamma/gestione del colore | Assicurati che le impostazioni di gestione del colore del tuo 3ds Max corrispondano a quelle che usi localmente — controlla Rendering > Gamma/LUT Setup o Color Management nelle versioni più recenti |
| Oggetti Forest Pack mancanti | File proxy non inclusi nel caricamento | Includi tutti i file proxy .vrmesh, .abc o .rs referenziati dalle librerie Forest Pack |
| Motore di render imprevisto utilizzato | Scena salvata con un motore diverso selezionato | Apri Render Setup e conferma che il motore corretto sia assegnato prima di archiviare |
Consigli per il tuo primo render
Inizia in piccolo. Renderizza prima un singolo frame o un breve intervallo di frame. Questo verifica che la tua scena, le texture e i plugin funzionino correttamente sul farm prima di impegnarti in un render di animazione completo.
Usa una risoluzione di test. Per il tuo primo test, considera il rendering a metà risoluzione. Questo riduce significativamente i tempi di render (e il costo) permettendoti comunque di verificare che tutto sembri corretto.
Controlla le unità della scena. Unità non corrispondenti tra la scena e gli asset referenziati possono far sì che la geometria appaia alla scala sbagliata. Verifica le unità in Customize > Units Setup.
Mantieni le impostazioni di render locali. Prima di caricare, esegui un render locale veloce di un frame per stabilire una baseline visiva. Confronta l'output del farm con il tuo render locale — dovrebbero corrispondere. Se non corrispondono, la causa più comune è una differenza di gamma o gestione del colore.
Per un confronto più ampio delle opzioni di render farm per 3ds Max, incluso cosa cercare quando si valutano i servizi, consulta la nostra guida ai migliori render farm per 3ds Max nel 2026.
FAQ
Q: Devo installare software o plugin per usare Super Renders Farm con 3ds Max? A: No. Super Renders Farm è un servizio completamente gestito — carichi la tua scena tramite il pannello di controllo web. Gestiamo automaticamente tutta l'installazione del software, la configurazione dei plugin e il licenziamento sui nodi di render. Non c'è nessun plugin desktop da installare dentro 3ds Max.
Q: Quali versioni di 3ds Max sono supportate? A: Supportiamo le versioni attuali e recenti di 3ds Max, tra cui 3ds Max 2024, 2025, 2026 e 2027. Se stai lavorando con una versione più vecchia, contatta il nostro team di supporto — spesso possiamo supportare versioni legacy su richiesta.
Q: Quanto costa renderizzare una scena di 3ds Max su un render farm? A: Il costo dipende dalla complessità della scena, dal motore di render, dalla risoluzione e dal numero di frame. Il rendering CPU viene addebitato per GHz-ora e il rendering GPU per OBh. Puoi stimare i costi usando il calcolatore nella nostra pagina prezzi. I nuovi account includono crediti di prova gratuiti per testare con una scena reale.
Q: Cosa succede se un frame fallisce durante il rendering? A: I frame falliti vengono segnalati nel pannello di controllo con un messaggio di errore specifico. Puoi correggere il problema nella tua scena e inviare nuovamente solo i frame falliti — non devi ri-renderizzare l'intero lavoro. Le cause comuni sono texture mancanti, errori di memoria insufficiente o versioni di plugin non supportate.
Q: Posso renderizzare sia immagini statiche che animazioni? A: Sì. Per le immagini statiche, invia un lavoro a frame singolo. Per le animazioni, imposta l'intervallo di frame e il farm distribuisce i frame su più macchine in parallelo. Un'animazione di 300 frame che richiederebbe giorni su una singola workstation può essere completata in poche ore.
Q: Devo fornire la mia licenza V-Ray o Corona? A: No. Come partner ufficiale Chaos, Super Renders Farm include il licenziamento di V-Ray e Corona nel costo di rendering. Il licenziamento di Arnold è incluso nella tua sottoscrizione 3ds Max e funziona anche sul farm. Non paghi extra per le licenze del motore di render.
Q: Per quanto tempo vengono conservati i miei file renderizzati dopo il completamento del lavoro? A: L'output renderizzato viene conservato sui nostri server per un periodo di conservazione dopo il completamento del lavoro. Ti consigliamo di scaricare i risultati prontamente e tenere backup locali. Se hai bisogno di conservazione estesa, contatta il supporto.
Q: Il mio file di scena e i dati del progetto sono al sicuro? A: Sì. I tuoi file vengono trasferiti tramite connessioni crittografate e conservati su infrastruttura sicura. Non condividiamo, distribuiamo o accediamo al contenuto della tua scena oltre ciò che è necessario per elaborare il tuo lavoro di render. Per i clienti con requisiti di riservatezza rigorosi, offriamo accordi NDA — consulta la nostra pagina NDA per i dettagli.
About Alice Harper
Blender and V-Ray specialist. Passionate about optimizing render workflows, sharing tips, and educating the 3D community to achieve photorealistic results faster.