Headless Rendering and Unattended Render Farm Workflows: What You Can Automate in 2026
Overview
Introduction
The goal of an automated render pipeline is easiest to describe by what nobody wants to do: sit at a workstation at 2 a.m. babysitting a frame queue. A technical director queues a 500-frame sequence before leaving for the night and wants the finished frames on local storage in the morning. That wish has two halves that are easy to conflate: headless rendering and unattended workflows.
Headless rendering means driving a render from the command line with no graphical interface open. Unattended means the loop (get the scene to the farm, render it, bring the output back) runs without a person watching it. You can have one without the other. This guide separates them, then walks through how much of an unattended loop you can build around a fully managed cloud render farm today.
We've been running distributed rendering since 2010, and many of the pipeline questions we field assume a public submission API. Our farm does not have one, and we'll be precise about that, because a workflow built on a feature that doesn't exist breaks on its first overnight run. What does exist covers more than people expect: the prep work sits on your side of the connection, and the upload can be scripted with the AWS CLI through S3 access to your SRF Space.
What headless rendering actually means
Headless rendering is a property of a single render invocation: the renderer runs without opening the application's user interface. Every major 3D and compositing application ships a command-line entry point for this, and every render farm node uses it, because there is no monitor attached to a machine in a rack.
Here are the canonical forms for the applications we support. They run on your machine for local prep and validation; on a managed farm, the farm invokes the equivalent on its nodes for you.
| Application | Command-line tool | Canonical invocation | Notes |
|---|---|---|---|
| Blender | blender -b | blender -b scene.blend -E CYCLES -o //out/fr_ -s 1 -e 250 -a | -b = background, no GUI; -a renders the range, -f N a single frame. -E picks the engine; our farm renders both Cycles and EEVEE. |
| Maya | Render | Render -r arnold -s 1 -e 100 -rd /out/ -of exr scene.ma | -r selects the renderer (arnold, vray, etc.); pass -cam so the intended camera renders. |
| 3ds Max | 3dsmaxcmd.exe | 3dsmaxcmd.exe -frames:1-100 -outputName:"D:\out\fr_.exr" scene.max | Colon key:value syntax; add -showRFW:0 for a silent run. |
| Cinema 4D | Commandline.exe | Commandline.exe -render scene.c4d -frame 1 100 -oimage D:\out\fr_ | -frame takes space-separated start and end; frame numbers are appended to the -oimage name. |
| Houdini | hbatch / husk | husk --engine cpu --frame 1 --frame-count 100 -o '/out/fr_$F4.exr' scene.usd | hbatch drives HIP-file ROPs; husk renders USD stages with Karma (--engine picks CPU or XPU). $F4 pads the frame number. |
| After Effects | aerender | aerender -project x.aep -comp "Main" -s 1 -e 100 -OMtemplate "EXR Sequence" -output /out/fr_[####].exr | -comp must match the composition name exactly; -OMtemplate names a saved output-module template (the name here is an example); [####] numbers the sequence. |
| NukeX | nuke -x | nuke -x -F 1-100 script.nk | -x executes the script headlessly (it does not mean NukeX); -F takes 1-100 or stepped 1-100x2. Check that your licence edition allows command-line rendering. |
The vendor references document the exact flags per version and are worth bookmarking: Blender's command-line rendering manual and SideFX's husk reference are the two we point people to most.
Headless and unattended are two different problems
It helps to hold the distinction firmly. Headless describes how a render is launched: without a GUI. Unattended describes whether a person has to be present across the whole workflow. They overlap, but they are not the same axis.
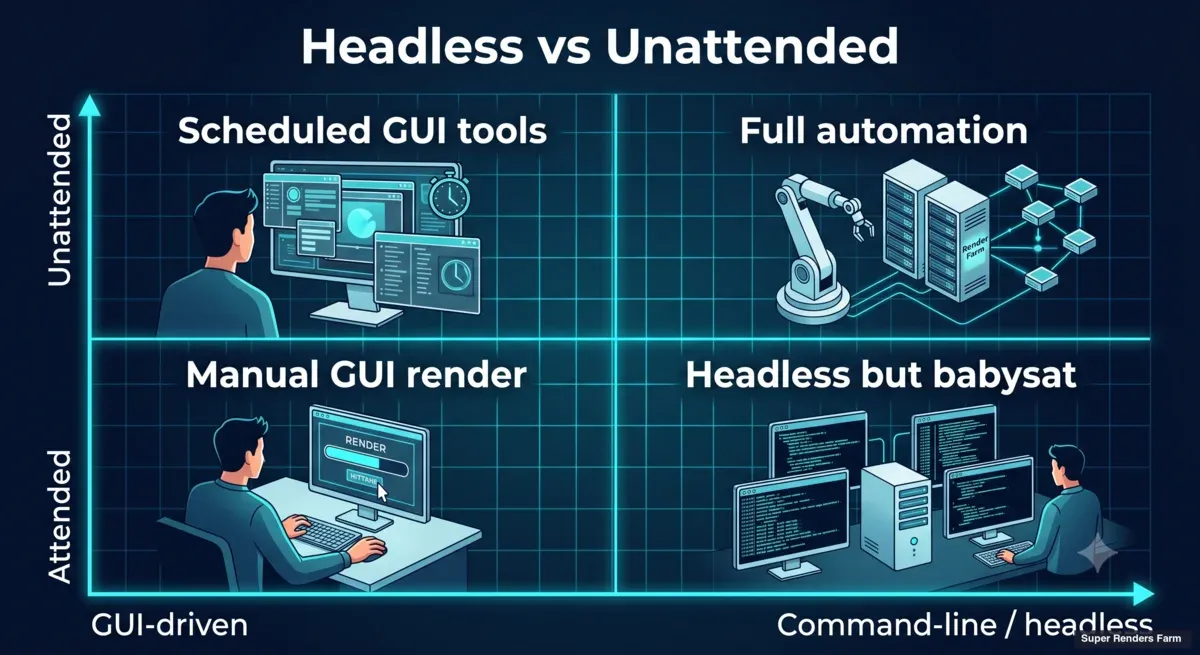 Quadrant comparing headless versus unattended rendering by interface type and human involvement
Headless (how a render is launched) and unattended (whether a person is present) are independent axes; automation aims for the top-right corner; the rest of this guide covers how close a managed-farm workflow gets today.
Quadrant comparing headless versus unattended rendering by interface type and human involvement
Headless (how a render is launched) and unattended (whether a person is present) are independent axes; automation aims for the top-right corner; the rest of this guide covers how close a managed-farm workflow gets today.
A render can be headless and still attended: you run nuke -x in a terminal and watch frames tick by, ready to kill it if frame 12 throws an error. A workflow can also use GUI tools and still be mostly unattended, if the slow parts run in the background. The objective of pipeline automation is the unattended half.
On a render farm the picture changes, because the farm already owns the part of the problem headless rendering was invented for: launching renders on machines with no screen attached.
Why a managed farm changes the headless question
There are two broad shapes of cloud rendering. In the infrastructure-rental model you rent machines and you are the render wrangler. In the fully managed model, the farm runs the machines and you hand it scenes. The word "headless" means something different in each.
| Responsibility | Infrastructure rental (self-managed) | Fully managed farm |
|---|---|---|
| Provision the machines | You, node by node | The farm |
| Install the DCC and plugins per node | You, on every node | The farm |
| Manage render-engine licences | You: license servers, checkout | The farm (included in the rate) |
| Launch the headless render per node | You: script Render, blender -b, etc. across nodes | The farm |
| Distribute frames and retry failures | You: orchestration is your code | The farm |
| Prepare, upload, submit, collect output | You | You: files through the web, the Client App or S3 access; jobs through the web dashboard, the Client App or a DCC plugin |
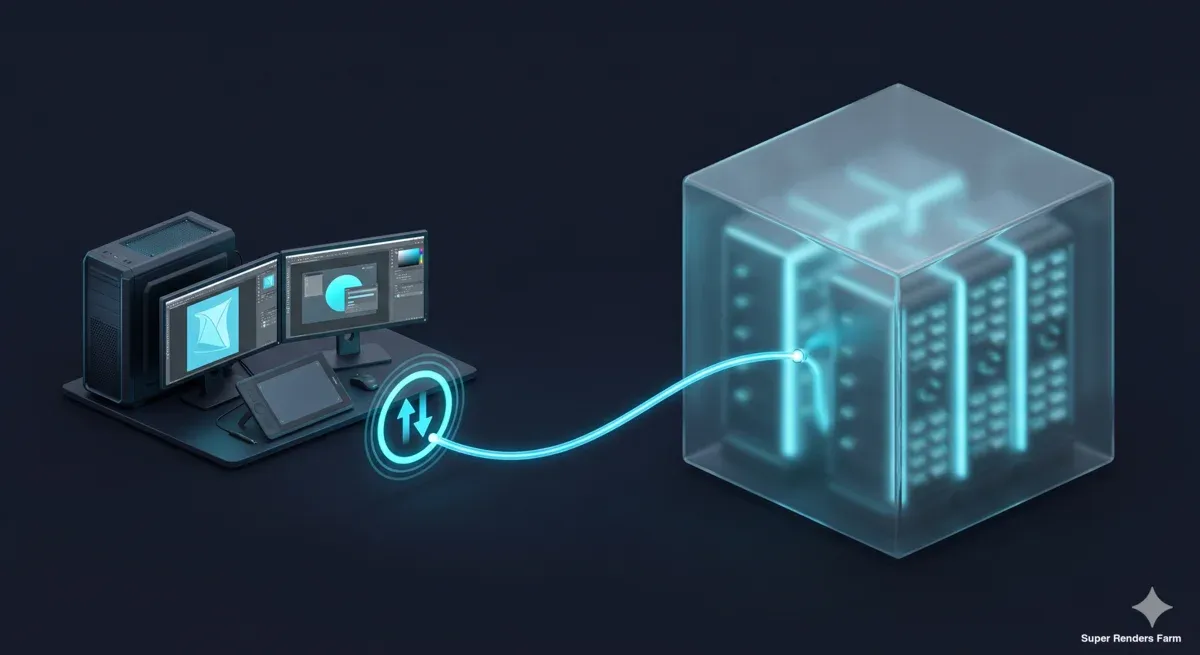 A studio workstation connected to a managed cloud render farm that runs the render nodes on the farm side
On a managed farm the nodes are the farm's problem; the studio side handles getting a clean project in and the frames back out.
A studio workstation connected to a managed cloud render farm that runs the render nodes on the farm side
On a managed farm the nodes are the farm's problem; the studio side handles getting a clean project in and the frames back out.
In the self-managed model, "headless" means node orchestration, and the automation you write is the entire render-management layer. On a fully managed farm that layer is off your plate: our CPU side runs engines like V-Ray, Corona and Arnold across more than 20,000 CPU cores, and a GPU side runs NVIDIA RTX 5090 cards (32 GB VRAM) for Redshift, Octane and V-Ray GPU, all orchestrated internally. So you don't drive the nodes at all. What's left is the loop around the farm, and most of it runs on your own machines.
If end-to-end scripted submission is a hard requirement today, renting machines and running your own automation is the honest fit: a rented machine, including our dedicated render servers, comes with the DCC stack installed, and you run your own automation and transfer tools on it.
The loop on a managed farm, stage by stage
Here is the full loop, with an honest label on each stage.
 Six-stage render loop: prep, package, upload scriptable; submit manual; render on the farm; retrieve scriptable
The loop on a managed farm: prep, package and upload can be scripted (upload via S3 access), submission stays manual, the farm renders, and retrieval can be scripted again.
Six-stage render loop: prep, package, upload scriptable; submit manual; render on the farm; retrieve scriptable
The loop on a managed farm: prep, package and upload can be scripted (upload via S3 access), submission stays manual, the farm renders, and retrieval can be scripted again.
1. Headless prep and pre-flight (yours, fully scriptable). Render one test frame locally in headless mode (blender -b scene.blend -f 1, nuke -x -F 1 script.nk); if frame 1 fails locally, it fails on every frame of a farm job. Then check every external reference: Blender's Report Missing Files, 3ds Max Asset Tracking, Maya's File Path Editor, Houdini's hou.fileReferences(). Paths relative to the scene file (// in Blender, $HIP/ in Houdini, a Maya project's sourceimages/) survive the trip to any node. If a project depends on absolute paths (some scatter, crowd and cache plugins store them internally), the Client App's Auto keep local path option recreates your local folder layout in cloud storage so those paths still resolve.
2. Package the project (yours, fully scriptable). Collect the scene and its dependencies into one project folder and keep it unpacked. The farm does not extract archives (.zip, .rar, .7z, .tar, .tar.gz), so nothing inside an archive gets rendered. 3ds Max users can follow our walkthrough on packaging a 3ds Max file for the farm.
3. Upload (scriptable with S3 access). There are three ways in. Web upload has no hard size cap, but a single browser upload gets slow above roughly 2 GB and unreliable above roughly 5 GB on residential connections, and it stops if the tab closes. The SuperRenders Client App uploads in parallel chunks, resumes from the last completed chunk after a dropped connection, and on Windows a background service keeps transferring after you close the main window. S3 access (Cloud Direct Connect in your account) is the scriptable one: generate an access key there, and the AWS CLI or Cyberduck (protocol: Amazon S3) moves files to and from your SRF Space, so an upload can run from a scheduled job with nobody at the desk.
4. Scene Analysis and submission (manual). Once files are uploaded, Scene Analysis checks that the project will render before any credits are charged. You then start the job from the web dashboard, the Client App (Start Render Job: frame range, output format, Normal or Express priority), or the submission plugin inside 3ds Max, Maya or Cinema 4D, which runs a pre-submit asset check and packages the open scene. S3 access moves files only: there is no public API, SDK or command-line submitter to call from a build script. If your pipeline assumed one, this is the line to design around.
5. Render and monitor (the farm's job; you watch). Follow progress in the Client App's Render Jobs panel or the web dashboard; the Client App can notify you on submit, completion, milestones and errors. It is a human-facing view, not a status feed a script can poll.
6. Retrieve (hands-off with the Client App). By default the Client App downloads each frame as soon as it finishes rendering, into a default folder or a per-job folder you set at submit time, so the frames are already on disk when the job completes. If the download path disappears mid-job (an unplugged external drive is a common cause), point it at a writable folder and use Sync output. Web download works too. Files stay available for download with no fixed automatic deletion period and are deleted on request; still, treat the farm as a render service, not your archive.
Steps 1 to 3, and everything after step 6, are where your scripts go.
Automating the studio side: pre-flight, packaging and upload
Most failed overnight runs trace back to inputs, so the highest-value automation is a gate that runs before the upload starts: confirm a scene file is present, flag archives and junk files, and write a checksum manifest. Our companion guide to automating the studio side of render farm uploads walks through a dependency-free Python script that does exactly this.
Pair it with a DCC-side check that runs headlessly. For Blender, a few lines of bpy report every external path that is absolute or missing, and --python-exit-code turns a failure into a non-zero exit your wrapper script can act on:
# check_paths.py
# run: blender -b scene.blend --python-exit-code 2 --python check_paths.py
import os
import bpy

absolute = [p for p in bpy.utils.blend_paths(absolute=False) if not p.startswith("//")]
missing = [p for p in bpy.utils.blend_paths(absolute=True) if not os.path.exists(p)]
for p in absolute:
    print("ABSOLUTE:", p)
for p in missing:
    print("MISSING:", p)
if absolute or missing:
    raise RuntimeError(f"{len(absolute)} absolute, {len(missing)} missing paths")
The same pattern works elsewhere: hou.fileReferences() in hython, filePathEditor queries in mayapy, a MAXScript pass over asset tracking in 3ds Max. Chain the DCC check and the folder check in one shell script and you have a gate that passes a project as ready or says exactly why not.
Once the gate passes, the same script can start the upload. Run aws configure once with the Access Key ID and Secret Access Key from Cloud Direct Connect and the region ap-southeast-1, then have the script copy the unpacked project folder to your Remote Directory with aws s3 cp and --recursive. Upload only when the gate exits cleanly, so a broken project never leaves your network. The same companion guide covers the scripting detail.
Automating the return trip: watching the download folder
With the Client App's auto-download doing the transfer, frames arrive in a local folder you chose at submit time. From there it is ordinary local automation: watch the folder until the expected frame range is present and each file's size has stopped changing, then trigger your encode, review upload or archive copy. The companion guide includes a watcher script for exactly this step.
If your job writes several passes per frame, count one pass name so each frame is counted once. The "sizes settled" check matters too: a frame still being written has the right name before it has the right bytes.
Scheduling what you can schedule
The overnight run on a managed farm is local jobs and a scripted upload wrapped in schedulers, with one manual step in the middle.
- Before the handoff: on a timer, with
cron(macOS, Linux) or Task Scheduler (Windows), run the pre-flight gate over a "ready to submit" folder and upload each project that passes to your SRF Space with the AWS CLI. - The handoff: a person submits the uploaded project. It takes a minute, and it is the one step you cannot script today.
- After the handoff: keep the Client App running (on Windows, enable Run on Windows startup so its background service survives a reboot) and start the watcher on that job's download folder.
# minute hour day month weekday  command
0 1 * * 1-5 /studio/bin/preflight-and-upload.sh >> "$HOME/render-preflight.log" 2>&1
Here preflight-and-upload.sh is your own wrapper: it runs the gate and calls aws s3 cp only for projects that pass. The 2>&1 redirect is not optional in unattended work. It captures errors in the log, and without it a failed check or a failed upload fails silently while nobody is watching.
What you can and can't automate today
Stated plainly, so you can build on it: Super Renders Farm does not currently publish a public REST API, an SDK, or a command-line job-submission tool. There is no status endpoint to poll and no webhook that calls back when a render finishes. We do not offer SFTP or FTP, on the managed farm or for rented machines; an earlier version of this article described a scriptable SFTP path that does not exist.
The scriptable transfer path is S3 access: an access key from Cloud Direct Connect, used with the AWS CLI or Cyberduck to move files to and from your SRF Space.
| Stage | Automatable today? | How |
|---|---|---|
| Local test render and path checks | Yes | Headless DCC runs on your machine (blender -b, hython, mayapy, nuke -x) |
| Packaging and checksum manifest | Yes | Local scripts; project folder stays unpacked |
| Upload | Yes, with S3 access | AWS CLI from a script or scheduled job; Client App (resumable, background service) and web upload for manual starts |
| Scene Analysis and submission | No, manual | Web dashboard, Client App, or plugin for 3ds Max, Maya and Cinema 4D |
| Progress | Watched, not polled | Client App Render Jobs panel, web dashboard, Client App notifications |
| Download | Yes, hands-off | Client App auto-download to a per-job folder |
| Post-render steps | Yes | Local watcher on the download folder, then your encode/review/archive scripts |
Programmatic submission is on our roadmap, not available today. If it is a hard requirement for your pipeline, tell our support team what you would call and when; that input shapes the roadmap.
If you're weighing this against running your own nodes, see our write-ups on the fully managed model and the managed versus do-it-yourself tradeoff. The getting-started walkthrough covers upload, submission and download in screenshots, application notes live on our Blender and Houdini cloud render farm pages, and the pricing page explains the credit model.
Common pitfalls in unattended render workflows
These are the causes our support team sees most often.
| Symptom | Cause | Fix |
|---|---|---|
| Textures render pink or black on the farm but fine locally | Absolute asset paths (D:\...) that don't exist on a node | Use scene-relative paths (//, $HIP/, project sourceimages/), or upload with the Client App's Auto keep local path |
| Job finds no scene, or nothing renders | Project uploaded as an archive, or only a sub-folder uploaded | Upload the whole project folder unpacked, with every referenced asset in place |
| Upload was at 60% in the morning | Browser tab closed or machine slept during a web upload | Use the Client App, which resumes from the last chunk, or a logged AWS CLI upload through S3 access |
| Wrong camera in the output | No camera specified in a multi-camera scene | Set the render camera in the scene before submitting (Maya -cam for local tests) |
| Frames missing locally after the job finished | Auto-download path was an unplugged or moved drive | Point the download folder at a writable path, then use Sync output |
| Overnight script "did nothing," no error | No 2>&1 logging; a silent failure | Redirect stdout and stderr to a log; render a local test frame first |
The common thread is determinism: an unattended workflow only works if every input is pinned down before the run starts. A render that depends on something only present on your workstation works once, in front of you, and never again at 2 a.m.
FAQ
Q: What is headless rendering?
A: Headless rendering means launching a render from the command line with no graphical interface open, for example blender -b scene.blend -a or nuke -x script.nk. Every render farm node works this way, and artists use the same entry points locally to test a scene before uploading it.
Q: What is the difference between headless and unattended rendering? A: Headless is about how a single render is launched: without a GUI. Unattended is about whether a person has to be present across the whole workflow. On a managed farm the farm handles the headless part, so your automation goes into the loop around it.
Q: Can I submit jobs to Super Renders Farm from a script or an API? A: Not today. Our farm does not expose a public REST API, SDK or command-line submitter; programmatic submission is on the roadmap. Jobs are submitted from the web dashboard, the Client App, or the plugin in 3ds Max, Maya or Cinema 4D. What you can script is the preparation before, the upload through S3 access, and the processing after.
Q: Can I script file transfers to the farm?
A: Yes, through S3 access; SFTP and FTP are not offered. Generate an access key under Cloud Direct Connect in your account, then use the AWS CLI (region ap-southeast-1) or Cyberduck with the Amazon S3 protocol to move files to and from your SRF Space. Web upload and the SuperRenders Client App cover manual transfers, and finished frames come back through Client App auto-download or web download.
Q: How do I get finished renders back without sitting at my computer? A: Use the Client App's auto-download, which is on by default: each frame downloads as soon as it finishes, into a default or per-job folder. On Windows its background service keeps transferring after you close the main window, and a local watcher script on that folder can start your encode or review step.
Q: How do I render Blender from the command line to test a scene before uploading?
A: Use background mode, for example blender -b scene.blend -E CYCLES -f 1 for one test frame. The -b flag runs without the GUI and -E chooses the engine; our farm renders both Cycles and EEVEE. A small bpy script run with --python-exit-code can report absolute or missing paths in the same pass.
Q: Can I schedule unattended overnight renders?
A: You can schedule your side: a pre-flight check with cron or Task Scheduler, an AWS CLI upload of each project that passes to your SRF Space, and a watcher that processes frames as the Client App downloads them. Submission happens in the web dashboard, the Client App or a DCC plugin, so a person makes one short handoff.
Q: Do I have to manage render-engine licences for headless rendering on the farm? A: No. On a fully managed farm, render-engine licences are handled on the farm side as part of the service. On a self-managed setup you would run your own license servers and launch the headless renders on each node yourself.
About Alice Harper
Blender and V-Ray specialist. Passionate about optimizing render workflows, sharing tips, and educating the 3D community to achieve photorealistic results faster.