Redshift Render Farm for Cinema 4D: What to Look for in 2026
Overview
Introduction
Redshift changed how a lot of Cinema 4D studios think about rendering. A scene that used to take forty minutes per frame on a workstation CPU now finishes in two or three minutes on a single GPU. Multiply that across a 3,000-frame animation and the math still doesn't work with one machine — you either buy more GPUs or you send it to a render farm.
We've been running Redshift jobs on our farm since 2019
If you are planning a move to the next Cinema 4D release, our Cinema 4D 2027 cloud render farm guide covers renderer readiness and migration timing. , back when it was still a relatively niche engine in the C4D world. In 2026 it's become the default choice for a large portion of Cinema 4D studios, especially in motion design and broadcast. That shift has changed what render farms need to get right — and where they commonly get it wrong.
This article covers what we've learned operating Redshift infrastructure at scale: what hardware actually matters, how licensing works in a farm context, common scene issues that waste render time, the exact submission workflow from Cinema 4D to rendered frames, version compatibility between Cinema 4D and Redshift releases, pricing expectations, and what to look for when evaluating a cloud render farm for your C4D + Redshift pipeline. As an official Maxon partner, we've worked closely with Cinema 4D teams to optimize this workflow.
Why Redshift for Cinema 4D
Cinema 4D and Redshift have an unusually tight integration compared to most DCC + render engine combinations. Maxon's acquisition of Redshift in 2019 (and their bundling of Redshift into Cinema 4D subscriptions starting in 2022) means that for many C4D users, Redshift is effectively the "included" production renderer.
That integration matters for render farms in specific ways. Redshift respects C4D's native material system through the Redshift node editor, handles C4D's MoGraph cloners and effectors natively, and deals with Takes — C4D's render pass system — without the conversion headaches that plague some third-party engines.
The key practical advantages for C4D Redshift users on a cloud farm:
- Linear frame scaling — Multiple machines means roughly N× the throughput for animations. Each machine renders a separate frame independently.
- Access to current-generation hardware — Our GPU fleet runs NVIDIA RTX 5090 cards with 32 GB VRAM, which handles scenes that would run out of memory on older cards.
- No overnight rendering — Instead of leaving your workstation rendering for three days, offload the job and keep working on revisions.
- Deadline flexibility — Client moved the delivery up by two days? Scale up the machine count instead of compromising on quality.
Redshift's biased GPU rendering approach delivers production-quality results substantially faster than CPU-based alternatives for the kinds of scenes C4D is typically used for: procedural geometry, high shader complexity, relatively moderate polygon counts.
For a broader perspective on how Redshift stacks up against V-Ray, Arnold, Corona, and Octane in 2026, our 3D rendering software comparison covers performance, pricing, and feature differences across engines.
Cinema 4D and Redshift Version Compatibility
Cinema 4D and Redshift release cadences are independent — Maxon ships C4D version updates roughly annually, while Redshift moves on its own track with a long-term-support (LTS) branch alongside the rolling-release main line. Mixing the wrong combination on a farm node generally produces one of two outcomes: a scene that loads but renders subtly differently than locally, or a hard load failure with a "Plugin not loaded" console error.
Before submitting, check that your local Cinema 4D version and your local Redshift version map to a combination we support on the farm. If your project was authored on a newer combination than the farm currently runs, you have two options: downgrade locally before final submission, or contact support to request the matching version pair.
| Cinema 4D | Redshift | Minimum NVIDIA Driver | Notes |
|---|---|---|---|
| 2024 | 3.5.x | 535+ | Stable production combo for archviz; Hydra USD render delegate available; AI denoiser (Altus, OptiX) supported |
| 2025 | 3.6.x | 545+ | First full release with the rebuilt Take System rendering pipeline; broader USD/MaterialX interchange; recommended for new productions |
| 2025 | 3.7 LTS | 555+ | Long-term-support branch — receives critical fixes only, no feature changes; recommended when reliability matters more than new features (e.g., long animation series) |
| 2026 | 3.7 LTS | 555+ | Backwards-compatible — C4D 2026 scenes load cleanly under 3.7 LTS for most workflows; verify if scenes use 2026-only MoGraph cache features |
| 2026 | 3.7.x main | 565+ | Current rolling-release combo; Blackwell-aware kernel updates tuned for the RTX 5090 SM layout; Karma XPU compatibility for cross-DCC pipelines |
Two practical notes:
- Driver minimums are NVIDIA-published floors, not recommendations. Our farm nodes typically run drivers two to three versions newer than the floor for stability and Blackwell scheduling improvements.
- The "rolling-release main" track moves fast. A scene authored on Redshift 3.7.5 can fail to load on 3.7.4 if it uses a new shader node introduced in 3.7.5. When in doubt, render test frames on the farm before committing the full sequence.
If you're uncertain which Redshift version your local Cinema 4D installation is using, check Redshift > About Redshift from the Cinema 4D menu. Match this against the farm's currently supported pair when submitting.
GPU Hardware: What Actually Matters for Redshift
Redshift is a GPU renderer, which means the farm's GPU hardware directly determines your render speed and cost. Here's what to evaluate:
VRAM is the bottleneck, not clock speed. The single most common issue we see with Redshift jobs that fail or run slowly is VRAM overflow. When a scene exceeds available GPU memory, Redshift falls back to out-of-core rendering — it still finishes, but performance drops significantly. A scene that renders in 90 seconds with textures fitting in VRAM can take 8–10 minutes when it has to page data back and forth.
For reference, our current GPU nodes run NVIDIA RTX 5090 cards with 32 GB VRAM — the current Blackwell-architecture flagship from NVIDIA. Each card carries 32 GB of GDDR7 video memory, a substantially expanded CUDA core count over the prior Ada Lovelace generation, and dedicated AI cores that Redshift 3.7 leverages for its OptiX-based denoiser. For the majority of C4D + Redshift jobs we see — motion design, product visualization, archviz interiors — 32 GB handles the scene comfortably. But if you're working with 8K textures, high-poly scatters, or heavy particle simulations, VRAM capacity should be the first spec you ask about.
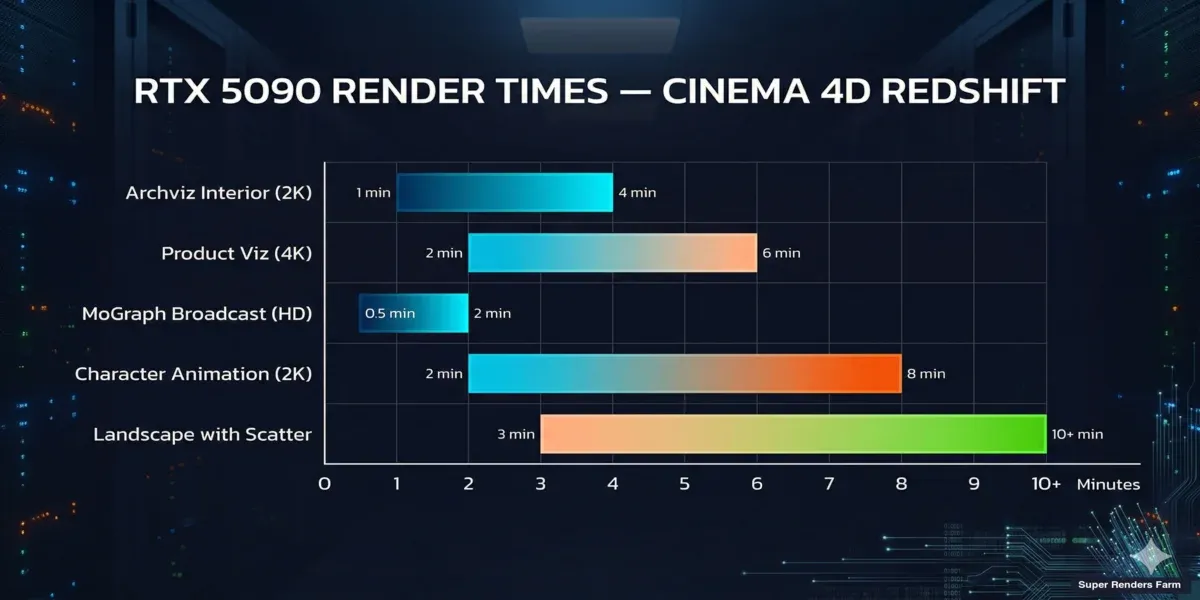
RTX 5090 render time benchmarks for Cinema 4D Redshift scenes by project type
Here's what current-generation hardware means for common Cinema 4D Redshift scene types:
| Scene Type | Typical Frame Time (RTX 5090) | Notes |
|---|---|---|
| Archviz interior (2K) | 1–4 minutes | GI-heavy scenes with many light bounces |
| Product visualization (4K) | 2–6 minutes | SSS materials, caustics add time |
| MoGraph broadcast (HD) | 30 seconds – 2 minutes | Depends on effects and volumetrics |
| Character animation (2K) | 2–8 minutes | Hair and SSS are the biggest factors |
| Aerial/landscape with scatter | 3–10 minutes | Vegetation proxies and fog volumes |
Compared to a local RTX 4090: The RTX 5090 delivers roughly 40–60% faster render times depending on scene complexity, primarily from the larger CUDA core count and improved memory bandwidth. Scenes that took 5 minutes per frame on a 4090 typically complete in 3–3.5 minutes. The GDDR7 memory on the 5090 also offers higher effective bandwidth (~1.8 TB/s) than the GDDR6X on the previous generation (~1.0 TB/s) — this manifests as faster texture streaming for scenes with large numbers of 4K and 8K bitmap textures.
Redshift 3.7 specific gains. The 3.7 main branch ships with Blackwell-aware kernel updates — Redshift recompiles its core sampling kernels for the 5090's SM (streaming multiprocessor) layout, recovering performance that was previously left on the table when the same binary ran on both Ada and Blackwell hardware. For volumetric-heavy scenes (broadcast motion design with VDB fog, atmospherics), the AI denoiser in 3.7 also reduces required sample counts substantially without visible quality loss — practical effect: 30–40% fewer samples to reach the same final image, which scales directly to lower render time and lower per-frame cost on a per-GHz-billed farm.
Multi-GPU scaling. Redshift scales well across multiple GPUs on the same machine, but cloud rendering typically distributes across multiple single-GPU nodes (one frame per node) rather than putting multiple GPUs on one frame. For animations, single-GPU-per-frame is more efficient. For single high-resolution stills, multi-GPU matters more — ask your render farm whether they offer multi-GPU nodes for still image renders.
Driver versions. This sounds like a minor detail but it causes more failed jobs than you'd expect. Redshift is tightly coupled to specific NVIDIA driver versions. A mismatch between your local workstation driver and the farm's driver version can cause subtle differences in shading or, worse, outright crashes. Farms that let you pick or verify driver versions before submitting will save you troubleshooting time.
For deeper technical context on RTX 5090 performance characteristics across renderers, our RTX 5090 GPU cloud rendering performance article covers Octane, V-Ray GPU, and Redshift benchmark methodology in detail.
Licensing: The Part Nobody Explains Well
Redshift licensing on render farms is one of the most frequently misunderstood aspects of cloud rendering for C4D users. Here's how it actually works in 2026.
If you have a Maxon One or Cinema 4D subscription, you get Redshift included — but that license is tied to your machine. It doesn't automatically extend to a render farm.
Render farms handle licensing in one of two ways:
-
Farm provides licenses — The render farm owns a pool of Redshift render licenses and includes the cost in their per-frame or per-hour pricing. You don't need to think about it.
-
Bring your own license (BYOL) — Some IaaS-style farms (where you remote desktop into a machine) require you to supply your own Redshift license. This can mean purchasing additional node-locked or floating licenses.
For most users, option 1 is simpler. We include Redshift licensing in our rendering cost — you submit a .c4d file, we handle the license allocation across however many nodes your job requires. No license server setup, no seat counting, no "maximum concurrent renders" caps to worry about. One thing to note: Redshift third-party plugins (like X-Particles using Redshift materials) need to be installed on the farm side. We maintain current versions of common plugins, but if you're using something niche, check with support before submitting.
For a broader look at how Redshift licensing compares to other engines — including the Maxon Teams pricing change, V-Ray node licensing, and Arnold's bundled nodes — see our render farm software licensing guide.
Scene Preparation: Saving Time Before You Submit
The difference between a smooth render farm experience and a frustrating one usually comes down to scene preparation. Here are the issues we see most often with Cinema 4D + Redshift submissions, ordered by frequency:
1. Texture paths and asset consolidation. Cinema 4D's "Save Project with Assets" (File > Save Project with Assets...) is your single most important tool before submitting to any render farm. It collects all external references — textures, HDRIs, proxy files, Alembic caches — into a single project folder. Without this, the farm receives a .c4d file pointing to C:\Users\YourName\Textures\ which obviously doesn't exist on the render node. We see this with roughly 20% of first-time submissions. It's a two-minute fix on your end that prevents a failed job. After consolidation, open the consolidated project and re-render a frame locally to confirm nothing broke. Check Window > Console for any asset path warnings. Verify texture paths are relative.
2. Redshift Proxy files (.rs). If your scene uses Redshift Proxy files — and many heavy scenes do, especially with scattered vegetation or product arrays — make sure the .rs proxy files are included in your packaged project. C4D's "Save Project with Assets" doesn't always catch Redshift Proxy references because they're technically external to C4D's asset management. Verify proxy paths in the Redshift Proxy object settings are relative. Large proxy files (>500 MB each) increase upload time — consider if instancing would work instead.
3. Takes and render settings. Cinema 4D's Takes system is powerful but creates a common error: you set up your render settings in the main take, then submit a different take to the farm, and the resolution or frame range is wrong. Always verify which Take is active and that its render settings (resolution, frame range, output path) match what you expect.
4. Render queue configuration for animations. For animation submissions, these settings matter:
| Setting | Recommended Value | Why |
|---|---|---|
| Frame Range | Full range (e.g., 0–499) | Farm splits this across machines |
| Frame Step | 1 (unless intentional) | Step > 1 causes missing frames |
| Output Format | EXR 16-bit or PNG sequence | Individual frames, not video container |
| Output Path | Relative: ./output/$take/ | Absolute paths won't exist on farm |
| Save Image | Enabled with file prefix | Each frame needs a unique filename |
Never submit as a video file output (MP4, MOV). Render farms render individual frames — you composite into video locally afterward.
5. Redshift-specific render settings to verify.
| Setting | Location | Farm-Ready Value |
|---|---|---|
| GPU Selection | Redshift > Preferences | Set to "All Available" (not a specific GPU) |
| VRAM Limit | Redshift Render Settings > Memory | Automatic (let the farm's 32 GB VRAM handle it) |
| Texture Cache | Redshift > Preferences > Cache | Leave default — farm paths differ |
| AOVs / Multi-pass | Render Settings > AOV | Include all passes you need — re-rendering for a missing pass costs time |
| Bucket Size | Render Settings > General | 256 or Auto (large buckets = better GPU utilization) |
6. MoGraph and simulation caching (critical for motion design). If your scene uses MoGraph effectors with randomization, cache the MoGraph (MoGraph > Cache MoGraph...) before submitting. Without caching, different machines may generate different random seeds, causing flickering or popping between frames. The same applies to Dynamics simulations, X-Particles, TurbulenceFD, RealFlow, and any Voronoi Fracture object that uses dynamics — bake all of them to disk before upload. Each can produce non-deterministic results across worker nodes if left uncached.
7. Third-party plugins and VRAM estimation. X-Particles, Forester, and similar plugins need to be installed on the render farm side. Not all farms support every plugin. Before committing to a large job, check whether your specific plugins and versions are available. Redshift's built-in VRAM usage display (visible in the Redshift RenderView) gives you a good estimate of peak VRAM consumption. Check this before submitting — if your scene is using 20+ GB on your local GPU, it's going to be tight on a 24 GB card and you should discuss options with your farm's support team before submitting a large batch.
Step-by-Step: Submitting a Cinema 4D Redshift Project
Here's the exact workflow from scene file to rendered frames:
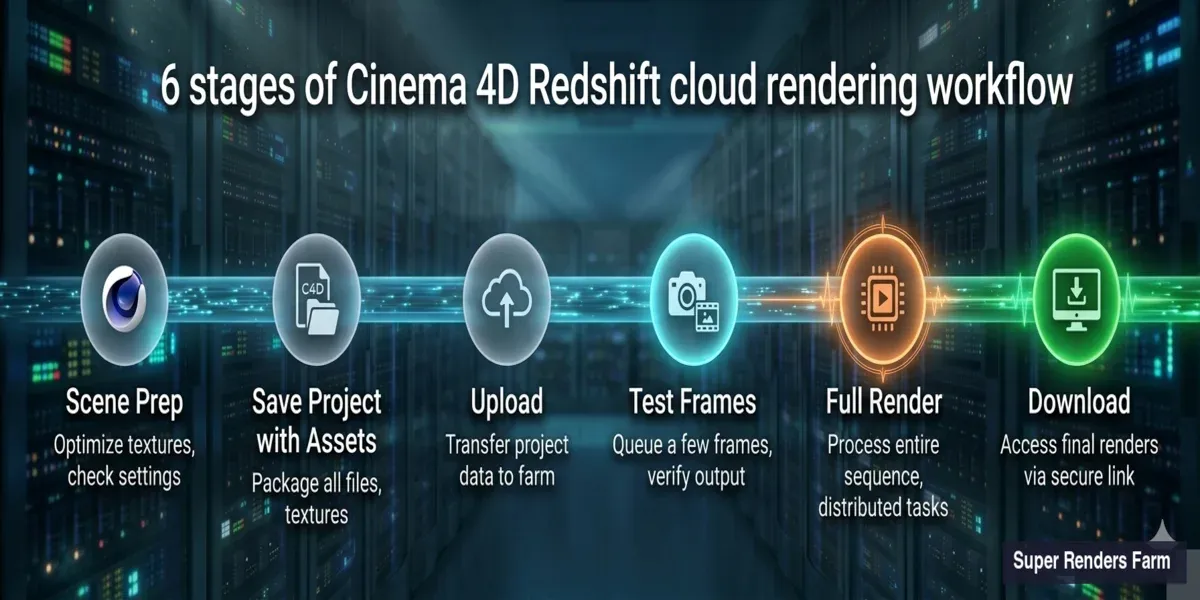
Cinema 4D Redshift render farm submission workflow — from scene prep to rendered frames
Step 1 — Prepare your scene. Follow the checklist above. Run a quick local test render (1 frame at final quality) to confirm everything works.
Step 2 — Upload your project. Use the Super Renders Farm desktop application: open the app and select Cinema 4D as your DCC, choose your consolidated project folder (the one from "Save Project with Assets"), and let the uploader scan for missing assets and warn you before upload begins. Upload speed depends on your connection — a typical 2 GB project takes 5–15 minutes on a 50 Mbps connection.
Step 3 — Configure render settings on the web dashboard. After upload, confirm frame range (start/end), priority (Standard or Rush — Rush uses more machines simultaneously), output format (should match what you set in C4D), and resolution (auto-detected from your render settings).
Step 4 — Run a test frame. Always render 2–3 test frames before committing the full sequence. Check for missing textures (shows as magenta/pink), verify lighting and exposure match your local render, and confirm output format and naming convention.
Step 5 — Launch full render. Once test frames look correct, approve the full frame range. Machines begin rendering immediately — you can monitor progress in real time. Each frame renders independently, so early frames are available for download while later frames are still processing.
Step 6 — Download results. Frames download as they complete (no need to wait for the entire sequence). Import your EXR/PNG sequence into your compositor (After Effects, DaVinci, Nuke). Verify frame continuity — scrub through the sequence looking for any outliers.
For projects with unusual plugin requirements or scenes exceeding 20 GB, reach out to support before uploading — we can verify compatibility and suggest optimizations specific to your scene. You can also start by downloading the Super Renders Farm app and creating an account.
Fully Managed vs Remote Desktop: Why It Matters for C4D Users
Cloud render farms fall into two distinct categories, and the difference matters more for Cinema 4D users than for some other DCCs:
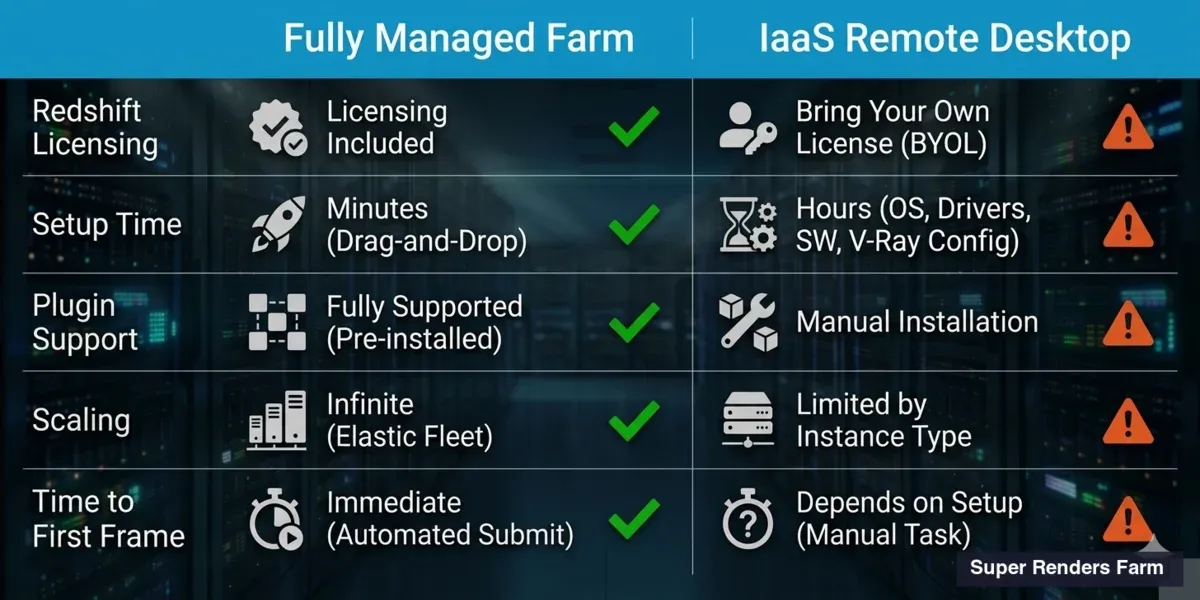
Comparison of fully managed render farm vs IaaS remote desktop for Cinema 4D Redshift rendering
| Feature | Fully Managed Farm | IaaS / Remote Desktop |
|---|---|---|
| Software setup | Pre-installed, updated | You install and configure |
| Redshift licensing | Included in render cost | You provide your own license |
| Plugin support | Common plugins pre-installed | You install manually |
| Scene troubleshooting | Support team helps fix issues | You troubleshoot on remote machine |
| Upload process | Drag-and-drop uploader | File transfer to VM, then render |
| Scaling | Automatic across available nodes | You spin up/down VMs manually |
| Billing | Per-frame or per-GHz-hour | Per-hour VM rental |
| Time to first frame | Minutes (after upload) | 30–60 min (VM boot + setup) |
Remote desktop / IaaS farms rent you a virtual machine. You connect via Remote Desktop (RDP), install Cinema 4D and Redshift yourself, configure the scene, and hit render. You're responsible for licensing, plugin installation, driver management, and troubleshooting. If something breaks at 2 AM on a deadline, you're the one fixing it.
Fully managed farms handle everything. You upload a scene file, the farm's system deploys it to render nodes that already have Cinema 4D, Redshift, required plugins, and correct driver versions installed. You monitor progress through a web dashboard or desktop app.
For Cinema 4D specifically, the fully managed approach avoids a common pain point: C4D's licensing and plugin ecosystem requires careful version matching. Redshift version, C4D version, plugin versions, and GPU driver versions all need to be compatible. On a managed farm, the operations team handles that matrix. On a remote desktop, you're navigating it yourself.
The trade-off is control versus convenience. If you have unusual pipeline requirements — custom scripts, Houdini Engine integration, proprietary plugins that aren't in any farm's standard library — a remote desktop gives you full control. For standard C4D + Redshift workflows (which covers the vast majority of jobs), fully managed removes operational overhead and lets you focus on the creative work. The break-even point in our experience is roughly: if you'd otherwise spend more than 30–45 minutes per project on machine setup, plugin install, and licensing configuration, fully managed pays for itself on a single project.
Cinema 4D for Motion Design: Cloud Rendering Workflow
Cinema 4D has been a core tool in broadcast motion design for over a decade, and motion graphics projects make up a significant share of the C4D render jobs we process. Title sequences, broadcast packages, event visuals, and social media content — these projects share characteristics that make cloud rendering particularly useful.
The first is volume. A 30-second broadcast opener at 24 fps is 720 frames. A 60-second event loop at 30 fps is 1,800 frames. Motion designers working in broadcast rarely deliver a single piece — a typical network package includes an opener, bumpers, lower thirds, and transition elements, easily reaching 5,000 to 10,000 frames per project. Rendering that locally ties up a workstation for days, and motion design deadlines are usually measured in days, not weeks.
The second is multi-pass complexity. Broadcast motion graphics workflows rely heavily on multi-pass rendering — separate passes for diffuse, reflection, ambient occlusion, matte objects, and cryptomatte IDs — so compositors in After Effects or NukeX can adjust timing, color, and layering without re-rendering. On our farm, multi-pass sequences render in parallel just like single-pass frames: each node outputs the full pass stack for its assigned frame, and all passes arrive together.
MoGraph-specific farm considerations worth flagging beyond the basic prep checklist:
- Cache everything — MoGraph effectors, Dynamics, Cloth, Soft Body. Any non-deterministic simulation must be baked to disk.
- Take System for variants — If your project has multiple Takes (different color schemes, different text overlays, different camera angles), submit each Take as a separate render job rather than enabling all Takes in one submission. Farms parallelize jobs more efficiently than they parallelize Takes within a single job.
- Multi-pass / AOV configuration — At minimum verify: Beauty, Diffuse, Reflection, Refraction, Specular, GI, AO, Z-Depth, Object ID. Re-rendering a 1,500-frame sequence because you forgot the Z-Depth pass costs as much as the original render.
- Frame dependencies — Some MoGraph effects create inter-frame dependencies (Motion Blur, Vector Motion Pass). These are fine on a farm — each machine renders its assigned frame with the full scene state.
- Audio-synced animation — The farm doesn't need your audio track. It renders frames based on keyframes baked into the timeline. Just make sure your animation curves are final.
Cinema 4D motion design also spans multiple renderers. While Redshift handles the majority of GPU-accelerated motion graphics work, studios still use Cinema 4D's Physical renderer for specific effects like sub-surface scattering accuracy, and some broadcast houses run Standard or Sketch and Toon for stylized looks. A render farm that supports C4D natively handles all of these without separate configuration — the renderer selection is embedded in the scene file. For an overview of how render costs scale across different project types and engines, our render farm cost-per-frame breakdown covers the math in detail.
Pricing: How Much Does Redshift Cloud Rendering Cost?
Render farm pricing for GPU jobs like Redshift is typically calculated by GPU-hour or per-frame based on render time.
Rough estimates for typical Cinema 4D Redshift projects:
| Project Type | Frames | Avg Frame Time | Estimated Cost |
|---|---|---|---|
| 30-second broadcast spot (720 frames, HD) | 720 | 1 min/frame | $15–$30 |
| Product turntable (120 frames, 4K) | 120 | 4 min/frame | $12–$25 |
| Architectural animation (1500 frames, 2K) | 1500 | 3 min/frame | $80–$150 |
| MoGraph reel (2000 frames, HD) | 2000 | 45 sec/frame | $25–$50 |
These estimates assume standard priority. Rush priority (more machines simultaneously, faster delivery) costs approximately 1.5–2× standard pricing. For exact pricing, use the cost calculator with your specific scene parameters — frame count, resolution, and expected render time per frame.
Optimizing Your Scene for Faster (Cheaper) Farm Renders
Every minute saved per frame multiplies across hundreds of frames. Here's how to reduce render time without compromising quality:
Quick wins (minimal visual impact):
- Reduce GI bounces from 8 to 4 — often indistinguishable in final output
- Use Redshift's automatic sampling instead of fixed high values
- Lower reflection/refraction depth from 8 to 4 for non-critical materials
- Disable "Render Hidden Objects" if your scene has hidden geometry
Medium effort (test before committing):
- Switch displacement to vector-based where possible (faster than height-field)
- Use LOD (Level of Detail) for background objects — lower poly for distant geometry
- Reduce texture resolution on objects that occupy <5% of screen space
- Enable Redshift's out-of-core texturing for scenes with many 8K textures
Large impact (requires scene adjustment):
- Replace heavy volumetric fog with environment fog where acceptable
- Use Redshift Proxy for repeated objects instead of geometry instances
- Bake complex procedural textures to bitmap for render-time efficiency
- Split extremely heavy scenes into render layers and composite
What to Evaluate When Choosing a Redshift Render Farm
Based on operating Redshift infrastructure and talking with hundreds of C4D users, here's what actually separates a good experience from a bad one:
GPU generation and VRAM. Ask specifically which GPU model and how much VRAM. "GPU rendering supported" tells you nothing. NVIDIA Ada Lovelace (RTX 4090) and Blackwell (RTX 5090) are the current generation that Redshift is optimized for. Older GPUs like GTX 1080 Ti will render Redshift but with significant feature and performance limitations.
Redshift and C4D version support. New Redshift versions ship roughly quarterly and sometimes introduce breaking changes in material systems or AOV pipelines. Confirm that the farm supports your specific version combination — not just "Redshift" generically. The compatibility matrix earlier in this guide is the version pairing we currently run; check it against your local install before you commit.
Plugin availability. X-Particles, Forester, TurbulenceFD, Greyscalegorilla — if your scene depends on it, the farm needs to have it. Ask for a current plugin list with version numbers.
Test renders. Any credible render farm will let you run a test render of a few frames before committing to a full job. Use this to verify: the output looks identical to your local render, the VRAM usage is within limits, and the per-frame time matches your expectations.
Support response time. When a 3,000-frame animation job fails at frame 847, how fast does the farm respond? At 3 AM on a Friday? This is where fully managed farms typically have an edge — dedicated support teams who understand the rendering pipeline versus generic cloud infrastructure support who may not know what Redshift is.
Output delivery. How do you get your frames? Direct download, cloud storage link, or shipped drive? For large animation jobs (thousands of high-resolution EXR frames), download bandwidth can become a real bottleneck. Ask about output options upfront.
For a wider view across all four C4D-supported render engines — Redshift, Octane, Arnold, and V-Ray — and how they compare on cloud hardware, our best Cinema 4D render farm comparison for 2026 covers per-frame cost, plugin compatibility, and version support across each engine.
Common Redshift Render Farm Issues (and How to Avoid Them)
After years of running Redshift at scale, here's a quick reference for the problems we see repeatedly:
| Issue | Cause | Fix |
|---|---|---|
| Pink/magenta areas in render | Missing textures | Re-run "Save Project with Assets," verify paths are relative |
| Different results per frame (flickering) | Un-cached MoGraph or Dynamics | Cache all MoGraph and simulations before upload |
| Render much slower than expected | VRAM overflow → out-of-core rendering | Optimize textures, check VRAM usage in RenderView |
| Out-of-memory error | Scene exceeds GPU VRAM | Check local VRAM usage — if near 32 GB, optimize displacement or texture resolution |
| Subtle shading differences | Driver or Redshift version mismatch | Verify exact version match with farm |
| Colors look different from local | Color management mismatch | Ensure ACES/ACEScg settings are embedded in the scene file, not just Redshift preferences |
| Missing motion blur or DOF | Render settings in wrong Take | Check active Take before exporting |
| Missing GI in animation | GI cache not set to per-frame | Use Brute Force GI or ensure irradiance cache is set to rebuild per frame |
| Plugin-dependent objects missing | Plugin not installed on farm | Confirm plugin availability before large jobs |
| Random frame crashes | GPU memory leak on long sequences | Enable "Restart renderer every N frames" if available |
If you also work in Maya alongside Cinema 4D, the Maya cloud rendering setup parallel covers Arnold, V-Ray for Maya, and Redshift for Maya workflows. You can also review our cloud rendering guide for a broader understanding of how distributed rendering works, or check the GPU rendering vs CPU rendering comparison if you're evaluating whether Redshift is the right choice for your pipeline.
FAQ
Q: Can I render Cinema 4D + Redshift on a CPU render farm? A: No. Redshift is GPU-only. You need a farm with NVIDIA GPUs and current CUDA drivers. There is no CPU fallback mode in production Redshift.
Q: Does my Maxon subscription cover render farm usage? A: Your Cinema 4D + Redshift subscription covers your local machines only. As an official Maxon partner, Super Renders Farm provides Redshift render licenses on all GPU machines — your subscription does not need to extend to farm use. Other farms may operate on a Bring Your Own License model that requires separate purchased render licenses.
Q: Which Cinema 4D and Redshift version combinations do you support?
A: We support Cinema 4D 2024, 2025, and 2026 paired with Redshift 3.5.x, 3.6.x, and 3.7.x (both rolling-release main and 3.7 LTS). The full compatibility table — including minimum NVIDIA driver versions and notes on Hydra USD, Karma XPU, and Blackwell-aware kernel updates — appears in the Version Compatibility section above. If your local installation uses a combination not listed, check Redshift > About Redshift for your exact build and contact support before submitting.
Q: What VRAM do your GPU machines have for Redshift rendering? A: Each GPU machine runs an NVIDIA RTX 5090 with 32 GB VRAM. This handles complex scenes with heavy displacement, numerous 4K textures, and large proxy counts that would exceed the memory of consumer cards.
Q: Can I render Cinema 4D MoGraph animations on a render farm?
A: Yes, but you must cache your MoGraph effectors and any Dynamics simulations before submitting. Without caching, each farm machine would generate different random seeds, causing flickering between frames. Use MoGraph > Cache MoGraph in Cinema 4D before export.
Q: How long does a typical Cinema 4D Redshift farm render take? A: Total delivery time depends on frame count and complexity. A 720-frame HD broadcast animation averaging 1 minute per frame would complete in roughly 30–45 minutes using 20 machines simultaneously — compared to 12 hours on a single local GPU.
Q: How do I estimate the cost of a Redshift render farm job? A: Render a representative frame locally and note the render time. Multiply by total frames for a rough estimate of GPU-hours needed. Then apply the farm's per-hour GPU rate. Most farms will give you a quote after a test render of 5–10 frames.
Q: What Cinema 4D plugins are supported on the render farm? A: We maintain current versions of major plugins including X-Particles, TurbulenceFD, Forester, and Signal. For niche or newly released plugins, check with support before submitting. All simulation-based plugins require cached/baked output regardless of farm support.
Q: What file format should I render to on a farm? A: EXR 16-bit (half-float) is recommended for most production work — it preserves dynamic range for compositing. PNG is acceptable for motion design deliverables that go straight to video edit. Never output as a video container (MP4, MOV) — farms render individual frames.
Q: Can I use Redshift proxies on a render farm? A: Yes, as long as the .rs proxy files are included in your uploaded project. Make sure the proxy file paths are relative, not absolute. Large proxy libraries increase upload time but render correctly once on the farm.
Q: What's the difference between Redshift and OctaneRender on a render farm? A: Both are GPU renderers, but Redshift uses a biased approach (faster, with controlled approximations) while Octane is unbiased (physically accurate, typically slower). Both work well on render farms. The choice depends on your production needs, not the farm.
Q: What if my scene exceeds the farm's GPU VRAM? A: Redshift's out-of-core rendering will handle it, but performance drops substantially. Options: optimize your textures (resize to what's actually needed at render resolution), use proxy geometry for heavy objects, or ask whether the farm offers higher-VRAM nodes.
Q: How much faster is Redshift on GPU compared to CPU rendering? A: For typical C4D scenes, GPU rendering is 5–15× faster. The exact speedup depends on your scene complexity, shader density, and effect types (motion blur, DOF). Simple scenes may be 20×+ faster; complex procedural scenes might be 3–5×.
Q: Is there a minimum render volume for a render farm? A: No. Most farms accept single-frame jobs. For small studios or freelancers, pay-as-you-go models work well. Once you hit 100+ GPU hours/month, monthly subscriptions become more cost-effective.
Q: Can I integrate Cinema 4D + Redshift rendering into my existing pipeline? A: Partly — the transfer layer, not submission. Super Renders Farm has no public job-submission API yet — programmatic submission is on our roadmap, not available today — so jobs are submitted through the GUI: the website upload form, our desktop app, or the Cinema 4D plugin. What you can automate now is asset transfer: uploads and finished-frame retrieval run over SFTP, which you can script with paramiko, rsync, or scp to slot repeatable transfers into your existing pipeline.
About Alice Harper
Blender and V-Ray specialist. Passionate about optimizing render workflows, sharing tips, and educating the 3D community to achieve photorealistic results faster.


