Cách Sửa, Lật và Đảo Ngược Normal trong Maya
Tổng quan
Hiểu Rõ Về Normal trong Maya
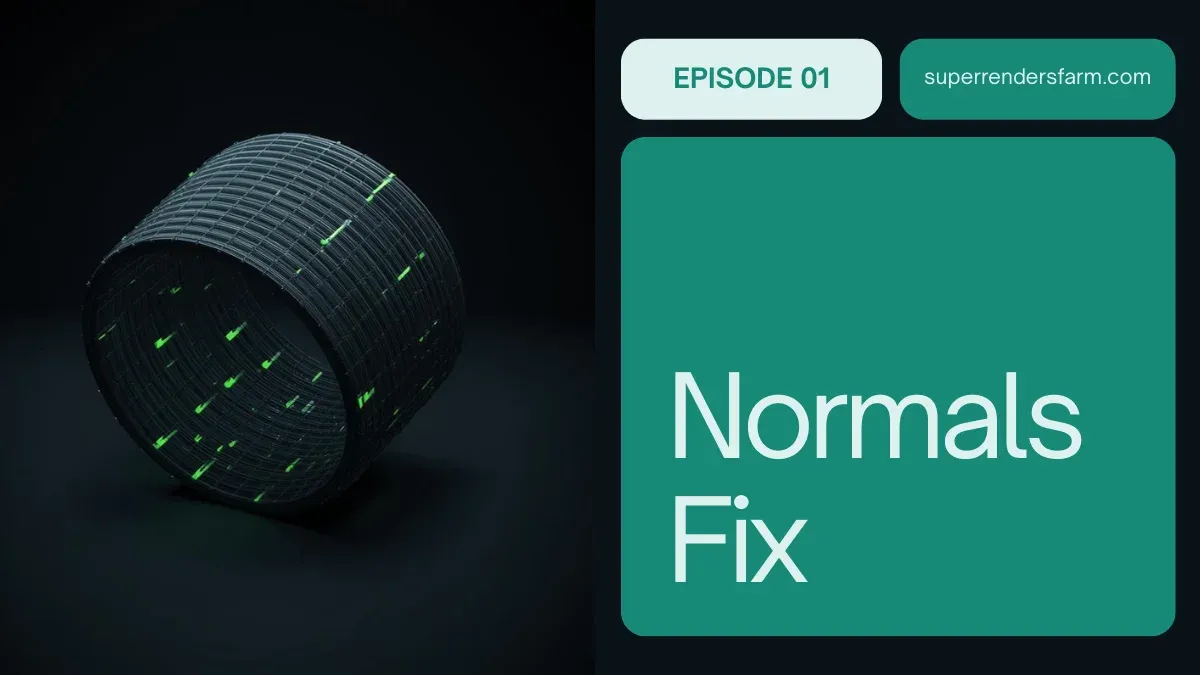
Khi làm việc với hình học 3D trong Maya, normal xác định cách ánh sáng tương tác với bề mặt của chúng tôi. Mỗi mặt đa giác có một hướng cho renderer biết mặt nào là "hướng về phía trước". Khi normal chỉ theo hướng sai, chúng tôi thấy các mặt đen trong render hoặc bóng đổi ngược làm hỏng toàn bộ hình ảnh. Tại render farm của chúng tôi, chúng tôi đã gặp vấn đề này vô số lần khi nhập tài sản từ các nguồn bên ngoài hoặc làm việc với các mô hình cũ.
Normal về cơ bản là một mũi tên vô hình vuông góc với mặt đa giác của bạn. Nếu mũi tên đó chỉ vào bên trong thay vì bên ngoài, renderer hoàn toàn bỏ qua mặt đó. Điều này trở thành vấn đề gắn lên khi chúng tôi đang chuẩn bị tài sản để rendering batch—thậm chí một normal bị lật trên một nhập khẩu lớn có thể phá hủy toàn bộ frame.
Tại Sao Normal Bị Lật
Có một số tình huống phổ biến gây ra vấn đề normal. Nguyên nhân phổ biến nhất tại render farm của chúng tôi là nhập mô hình từ phần mềm 3D sử dụng các quy ước khác nhau. Các tệp FBX và OBJ đôi khi không bảo tồn đúng định hướng normal, đặc biệt nếu mô hình gốc sử dụng chia tỷ lệ không đều hoặc được tạo với hình học bị đảo ngược. Các tệp cũ thường có normal bị hỏng từ nhiều năm retopology và điều chỉnh mô hình.
Normal cũng bị lật khi chúng tôi phản chiếu hình học mà không đóng băng transform, nhân đôi các mặt không chính xác, hoặc áp dụng các giá trị chia tỷ lệ âm cho các đối tượng. Trong nhập khẩu quy mô lớn—đặc biệt là khi chúng tôi kéo vào hàng trăm tài sản cho một render duy nhất—thậm chí một tỷ lệ nhỏ các normal bị lật cũng tạo ra các khiếm khuyết rõ ràng trên toàn bộ output của render farm.
Hình Dung Normal trong Maya 2026
Trước khi chúng tôi sửa bất cứ điều gì, chúng tôi cần thấy những gì chúng tôi đang làm việc. Maya 2026 cung cấp cho chúng tôi một số tùy chọn trực quan hóa.
Sử Dụng Hiển Thị Normal Mặt
Chọn hình học của bạn và chuyển đến Display > Polygon Components > Face Normals. Điều này hiển thị các đường nhỏ kéo dài từ trung tâm mỗi mặt theo hướng normal chỉ. Bạn sẽ ngay lập tức phát hiện các mặt trong đó các đường này chỉ vào bên trong mesh thay vì bên ngoài.
Hình Dung Backface Culling
Đây là phương pháp ưa thích của chúng tôi tại farm. Kích hoạt Shading > Backface Culling trong viewport của bạn. Bây giờ bất kỳ mặt nào có normal bị lật sẽ xuất hiện hoàn toàn đen—không có sự mơ hồ. Chúng tôi có thể nhanh chóng quét mô hình và xác định các vùng có vấn đề mà không cần phóng to các normal riêng lẻ.
Để bật backface culling, hãy mở cài đặt shading viewport và tìm "Backface Culling" trong các tùy chọn Polygon Display. Bạn cũng có thể sử dụng lệnh: polyOptions -bc on; trong trình chỉnh sửa tập lệnh.
Sửa Normal Đối Tượng Đơn Lẻ
Phương Pháp 1: Đảo Ngược Các Mặt Được Chọn
Nếu chỉ một vài mặt bị lật, hãy chọn trực tiếp những mặt đó và sử dụng Mesh > Reverse. Điều này đảo ngược hướng normal chỉ cho những mặt đó. Tại render farm của chúng tôi, chúng tôi sử dụng cách tiếp cận này cho các lỗi nhập khẩu ảnh hưởng đến dưới 50% của hình học.
Các bước:
- Chọn đối tượng của bạn và chuyển sang chế độ Face Selection (nhấn 3)
- Sử dụng backface culling để xác định các mặt bị lật
- Giữ Shift và nhấp vào các mặt riêng lẻ hoặc kéo để chọn các nhóm
- Chuyển đến Mesh > Reverse trong menu hoặc sử dụng
polyReverseNormal;
Phương Pháp 2: Conform Normals Hiển Thị Mesh
Đối với các đối tượng trong đó normal hầu hết đều đúng nhưng phân tán, hãy sử dụng công cụ Conform Normals. Công cụ này thông minh sửa chữa hướng normal dựa trên hình học xung quanh.
Chọn đối tượng của bạn và chuyển đến Mesh > Conform Normals. Maya phân tích topology mesh của bạn và chỉ normal một cách nhất quán ra bên ngoài. Điều này hoạt động vô cùng tốt cho các mô hình nhập khẩu trong đó hầu hết normal đều đúng nhưng một vài cái chỉ vào bên trong.
Các Hoạt Động Batch Quy Mô Lớn với MEL
Khi chúng tôi nhập hàng trăm đối tượng hoặc xử lý các cảnh phức tạp, Modeling Toolkit và các tập lệnh batch là cần thiết.
Tập Lệnh MEL cho Đảo Ngược Batch
Tạo tệp tập lệnh MEL được gọi là fixAllNormals.mel:
global proc fixAllNormals()
{
    string $selected[] = `ls -sl`;

    for ($obj in $selected)
    {
        select $obj;
        polySetNormal -d 1;
    }

    print("Normals fixed for " + size($selected) + " objects\n");
}

fixAllNormals();
Lưu cái này vào thư mục tập lệnh của bạn và chạy nó từ Script Editor. Chọn tất cả các đối tượng cần sửa normal, sau đó thực thi tập lệnh. Lệnh polySetNormal -d 1 đảm bảo tất cả normal đều chỉ ra bên ngoài một cách nhất quán.
Tập Lệnh Python cho Kiểm Soát Nâng Cao
Đối với các đường dẫn batch của render farm, các tập lệnh Python cung cấp cho chúng tôi nhiều kiểm soát. Tập lệnh này xử lý tất cả các đối tượng được chọn và báo cáo những đối tượng nào có normal bị lật:
import maya.cmds as cmds

def fix_normals_batch():
    selected = cmds.ls(sl=True)
    fixed_count = 0

    for obj in selected:
        # Conform normals for each object
        cmds.polySetNormal(obj, d=1)
        fixed_count += 1

    print(f"Processed {fixed_count} objects")

if __name__ == "__main__":
    fix_normals_batch()
Chạy cái này trên tab Python của Script Editor trong Maya. Lệnh polySetNormal -d 1 tính toán hướng normal dựa trên vị trí đỉnh và thứ tự quấn đa giác, đảm bảo tính nhất quán trên toàn bộ lựa chọn của bạn.
Sử Dụng Modeling Toolkit
Modeling Toolkit của Maya 2026 bao gồm các công cụ normal chuyên dụng hoạt động hiệu quả ngay cả trên hình học dày đặc.
Mở Modeling Toolkit (Windows > Modeling Toolkit) và điều hướng đến phần Normals. Bạn sẽ tìm thấy:
- Conform: Thông minh sửa chữa normal phân tán bị lật
- Reverse: Đảo ngược tất cả normal trên các đối tượng được chọn
- Harden/Soften: Kiểm soát làm mềm cạnh (khác với đảo ngược, nhưng liên quan đến hình thức normal)
Đối với quy trình nhập khẩu, chúng tôi thường sử dụng Conform trước tiên. Nếu toàn bộ đối tượng bị lật ngược, hãy sử dụng Reverse trên toàn bộ đối tượng. Bản xem trước thời gian thực của Toolkit cho phép chúng tôi xác nhận sự sửa chữa trước khi cam kết với thay đổi.
Chiến Lược Phòng Chống Nhập Khẩu
Cách tiếp cận hiệu quả nhất là ngăn chặn vấn đề normal trong quá trình nhập khẩu. Tại render farm của chúng tôi, chúng tôi tuân theo các bước sau:
Chia Nhỏ Tệp Lớn Trước Khi Nhập Khẩu
Không bao giờ nhập tệp 50MB với 100.000 đối tượng vào một cảnh duy nhất. Chia nó thành các chunk. Mở tệp gốc trong phần mềm mô hình của bạn, nhóm các đối tượng hợp lý và xuất các phần riêng biệt. Các nhập khẩu nhỏ hơn dễ kiểm tra và khắc phục sự cố hơn.
Xác Minh Chất Lượng Trước Khi Gửi Render Farm
Sử dụng backface culling và bật hình dung normal trên tất cả các tài sản nhập khẩu. Quay mô hình trong viewport của bạn và tìm kiếm các mặt đen. Render một frame kiểm tra duy nhất với lighting thích hợp—normal bị lật rõ ràng với shading thực tế.
Sử Dụng Định Dạng Nhập Khẩu Nhất Quán
FBX là tiêu chuẩn của chúng tôi tại farm. OBJ hoạt động nhưng đôi khi mất thông tin normal. Luôn xuất với normal được bật từ phần mềm nguồn của bạn. Trong các tùy chọn nhập khẩu FBX của Maya, đảm bảo "Smooth Mesh Preview" và "Bake Animation" phù hợp với quy trình làm việc của bạn.
Chỉ Áp Dụng Chia Tỷ Lệ Đều
Các giá trị chia tỷ lệ âm hoặc chia tỷ lệ không đều (các giá trị khác nhau trên các trục X, Y, Z) làm hỏng hướng normal. Sử dụng Modify > Freeze Transformations sau khi bạn đã định kích cỡ và định vị đúng nhập khẩu của mình. Điều này cố định chia tỷ lệ vào hình học và ngăn chặn các vấn đề render.
Ý Nghĩa Render Farm
Điều này rất quan trọng: một render farm không tự động sửa normal bị lật. Khi chúng tôi gửi hình học với normal bị đảo ngược đến farm, mỗi frame bao gồm tài sản đó sẽ render với các mặt đen trong đó normal chỉ ra xa từ máy ảnh. Vào lúc render, không có phục hồi. Chúng tôi không thể sửa nó trong post-processing hoặc thông qua điều chỉnh lighting.
Chúng tôi đã mất toàn bộ render pass vì normal bị lật trên nhập khẩu lớn. Tác động tài chính của việc re-render khi phát hiện xảy ra quá muộn đã thúc đẩy chúng tôi tự động hóa các kiểm tra này. Trước khi bất cứ điều gì đến hàng đợi farm, chúng tôi chạy một kiểm toán normal hoàn chỉnh trên tất cả hình học.
Kiểm Tra Normal trong Cảnh Cuối Cùng của Bạn
Trước khi xuất hoặc gửi farm:
- Chọn tất cả đối tượng: Select > All
- Bật backface culling: Shading > Backface Culling
- Quay mô hình và tìm kiếm bất kỳ vùng đen nào
- Nếu tìm thấy, hãy chọn các đối tượng có các mặt culled và chạy Mesh > Conform Normals hoặc sử dụng tập lệnh MEL của chúng tôi
Điều này mất 60 giây và ngăn chặn hàng giờ thời gian render bị lãng phí.
Xuất với Normal Chính Xác
Khi bạn xuất hình học được sửa của mình, hãy đảm bảo các cài đặt này được bật:
Tùy Chọn Xuất FBX:
- Smooth Groups: On
- Export Smooth Mesh Preview: On
- Normals: On
Tùy Chọn Xuất OBJ:
- Smooth Groups: On
- Normal Groups: On
Các cài đặt này bảo tồn thông tin normal được sửa chữa của bạn để hình học trông đúng trong phần mềm khác và trong render farm của bạn.
FAQ
Sự khác biệt giữa conforming normals và reversing chúng là gì?
Conform Normals phân tích topology mesh của bạn và đảm bảo normal chỉ ra bên ngoài một cách nhất quán dựa trên thứ tự quấn mặt. Reverse lật tất cả normal 180 độ bất kể hướng. Sử dụng Conform cho normal phân tán bị lật; sử dụng Reverse khi toàn bộ đối tượng bị lật ngược.
Tôi có thể sửa normal trong render engine thay vì Maya không?
Không. Hầu hết các render engine (Arnold, V-Ray, RenderMan) sẽ không shade các mặt có normal bị lật—chúng sẽ xuất hiện đen. Không có trick shader hoặc post-process nào có thể sửa hình học bị đảo ngược. Vấn đề phải được giải quyết trong mô hình 3D trước khi render.
Tại sao các tệp FBX nhập khẩu của tôi có normal bị lật?
Các cài đặt xuất FBX trong phần mềm nguồn rất quan trọng. Nếu ứng dụng gốc xuất với "Flip Normals" được bật hoặc không bao gồm smooth groups, FBX sẽ mang theo sự hỏng hóc đó. Luôn xác minh các tùy chọn xuất trong phần mềm nguồn của bạn trước khi nhập vào Maya.
Làm cách nào tôi biết nếu các vấn đề normal sẽ ảnh hưởng đến render của tôi?
Bật backface culling trong viewport của bạn và render một frame kiểm tra dưới lighting thích hợp. Nếu bạn thấy các mặt đen trong viewport với culling bật, bạn sẽ thấy chúng trong render cuối cùng. Không gửi đến render farm cho đến khi điều này được giải quyết.
Có phím tắt để đảo ngược normal không?
Không theo mặc định, nhưng bạn có thể tạo một phím. Chuyển đến Hotkey Editor (Windows > Settings/Preferences > Hotkey Editor), tìm kiếm "Reverse" hoặc "polyReverseNormal" và gán một tổ hợp phím. Tại render farm, chúng tôi đã liên kết cái này đến Ctrl+Shift+N để sửa chữa nhanh.
Các giá trị chia tỷ lệ âm có thể gây normal bị lật không?
Có. Sử dụng Scale -1 trên bất kỳ trục nào sẽ đảo ngược normal như một tác dụng phụ. Luôn sử dụng các giá trị chia tỷ lệ dương hoặc sử dụng Freeze Transformations sau khi chia tỷ lệ để cố định transform vào hình học. Điều này ngăn chặn hỏng hóc normal trong quá trình xuất hoặc mô hình hóa thêm.
Chúng tôi đã bao gồm quy trình làm việc hoàn chỉnh để phát hiện, sửa chữa và ngăn chặn các vấn đề normal trong Maya. Cho dù bạn đang làm việc với các đối tượng đơn lẻ hay nhập các thư viện tài sản khổng lồ để getting started tại render farm của chúng tôi, những phương pháp này đảm bảo hình học của bạn sẵn sàng render. Khám phá Arnold cloud render farm và GPU cloud rendering của chúng tôi để có các giải pháp rendering tích hợp. Để biết thêm thông tin chi tiết về các đặc tả FBX và OBJ, hãy xem tài liệu Autodesk Maya.
Dùng thử miễn phí Super Renders Farm ngay hôm nay và khám phá cách các giải pháp rendering cloud của chúng tôi có thể tăng tốc độ quy trình làm việc 3D của bạn.