Quick start: from upload to first render
Start rendering in under 5 minutes.

This guide walks a brand-new account through the full path from signup to a finished render on your local disk. The whole loop is about ten minutes of active work plus the render itself. We've kept it engine-agnostic at the top level — the universal steps are the same for a 3ds Max + V-Ray archviz scene or a Houdini + Redshift simulation. Per-DCC packaging quirks live in the setting-up-{DCC} docs, cross-linked below where they matter.
The 10-minute Hello World walkthrough
If you only read one section, read this one. These eight steps cover the end-to-end render lifecycle.
Step 1 — Create an account. Register at superrendersfarm.com with an email address you actually monitor. Invoices, render-completion notifications, and account messages all go there. New accounts include a $25 free trial credit so you can run a real test render without committing budget.

The signup form at superrendersfarm.com — completing it creates the account that receives the $25 trial credit referenced in Step 1.
Step 2 — Prepare your scene. Open the project in your DCC and run the built-in package command (File → Archive, Collect Files, Save Project with Assets, depending on the tool). The goal is a single self-contained folder where every texture, proxy, cache, and reference resolves via a relative path. See §Prepare your project below for the principle, and the per-DCC docs for tool-specific steps.
Step 3 — Upload the packaged project. Drag the folder into the web uploader, pull from Google Drive or Dropbox using the connector, or use the SuperRenders Client App for resumable transfer on larger projects. See §Upload your project below for the quick chooser, and /docs/upload-and-download for the full reference.
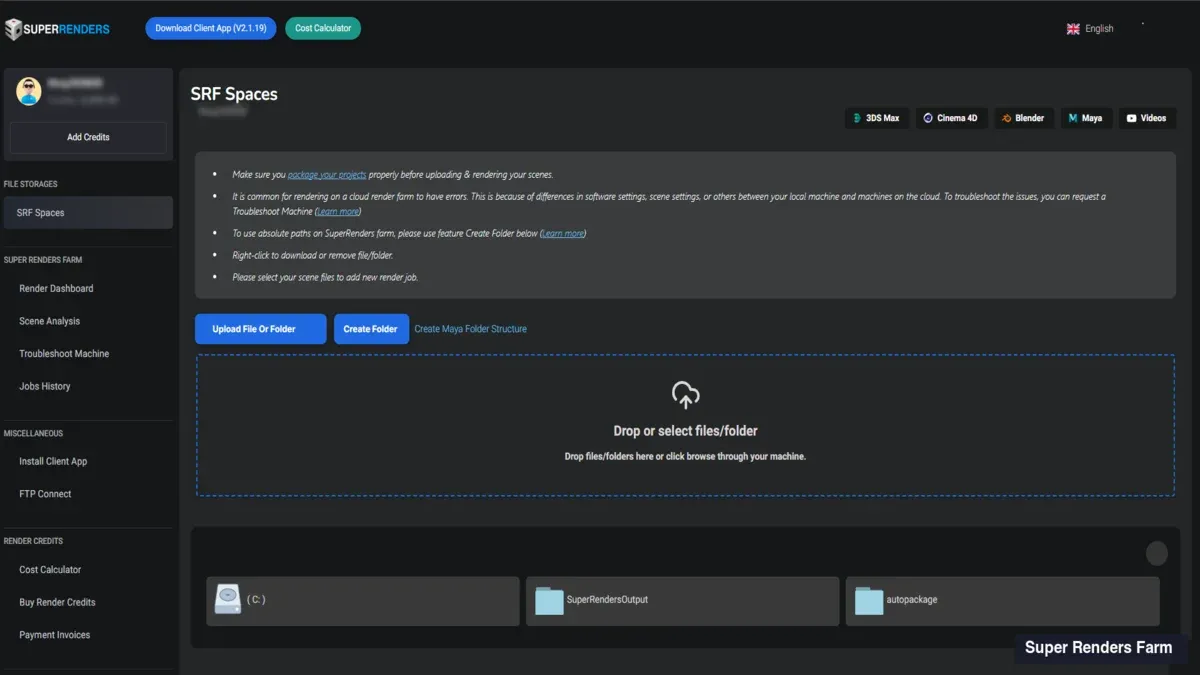
The upload chooser — Step 3 picks one of these four paths depending on project size and network conditions, covered in depth in /docs/upload-and-download.
Step 4 — Pick how you submit. Three submission methods are available: the website (browser form, no install), the SuperRenders Client App (desktop app, queue-aware), or a DCC plugin (submit from inside 3ds Max, Maya, Cinema 4D, or Houdini). The decision table below explains which one fits your workflow.
Step 5 — Configure the job. On the submission form, confirm the scene file, output path, frame range, render engine, output format, and resolution. The dashboard shows an estimated cost in credits before you commit.
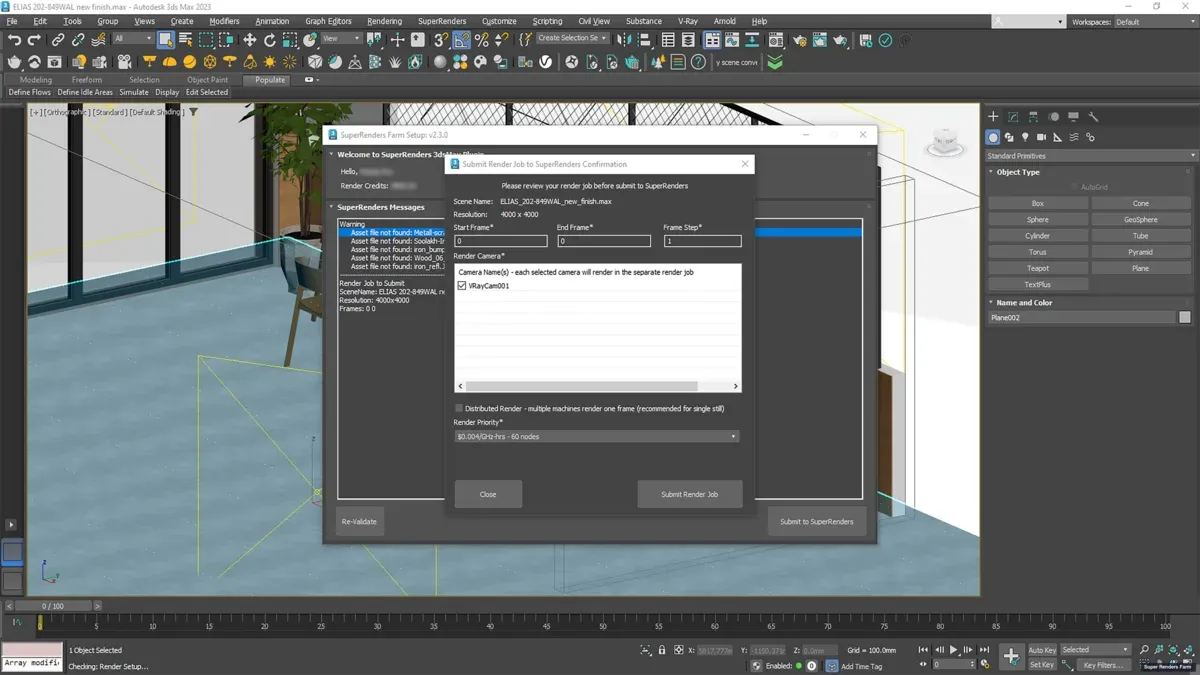
The submission form — every field referenced in Step 5 appears here, including the cost estimate that updates as inputs change.
Step 6 — Run a test frame first. Before committing to a 1,500-frame sequence, submit a single representative frame as a test job. This catches missing assets, wrong output paths, and engine-version mismatches at the cost of a few cents instead of the cost of a full sequence. The §Run a test render first section covers what to check.
Step 7 — Monitor the job. Open the dashboard and watch the job progress. Frames complete one by one, per-frame render time is logged, and the cost meter updates as credits are spent. If a frame fails, the dashboard shows the per-frame error log. Most first-job errors are covered in /docs/common-errors.
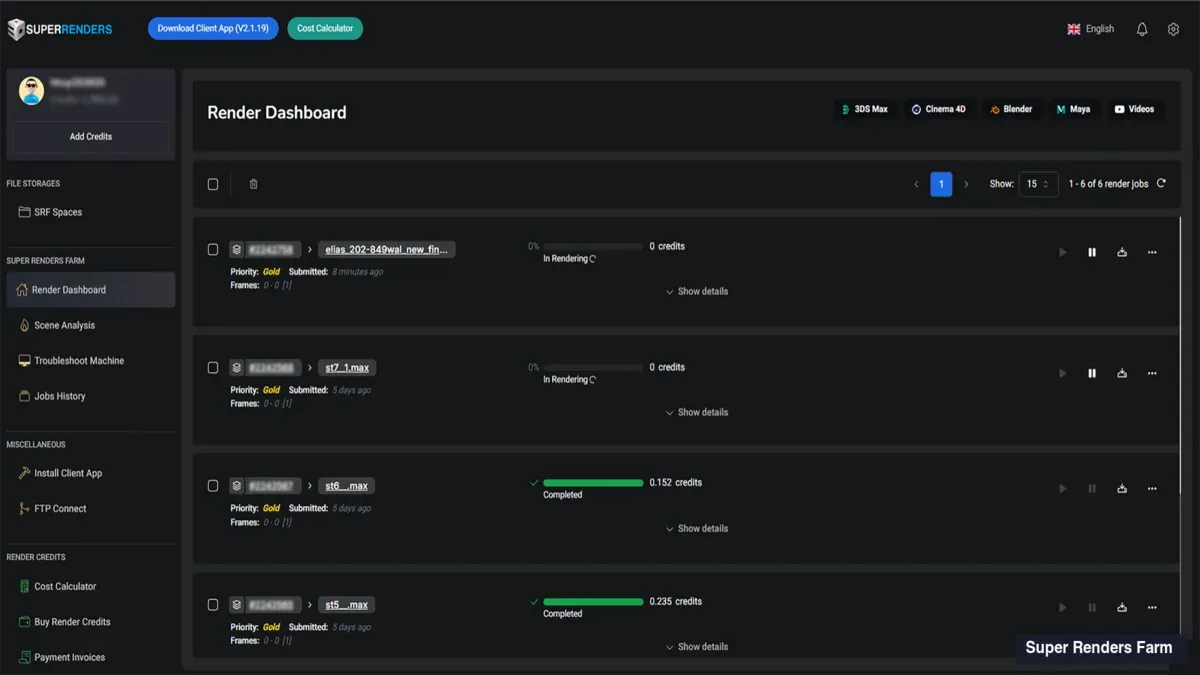
The per-job detail view — frames complete left-to-right across the grid, per-frame error logs surface inline if any frame fails.
Step 8 — Download and confirm credits. When the job finishes, download the rendered frames from the dashboard (single archive for small jobs, per-frame URLs for larger sequences). Cross-check the credit ledger — the cost displayed should match your pre-submit estimate within a few percent. The invoice for that job lands in your billing history.
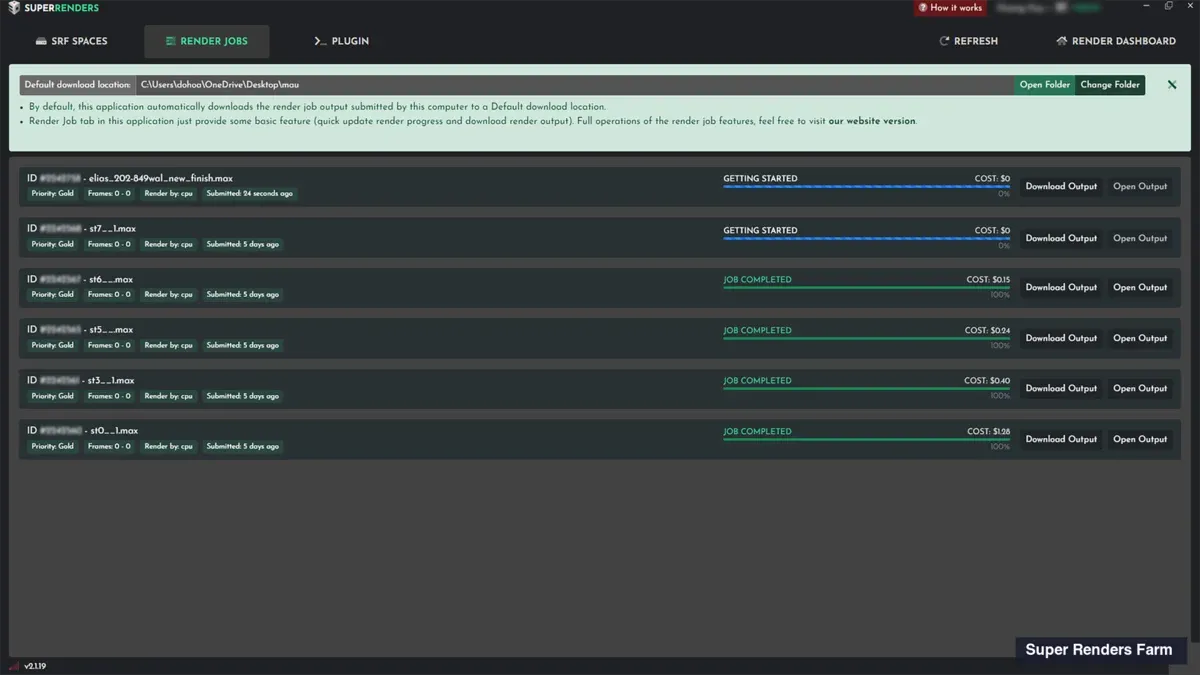
The completed job — download options sit alongside the per-frame credit ledger so customers can cross-check actual cost against the Step 5 estimate.
From step 8 you're ready to submit the next job with a real, empirical per-frame cost figure instead of an estimate.
Decision table: which submission method fits you?
We support three submission methods. None of them is wrong — they fit different working styles.
| Method | Best for | Tradeoff | |---|---|---| | Website form | One-off jobs, first-time users, borrowed workstations, no install possible | Manual form fill per submission; not ideal for high-frequency submitters | | SuperRenders Client App | Daily submitters, large projects (>20 GB), multi-job batching, anyone needing resumable uploads | One-time install and login on the workstation | | DCC plugin (3ds Max, Maya, Cinema 4D, Houdini) | Iterative shot work, submitting from inside the host app, scene-context-aware submissions | Plugin install per DCC; not every DCC has plugin coverage yet |
The website works for everyone and needs nothing on your machine. The Client App is the right answer once you're uploading more than once a week. The DCC plugin fits well when submission should feel like a render-to-disk button inside your existing tool.
For deeper coverage: /docs/tools-client-app walks through Client App install, login, and project-tree behavior. /docs/tools-web-submit covers the browser submission flow in depth.
Submit a render job
This section is the reference for the website submission flow. The Client App and DCC plugin flows share the same conceptual fields — what differs is the surrounding interface.
Account and login. Log in at the SuperRenders dashboard. The account home shows current credit balance, recent jobs, invoices, and a "submit new job" entry point. The $25 trial credit is already on your balance, so no top-up is needed before the first test render.
Upload happens first. A render job is always tied to a project that already exists in your SuperRenders project storage, so the upload step (see §Upload your project below) happens before submission. Clicking submit without an uploaded project routes you to the upload flow.
Scene file. The submit form lists the files inside your uploaded project folder. Pick the master scene file — .max, .ma or .mb, .c4d, .blend, .hip or .hipnc, .aep, .nk. If your project contains referenced assets, confirm the master scene is selected, not a referenced sub-scene.
Render engine. Pick the engine your scene is configured for — V-Ray, Corona, Arnold, Redshift, Octane, or Cycles. The dashboard auto-detects the engine in most cases; verify before submitting. Submitting a V-Ray scene as Corona, or vice versa, will fail at the worker.
Frame range and output. Configure start/end/step frames (e.g., 1-1500 step 1, or 1001-1100 step 2 for every other frame). Output format defaults to the scene's setting; override at submission time if needed. Output filename pattern accepts standard tokens such as <scene>_<frame>.exr.
Resolution and quality overrides. Most users leave these at scene defaults. Override only when there's a clear reason — downscale for proxy, upscale for delivery. Sampling, denoising, and lighting parameters generally stay in the scene file.
Cost estimate. Before final submit, the dashboard displays an estimated cost in render credits and in dollars. The estimate uses an average per-frame time multiplied by the frame count and the per-GHz price for your engine. Treat it as a planning number, not a contract — actual cost depends on per-frame complexity. For the GHz·hour pricing model, see /docs/pricing-and-credits.
Submit. Once submitted, the job enters the queue. Most jobs begin within a minute during normal load; large bursts may queue briefly. The job's dashboard URL becomes your monitoring view.
Prepare your project
Most failed render jobs we see are not engine bugs — they're packaging gaps. A scene that renders fine on the artist's workstation can fail on a fresh worker because some asset path points to a local-only drive, or because a referenced sub-scene was never bundled with the upload.
The packaging principle is simple: everything the scene needs to render must be inside one folder, and every reference inside the scene must resolve as a relative path within that folder.
Most DCCs ship a built-in command for this:
- 3ds Max —
File → Archivebundles the scene and all referenced assets. - Maya —
File → Archive Sceneproduces a self-contained.maor.mbarchive. - Cinema 4D —
File → Save Project with Assets. - Blender —
File → External Data → Pack All Into .blend, orMake All Paths Relativethen copy the project folder. - Houdini — the project archive workflow plus
File → Pack Geometryhandle.hipand caches. - After Effects —
File → Dependencies → Collect Files. - NukeX —
Export Selected Nodes → Archive Project.
After packaging, sanity-check. Open the packaged project on a different machine or fresh user account and confirm it opens without missing-asset warnings. For DCCs with an asset list (3ds Max Asset Tracker, Maya File Path Editor, Cinema 4D Project Asset Inspector, Blender External Data), confirm every entry resolves inside the package folder. If your project uses third-party plugins (Forest Pack, RailClone, Anima, X-Particles, and the like), confirm they're listed in the relevant setting-up-{DCC} doc's plugin coverage.
Archive-format note: we accept tar, tar.gz, and 7z. We do not accept .zip — repack as .tar.gz, or skip archiving and use SFTP or the Client App.
Run a test render first
Before submitting a 1,500-frame animation as your first job, submit a single frame from the middle of the sequence. It's the lowest-cost insurance you can buy on a render job.
A test frame surfaces problems the cost estimate cannot — missing asset paths, plugin version mismatches, engine-side errors. A failed full sequence costs queue time plus any per-frame charges that succeeded before the queue gave up. A failed test frame costs a few cents.
What to test:
- A single frame from the middle of the sequence (not frame 1, which often has unique setup state).
- Same render settings, resolution, and output format you'll use for the full sequence.
- If your project has multiple cameras or shots, test one frame per camera or shot.
What to look for:
- Does the rendered frame visually match your local viewport or IPR?
- Are all expected lights, shadows, GI, AOVs, and post-effects present?
- Did per-frame render time match your local benchmark? If the worker took noticeably longer, something is wrong — a missing texture has fallen back to a default, displacement subdivided unexpectedly, or an AOV is writing garbage data.
- Check the log for warnings. "Missing texture", "license fallback", or "plugin not loaded" signal real problems.
If the test frame is wrong, fix the scene locally, repackage, re-upload, and re-submit. Don't promote a broken test to a full-sequence submit — debugging 1,500 frames after the fact is painful.
Dashboard tour
Your dashboard is the operational center for everything you do on our farm. The main views:
Account home. Summary of credit balance, jobs in progress, recent invoices, and the "submit new job" entry point. The balance refreshes every few seconds while a job is rendering, so you can watch the cost meter tick.

The account home — balance, in-flight jobs, recent invoices, and the entry point to submit a new render are all on one view.
Job list. Reverse-chronological list of every submission. Each row shows job name, scene file, engine, frame range, status, elapsed time, and current cost. Click into a row for per-job detail.
Per-job detail view. A per-frame status grid (cells color-coded by state), per-frame log files, the cost ledger, and the download panel. Failed frames can be re-submitted individually without re-running the whole job.
Project storage. Lists your uploaded projects. Browse the asset tree, delete old projects, or reuse an existing project as the source for a new submission. Render output is retained for 45 days after job completion — download promptly or configure the Client App to auto-download to local storage.
Billing and invoices. History of credit purchases, render charges per job, and downloadable invoices. The invoice for a completed job appears within a minute. Render credits do not expire.
Settings. API tokens (for Client App and plugin auth), email notification preferences, default output paths, and account-level defaults.
A useful habit for new users: leave the per-job detail view open in a browser tab during the first few renders. Watching frames complete in real time builds intuition for which scenes are fast, which are slow, and where in your scene the render time actually goes.
Upload your project
The submission flow needs your packaged project to already be in SuperRenders project storage. Three upload paths cover the common cases.
Web upload. Drag-and-drop in the dashboard. Works well for projects up to a few tens of GB. Keep any single web upload under 300 GB; above that, SFTP or the Client App is a safer fit because they're resumable and parallelizable. Suited to one-off uploads where install isn't desired.
Google Drive or Dropbox connector. If your packaged project already lives in a cloud storage account, link the connector under dashboard settings, then point SuperRenders at the source folder. The transfer is server-to-server, which is faster than re-downloading to your laptop and re-uploading. This is import-only — completed renders do not push back to Google Drive or Dropbox; you download them from the dashboard, via SFTP, or with the Client App's auto-download.
SuperRenders Client App. For high-frequency submitters or large projects, the Client App chunks the upload, resumes on network drops, and de-duplicates files you've already uploaded across past projects. Install and auth are covered in /docs/tools-client-app.
This page covers the upload paths at quick-reference level. For the full coverage — speed expectations, account-storage quotas, file-type restrictions, and download paths for completed renders — see /docs/upload-and-download.
Where to go next
You've now got the universal flow. The natural next reads:
- Cost questions →
/docs/pricing-and-creditsfor the credit system, per-GHz pricing, and pre-submit estimation. - DCC-specific packaging → the relevant
/docs/setting-up-{DCC}doc for your software. - Upload deep-dive →
/docs/upload-and-downloadfor resumable transfers, sync patterns, and download options. - Something failed →
/docs/common-errorscovers the most frequent first-job failure modes. - Cost estimation tool → the cost calculator gives a per-engine, per-resolution estimate.
- Pricing reference → pricing for current per-GHz rates and credit-pack pricing.
- Background reading → What is a fully-managed render farm? explains the model and how it compares to IaaS render farms.
- Back to entry → Welcome to Super Renders Farm Docs.
We update this page when the submission flow changes, a new DCC version ships, or feedback from new customers surfaces a step that's underexplained. If something here didn't match what you saw in the dashboard, the live chat at knowledge.superrendersfarm.com is the right channel — our team uses that feedback to keep the doc current.