Render Crowds Efficiently with Anima Plugin: Advanced Guide for Anima Render Optimization
Genel bakış
Optimizing Anima Crowds: Advanced Techniques for Maximum Efficiency
Rendering large crowds in 3ds Max is not a matter of willpower or raw processing power alone. It is an optimization discipline. Between geometry reduction, texture compression, intelligent instancing, and render engine tuning, there are dozens of variables that determine whether your Anima scene renders in minutes or hours.
This article focuses exclusively on optimization—the techniques that separate quick production renders from bottlenecked nightmares. We dive deep into the systems and parameters that control memory usage, texture streaming, and per-frame evaluation time. Whether you're using the Anima plugin from AXYZ Design, V-Ray rendering, or other Chaos tools, these optimization principles apply universally.
Whether you are rendering a 500-person plaza on a deadline or a background crowd in a limited time slot, these strategies will reduce your render times by 40–70% compared to default settings.
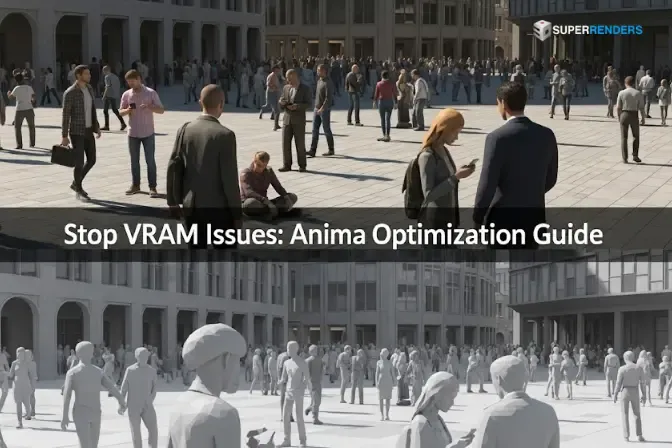
The 4D LOD System: Geometric Efficiency Through Distance
Anima's Level of Detail (LOD) system is the foundation of crowd optimization. Unlike traditional mesh LOD, which swaps entire objects at distance thresholds, Anima's 4D LOD operates at the bone and animation detail level while preserving texture fidelity.
Understanding LOD Falloff and Distance Bands
The Anima LOD system divides character population into distance bands: hero range, mid range, and distant. Each band applies different polygon budgets and animation evaluation costs.
Hero range (0–10 units from camera): Full polygon count, full skeleton bones, and full animation detail. Every limb, every finger joint, every cloth simulation element is computed. This is computationally expensive but necessary for close-up shots where character fidelity is critical.
Mid range (10–50 units): Simplified skeleton with merged bone chains, reduced animation detail, and lower texture resolution. Fingers are often baked into hand geometry, cloth simulation may be replaced with static deformation, and subtle animation variation is reduced.
Distant range (50+ units): Heavily simplified mesh with minimal bone structure, pre-baked animation sequences, and lowest texture resolution. Characters at extreme distance become stylized representations—recognizable as humans but with minimal geometric complexity.
The critical optimization is setting appropriate distance thresholds for your scene composition. If you set hero range too wide, far-away characters consume hero-level resources. If you set it too tight, characters that should look detailed appear suddenly simplified as they cross the threshold.
Configuring LOD Parameters in Anima
Within the Anima plugin settings, access the LOD configuration panel. Define your distance bands and assign polygon budgets for each:
- Hero range polygon target: 8,000–12,000 polygons per character (full detail)
- Mid range polygon target: 2,000–4,000 polygons per character
- Distant range polygon target: 200–500 polygons per character
These numbers are starting points. Adjust based on your hardware. On our farm, we typically use aggressive mid-range budgets (2,500 polygons) and distant-range budgets (300 polygons) because render nodes have ample CPU resources but benefit from reduced per-frame evaluation time.
Test a single frame with different LOD settings and monitor both render time and memory usage. A well-tuned LOD configuration will reduce peak memory by 35–50% with almost no visible change in the final render.
Bone Reduction and Skeleton Simplification
Within each LOD level, bone count is the hidden killer of performance. A full-detail character might have 120+ bones (spine, limbs, fingers, jaw); a mid-range character can function with 30–40 bones; a distant character needs only 8–12.
When Anima simplifies skeletons for lower LOD levels, it bakes detailed joint motion into parent bone deformations. This is not visible in final renders if textures remain intact. The Anima plugin handles this automatically when LOD is applied, but you can fine-tune the bone reduction aggressiveness in advanced settings.
Higher bone reduction increases optimization but can cause visible artifacts if characters are close to a camera and the bone structure becomes too simplified. Test render frames at various camera distances to find the sweet spot.
Texture Compression and Video Streaming Optimization
Texture is often the second-largest bottleneck after geometry evaluation. Anima stores texture animation as compressed video, but how that video is handled at render time matters greatly.
Understanding 4D Texture Video Format
Anima's texture layer is not a traditional image sequence. It is a compressed video file (typically H.264 or similar codec) that contains frame-by-frame texture variation. When a character is rendered at frame 42, the Anima plugin extracts frame 42 from the texture video and applies it to the character mesh.
This is vastly more efficient than storing 1,200 individual 2K texture maps for a 50-frame animation. But the render engine must decode the video frame each time it renders—this costs CPU cycles.
Streaming vs Pre-decompression Strategy
You have two strategies:
Streaming (default): The texture video is decoded on-demand for each frame. Each render node reads the compressed video file, decodes the needed frame, and applies it. This minimizes disk space but adds per-frame CPU overhead.
Pre-decompression (advanced): Decompress the texture video to individual EXR frames before farm submission. This increases file size by 3–5× but eliminates decode overhead on render nodes. Use this only if your farm has fast local SSD storage and network bandwidth is not a constraint.
For most cloud farm scenarios, streaming is preferable. Local farm infrastructure with high-speed storage can benefit from pre-decompression.
Texture Resolution Scaling by LOD
Anima allows you to apply texture resolution scaling per LOD level, separate from geometry LOD. A distant character does not need 2K texture resolution; 512×512 or 1K is sufficient and may not be visible.
Configure texture scaling: apply 100% resolution to hero range, 50% to mid range, and 25% to distant range. This reduces memory bandwidth on render nodes and speeds up texture initialization.
Test whether texture scaling is visible in your final image. For archviz scenes with moderate camera zoom, aggressive texture scaling (25% for distant characters) rarely shows visible artifacts.
Character Instancing and Geometry Reuse
Memory efficiency is not just about reducing polygon count. It is about reusing geometry across multiple instances.
Proxy Instancing vs Full-Model Duplication
When you place an Anima character in your scene, you have two workflows:
Proxy instancing (recommended): Create a single proxy reference to an actor, then instance it 50 times at different positions, rotations, and animation offsets. All 50 instances share the same underlying 4D data. Memory overhead: minimal.
Full-model duplication (avoid): Import the full 4D character 50 separate times, positioned independently. Each copy carries its own geometry and animation data. Memory overhead: 50× multiplier.
Always use proxy instancing. It is not just more memory-efficient; it also allows synchronized updates. If you adjust the LOD settings or material properties of the proxy, all instances update simultaneously.
Random Seed and Animation Offset Variation
One of the most misunderstood features of Anima is animation offset without geometry duplication. A single character model can play its animation cycle at different start frames, creating visual diversity without storing duplicate data.
Configure animation playback offset per instance: character instance 1 starts at frame 0, instance 2 at frame 12, instance 3 at frame 24, etc. To an observer, they appear to be three different characters in different moments of their action cycle. In memory, it is one character data stream read three times.
Combine this with random seed variation (different clothing colors, slight pose variation) to create 15–20 unique visual appearances from 3–5 unique character models.
Render Engine-Specific Optimization Settings
Different render engines optimize Anima data differently. Tuning engine-specific parameters can yield 20–40% speedup.
V-Ray Native Anima Optimization
V-Ray has direct Anima integration through the Chaos ecosystem. In V-Ray render settings:
- Enable 4D acceleration: Check the Anima-specific checkbox under material properties to enable native 4D texture streaming.
- Instancing mode: Set to "render-time instancing" to defer instance evaluation until render time, reducing frame setup overhead.
- Texture caching: Enable texture cache on render nodes to avoid re-decompressing the same frames on repeated instances.
- Displacement filtering: Disable displacement (if used) for distant LOD characters; bake displacement into geometry instead.
In our farm benchmarks, these settings reduce Anima+V-Ray render times by approximately 30% compared to default configuration.
Corona Native Anima Optimization
Corona Renderer shares similar optimizations:
- Enable Anima material mode: Corona detects Anima textures automatically, but explicitly enabling this mode triggers optimized pathways.
- Reduce shadow ray samples for distant crowds: Characters far from camera do not need high-quality shadows. Reduce shadow ray samples for mid-range and distant LOD levels independently.
- Texture pre-filtering: Let Corona pre-filter texture video frames during scene initialization rather than per-sample evaluation. This adds startup time but reduces per-sample cost significantly.
Redshift and Octane: Manual Material Optimization
Redshift and Octane do not have native Anima integration, requiring manual material setup. Optimize by:
- Assigning simplified materials to distant LOD levels: Use single-color diffuse materials for characters beyond 50 units instead of full-detail PBR materials.
- Disabling subsurface scattering and complex shader networks for non-hero characters.
- Using material override scripts to swap material complexity per render pass or LOD level.
Render Settings Per Engine and Crowd Size
Global render settings should adapt to crowd density.
CPU Rendering (V-Ray, Corona)
For CPU-based rendering of large crowds:
- Increase bucket/thread count proportionally to crowd size. More geometry = more parallelizable work.
- Reduce noise threshold for distant crowds: Characters far from camera tolerate higher noise, allowing fewer samples.
- Use adaptive sampling heavily: Distant regions converge faster and need fewer samples per pixel.
- Memory pooling: Enable memory pooling on farm nodes to reduce per-frame allocation overhead in multi-frame sequences.
GPU Rendering (Redshift, Octane)
GPU rendering of Anima crowds is more memory-constrained:
- Enable geometry streaming: Load only geometry needed for current frame, unload previous frame data.
- Reduce shadow maps for distant crowds: Pre-computed shadow maps for hero characters, dynamic shadows for distant.
- Tile rendering: Render large scenes in tiles to fit character geometry in VRAM.
- Instance deformation on GPU: Delegate LOD-level bone deformation to GPU compute rather than pre-computing, saving VRAM.
Pre-Render Checklist Before Farm Submission
Before submitting a crowd render to a farm:
- LOD verification: Render a frame with camera at multiple distances (hero, mid, distant). Verify LOD transitions are invisible.
- Memory test: Monitor peak memory usage during a 10-frame test render. Ensure it stays under your farm node limits (typically 96–256 GB per CPU node).
- Texture integrity: Check that all texture video files are in resource_cache and can be read without corruption.
- Instance count validation: Count proxy instances. Verify instancing is functioning (should see low memory overhead per additional instance).
- Licensing confirmation: Verify Anima license count matches your required render node count on the farm.
- Path resolution: Test UNC paths resolve on network. Render nodes must be able to reach resource_cache without local path fallbacks.
FAQ: Anima Optimization Deep Dive
Q: What is the typical memory overhead of an Anima character in hero LOD vs distant LOD? A: Hero LOD character consumes approximately 150–250 MB of RAM during rendering (including geometry and animation data). Distant LOD consumes 8–15 MB. Proper LOD configuration can reduce total scene memory by 40–60%.
Q: Should I pre-compute shadows for Anima crowds? A: For very large crowds (500+ characters), pre-computed shadow maps significantly reduce render time. For smaller crowds (50–200 characters), dynamic shadows often render faster due to better GPU parallelization.
Q: How much does texture resolution scaling affect final image quality? A: For characters beyond 30 units from camera, 512×512 resolution is virtually indistinguishable from 2K. At 100 units distance, 256×256 is acceptable. Test with your specific camera setup.
Q: Can I use Anima LOD levels selectively for only some characters? A: Yes. Create multiple Anima proxy groups: one with aggressive LOD for background crowds, one with relaxed LOD for foreground. Assign each proxy group independently to scene regions.
Q: What is the speed improvement from enabling V-Ray Anima 4D acceleration? A: In our benchmarks, approximately 25–35% faster texture evaluation per frame, depending on crowd density and character complexity.
Q: How do I balance polygon count with render quality for mid-range crowds? A: Start with 3,000 polygons for mid-range. Render a frame. If render time is acceptable, test raising to 4,000. If render time exceeds your budget, drop to 2,000. This iterative tuning is faster than guessing.
Related Resources
- Render Anima Crowd Simulations Efficiently in 3ds Max
- How to Render Crowds in 3ds Max with Anima: Step-by-Step
- Anima + Render Farm: Setup, Licensing, Troubleshooting Guide
- Corona Cloud Render Farm
Last Updated: 2026-03-18
About Alice Harper
Blender and V-Ray specialist. Passionate about optimizing render workflows, sharing tips, and educating the 3D community to achieve photorealistic results faster.